Heavenly Homemakers

Encouraging women in homemaking, healthy eating and parenting

  • Home
    • About
    • FAQs
  • Recipes
    • Bread and Breakfast
    • Condiments
    • Dairy
    • Main Dishes
    • Side Dishes and Snacks
    • Desserts
    • Gluten Free
    • Instant Pot
    • Crock Pot
    • Heavenly Homemaker’s Weekly Menus
  • Homemaking
    • Real Food Sources
  • Store
  • Contact
    • Advertise
    • Disclosure
    • Privacy Policy
  • Simple Meals
  • Club Members!

At Our House This Week

November 7, 2015 by Laura 16 Comments

This post may contain affiliate links. For more information, please see our disclosure policy.

We interrupt our Getting Ahead for the Holidays series with a cat update, as well as a few other tidbits about my week.

Wiggams exhausts me. I still love her, but she’s on my naughty list right now. If you recall, she had her kittens last weekend. Her mama instinct did not kick in. It became a full time job to try to get her to stay with her kittens. We got down to only one sweet surviving little kitten. We fed the baby ourselves, worked to keep it warm, tried to teach Wiggams to be a mama. We thought she was getting it. There were some good moments. But little Lionel died this week too.

Good grief, I didn’t expect to get attached or be so sad over kittens. Nor did/do I have time or energy to be a mama cat. I made an appointment to get Wiggams spayed next week. I sure am thankful we got some sweet pictures of the kitten while he was healthy.

lionel1

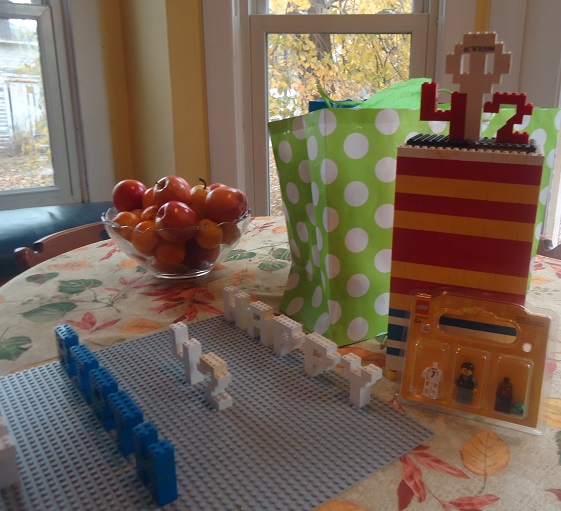
In happier news, Matt is finally as old as I am. I’ve got three months on him, so it’s always a fun day when he catches up to be my age again. Malachi had a blast making Lego displays for the birthday table. The tall red and yellow tower actually contained one of Matt’s gifts. Impressive, huh?

matt's birthday

We had a huge birthday brunch of waffles, eggs, bacon, hashbrowns, and fruit with all six of us plus some of Asa’s friends from college. We enjoyed this one hour window of time we could coordinate all of our schedules to be together on Matt’s birthday. Fun!

Lastly, I have to share my current favorite book.

the hiding place

I very highly recommend The Hiding Place, by Corrie Ten Boom. I’m slowly reading through this for the second time, and being reminded once more to look at people through the eyes of Jesus. Here’s an excerpt from Amazon:

Corrie ten Boom was a Dutch watchmaker who became a heroine of the Resistance, a survivor of Hitler’s concentration camps, and one of the most remarkable evangelists of the twentieth century. In World War II she and her family risked their lives to help Jews and underground workers escape from the Nazis, and for their work they were tested in the infamous Nazi death camps. Only Corrie among her family survived to tell the story of how faith ultimately triumphs over evil.

This book is powerful, educational, and extremely faith building. It’s been a good read for me right now. I should probably read it every year until forever to help me keep life in perspective.

Read any good books lately?

Heavenly Homemaker's Club Members: Access your homepage and all your fantastic resources here! Not a member yet? Please join us!

Oh Good Gravy ~ How to Make Turkey Gravy

November 5, 2015 by Laura 42 Comments

This post may contain affiliate links. For more information, please see our disclosure policy.

I’ve probably told you about the first time I made gravy for Matt (who was my boyfriend at the time). It was so thick he had to spread it onto his potatoes with a knife. I’m pretty sure it was flavorless. He still married me a year later.

Thankfully, I’ve improved my gravy-making skills. I think it gets easier with practice. Sometimes I still mess it up. I’ve been known to strain out lumps while distracting my guests by sending them outside to look for the black squirrels we sometimes have on our property. Straining works, and black squirrels are fascinating.

Below you’ll find step-by-step instructions (with pictures!) to make your gravy-making experiences easier.

While this series is called “Getting Ahead for the Holidays,” gravy is actually one part of the meal I save for the last minute. This still isn’t hard though. Here’s why:

  1. I’ve already made the broth for this gravy a couple of days before the holiday meal when I made the turkey. Therefore, I just have to rewarm some broth and whisk it into gravy (details below).
  2. I’ve made so many of our other dishes ahead of time that I have plenty of time to make gravy just before serving the meal.
  3. Turkey Gravy can be made in only about 10 minutes.

Why do I wait until the last minute to make gravy?

Because it tastes best this way. You can make it ahead of time and rewarm it before serving (we do this with leftover gravy, after all). But I prefer to make a fresh batch for a special meal on Thanksgiving or Christmas.

How to Make Turkey Gravy

Oh Good Gravy

Yum

Oh Good Gravy ~ How to Make Turkey Gravy
 
Save Print
Author: Laura
Ingredients
  • Turkey broth
  • Cornstarch, arrowroot powder, or wheat flour (about 2 Tablespoons for every 2 cups of broth)
  • Cold water (about ⅓ cup for each of your 2 Tablespoons of corn starch/arrowroot/flour)
  • Sea salt
Instructions
  1. Spoon cornstarch (or arrowroot or flour) into a small jar or glass.
  2. Add water to to the jar and whisk smooth with a fork.
  3. Pour broth into a medium saucepan. Heat to boiling.
  4. Slowly pour cornstarch (or arrowroot or flour) and water mixture into boiling broth, whisking while you pour.
  5. Stir at medium to high heat until gravy thickens.
  6. Turn down the heat and allow the gravy to simmer for a minute or two.
  7. Salt to taste and serve your gravy.
3.4.3177

You’ll notice my recipe gives the option of using cornstarch, arrowroot powder, or wheat flour to thicken your gravy. Any will work. I prefer cornstarch because it’s easiest. Arrowroot powder works well but can sometimes result in a gooey gravy. Wheat flour works well, but I’d rather avoid it so that people with a gluten or wheat intolerance can still enjoy it.

Trouble Shooting Your Gravy

  • If it isn’t thick enough for your liking, simply stir 2 Tablespoons cornstarch/arrowroot/flour into about 3 Tablespoons of water – making a consistency just thinner than paste. Stir it into your gravy while it is hot, whisking until smooth. This should thicken it up as it cooks.
  • Lumpy gravy? Whisk like you’ve never whisked before.
  • Still lumpy? Strain out the lumps the best you can. Pray your guests like lumpy gravy. Hey, you never know.

Here is a picture tutorial to show you the specifics of making Turkey Gravy:

Step One: Pour broth into a medium saucepan.

gravy2sm

Step Two: Spoon cornstarch (or arrowroot or flour) into a small jar or glass.
(Surprise, surprise…I use  a jar.)

gravy1sm

Step Three: Add cold water to cornstarch/arrowroot/flour and whisk smooth with a fork.

gravy3sm

Step Four: Bring broth to a boil.

gravy4sm

Step Five: Slowly pour cornstarch (or arrowroot, or flour)/water mixture into boiling broth, stirring while you pour. (I usually use a whisk. On picture taking day, I used a wooden spoon. Either one works, but a whisk usually helps in case lumps want to form.

gravy5sm

Step Six: Stir at medium to high heat until mixture thickens.
Turn down the heat and allow the gravy to simmer for a minute or two.
Salt to taste.

gravy6sm

What has been your gravy making experience? Do you find it easy? Hard? Lumpy?

Here are the quick links to all the recipes we covered in this series:

  • Make-Ahead Turkey
  • Stuffing Muffins
  • Cheesy Mashed Potatoes
  • Oh Good Gravy
  • Green Bean Casserole
  • How to Make Frozen Pies
  • Simple Whipped Sweet Potatoes
  • How to make Whipped Cream
  • Whole Wheat Stir-and-Pour Dinner Rolls

~~~~~~~~~~~~~~~~~~~~~~~~~~~~~~~~~~~~~~~~~~~~~

Simple Meals is here! It’s saving my brain (and many of yours too!). If you haven’t joined yet, now’s the time. Get all the details here!

728x90

Heavenly Homemaker's Club Members: Access your homepage and all your fantastic resources here! Not a member yet? Please join us!

Can You Make Mashed Potatoes Ahead of Time?

November 4, 2015 by Laura 53 Comments

This post may contain affiliate links. For more information, please see our disclosure policy.

Oh yes. You can. You can make mashed potatoes ahead of time.

potatoes_2

Now, there are some things you’ll need to avoid. Here are two mashed potato tricks that do not work:

1. Do not boil potatoes with the plan to mash and serve them later.

While this seems like such a good idea, this will turn them into a sticky, gooey mess.

2. Do not make mashed potatoes and freeze them as-is.

I’ve never had success with this. Plain mashed potatoes freeze fine but thaw weird. They are always watery and unappetizing. These are not the kind of potatoes I want to include on my holiday table. If you do freeze them as-is, you must cook the frozen/thawed potatoes in a pot to steam off excess water that has formed in the freezing process. More info to come.

Make-Ahead Mashed Potatoes ~ What Works, What Doesn't.

Ways to prepare this side dish favorite ahead of time:

1. Scrub or peel the potatoes and put them into a pot of cold water.

Want to get the prep work out of the way on a busy day filled with meal preparations? Typically I pull my family into the kitchen the night before the holiday meal. Together, we scrub and chop potatoes. We put them into a large pot, cover them with cold water, put on a lid, and leave them until boiling and mashing time the next day.

potatoes

2. Make mashed potatoes, then use your crock pot to keep them warm.

What I find very helpful is to follow all the instructions detailed in #1 to prep the potatoes the night before. The next morning – hours before our meal – I cook, drain, and mash. I then put them into a crock pot (with butter, always) on the “keep warm” setting until serving time. In the meantime, I can wash and put away the potato pot, then focus on other meal prep that needs to be done.

3. Embellish the mashed potatoes before freezing them.

While mashed potatoes don’t freeze well as-is, they do freeze well if you add some goodies to them. Take a look at the recipe below for all the specifics! When made like that, they do freeze well. Or, at the very least, you can make them a few days before your holiday meal, refrigerate them, then bake them on serving day. This is the method I plan on using this holiday season.

cheesy_mashed_potatoes

Cheesy Mashed Potatoes are always a huge hit. You can’t go wrong with sour cream and cheese right?

Make-Ahead Cheesy Mashed Potatoes

Yum

5.0 from 1 reviews
Make-Ahead Cheesy Mashed Potatoes
 
Save Print
Author: Laura
Serves: 8-10 servings
Ingredients
  • 8 medium-sized potatoes
  • 1 cup milk (more or less as needed)
  • sea salt to taste
  • 3 Tablespoons butter
  • 1 cup sour cream
  • 1 cup shredded cheese
Instructions
  1. Scrub and cube potatoes.
  2. Boil them in water until tender.
  3. Drain water and mash potatoes with milk and salt until smooth.
  4. Stir together the mashed potatoes, butter, and sour cream.
  5. Spread into a 3 quart casserole dish.
  6. Sprinkle cheese on top.
  7. Refrigerate until you are ready to bake this dish.
  8. Bake in a 350° oven for 45 minutes.
3.4.3177

Freezing Instructions:

Make the potatoes as directed in the recipe above. All it to cool completely. Cover and freeze for up to three months.

To bake and serve, thaw potatoes in the refrigerator and bake as directed. OR, cover the frozen dish with foil. Place the frozen dish of potatoes into a cold oven*. Turn the oven on to 250° and bake for 2 hours. Turn the oven up to 350° to continue baking to heat through.

*Be sure your oven is cold when you put in the frozen dish! Otherwise, the pan will crack because of the extreme temperature change.

What has been your experience with making potatoes ahead of time?

Here are the quick links to all the recipes we covered in this series:

  • Make-Ahead Turkey
  • Stuffing Muffins
  • Cheesy Mashed Potatoes
  • Oh Good Gravy
  • Green Bean Casserole
  • How to Make Frozen Pies
  • Simple Whipped Sweet Potatoes
  • How to make Whipped Cream
  • Whole Wheat Stir-and-Pour Dinner Rolls

~~~~~~~~~~~~~~~~~~~~~~~~~~~~~~~~~~~~~~~~~~~~~

Simple Meals is here! It’s saving my brain (and many of yours too!). If you haven’t joined yet, now’s the time. Get all the details here!

728x90

Heavenly Homemaker's Club Members: Access your homepage and all your fantastic resources here! Not a member yet? Please join us!

Make-Ahead Turkey ~ Yes You Can!

November 3, 2015 by Laura 73 Comments

This post may contain affiliate links. For more information, please see our disclosure policy.

Make-Ahead Turkey? Oh yes, indeed!

turkey22sm

There are people who wake up in the middle of the night to begin cooking their turkey for a holiday meal. There are people who baste and stuff and rub down their bird. These people are so very nice and dedicated to poultry perfection.

And then there’s me.

huge turkey 1

That is one huge bird.
Read the whole tale here.

I cannot find it within myself to do any of this to my turkey. I’m just not as devoted of a holiday baker as some. I’m a plop the bird in a pan, add nothing to it, cover it, put it in the oven, and take it out a few hours later kind of girl.

And…my favorite turkey baking tip of all: I cook my bird before the holiday. Like, two days before, usually.

I bake it, de-bone it, prepare all the broth, dispose of the carcass – basically I do all the messy, tedious, laborious turkey work ahead of time. Then on the day of the holiday feast, I take out my big dish of cooked meat, pour on a little broth, cover it, rewarm it, and we eat it. This is stress-free turkey baking.

My turkey always still tastes delicious.

That’s why I keep doing it this way.

No, our table doesn’t hold a big un-carved turkey. There is no turkey carving tradition at our house. For those who love traditions like this, I say go for it! Baste and carve and enjoy that special tradition.

But for those who find the turkey to be tedious, you might instead consider making it ahead of time.

But won’t the meat be dry?

Not if you don’t over-bake it in the first place.

The trick is to drizzle broth over your cooked, de-boned meat (I’d say one-two cups of broth per 9×13 inch dish full of meat), then cover the dish well. I warm it on Thanksgiving day for 30-45 minutes in a 300-350° oven along with other dishes that are baking. I pull it out and have a steaming, moist, delicious pan of turkey.

Make-Ahead Turkey

Yum

4.8 from 5 reviews
Make-Ahead Turkey
 
Save Print
Author: Laura
Ingredients
  • 1 Turkey
  • Seasonings of your choosing
  • 1 Large Roasting Pan
  • Foil if necessary
Instructions
  1. Place the turkey in the refrigerator for 3-4 days until thawed.
  2. Remove the bag of giblets from the inside of the turkey.
  3. Empty the giblets into your roasting pan as they help make a good, rich broth.
  4. Place the bird, breast side up, into a large baking pan or roaster.
  5. Season however you like.
  6. Cover with foil or with your roaster lid.
  7. Cook at 325° for 15-20 minutes per pound.
  8. You know your turkey is done cooking when the red thing pops up, or when the legs start to pull away from the body. It should be golden brown and slightly crisp looking.
  9. Be sure to save the broth that formed naturally!
  10. Allow the turkey to cool, then de-bone completely. Store meat in baggies or in covered pyrex dishes in the refrigerator.
  11. Save turkey carcass to make another round of broth for gravy, soup, and other nourishing meals.
  12. On serving day, drizzle a liberal amount of broth (one-two cups per 9x13 inch pan of meat) over turkey, cover and warm in 300°-350° oven for 30-45 minutes or until meat is hot and steamy.
  13. Serve right away.
3.5.3251

Simple Make-Ahead Turkey ~ Easy, Moist, Delicious

Additional Turkey Tips:

  • Adding a few onions to the turkey while baking is an effortless way to add more flavor.
  • Be sure to save the broth that forms naturally while your bird bakes.
  • Do not wait until your turkey is cold to take the meat off the bones. This makes the job much harder!
  • After you’ve taken all the meat off the bones, save the bones and put them into a stock pot. Fill the pot with water, carrots, onions, and any other veggies you like. Salt liberally. Cook on low for 4-6 hours to create a wonderful broth. Strain out bones. Blend the veggies until smooth and stir them back into the broth for added richness.
  • Use turkey broth for gravy. Use it to make Turkey and Noodles a few days after Thanksgiving. Use it for any soup or recipe that calls for chicken broth.
  • While making your turkey ahead of time is wonderfully helpful in cutting down work on your holiday meal serving day, you don’t want to make it too far in advance! I recommend making it on Tuesday or Wednesday, then serving it on Thanksgiving Thursday.

What’s your turkey tradition? To carve, or not to carve? To baste, or not to baste? Ever made a turkey ahead of time?

Here are the quick links to all the recipes we covered in this series:

  • Make-Ahead Turkey
  • Stuffing Muffins
  • Cheesy Mashed Potatoes
  • Oh Good Gravy
  • Green Bean Casserole
  • How to Make Frozen Pies
  • Simple Whipped Sweet Potatoes
  • How to make Whipped Cream
  • Whole Wheat Stir-and-Pour Dinner Rolls

~~~~~~~~~~~~~~~~~~~~~~~~~~~~~~~~~~~~~~~~~~~~~

Simple Meals is here! It’s saving my brain (and many of yours too!). If you haven’t joined yet, now’s the time. Get all the details here!

728x90


~~~~~~~~~~~~~~~~~~~~~~~~~~~~~~~~~~~~~~~~~~~~~~~~~~

Subscribe for FREE to Heavenly Homemakers so you won’t miss all the new Simple Recipes and ideas we share to save you money!

Heavenly Homemaker's Club Members: Access your homepage and all your fantastic resources here! Not a member yet? Please join us!

Easy Make-Ahead Stuffing Muffins

November 2, 2015 by Laura 53 Comments

This post may contain affiliate links. For more information, please see our disclosure policy.

Of all the dishes that must be included in a holiday meal, stuffing is the one I always try to avoid making if possible. If I’m hosting the meal, when people ask what they can bring, I almost always ask them to bring the stuffing so I don’t have to make it. (Nice, huh?)

Why had stuffing always been such a hard one for me? I just hadn’t found a stuffing recipe I love. I look at stuffing recipes and get completely overwhelmed. After all, there are usually no fewer than 28 steps to take to go from bread to stuffing.

Until now.

stuffing2

Oh look. We made toasted bread.
It wasn’t even hard.

Homemade Stuffing Made Easy

Once I finally wrapped my brain around all the instructions in all the recipes I looked at, I realized that I didn’t need to perform 28 steps. I could simplify everything and cut it down to four:

1. Cube and toast bread.
2. Brown sausage with onion and sage.
3. Stir everything together with a few other ingredients.
4. Bake.

What? That’s it? Yes.

Some may prefer their stuffing with additional spices. Many like celery. But this turned out plenty flavorful for us with very few ingredients. Plus, not one of the six of us likes celery. So I skipped it.

This recipe can be made ahead of time. You can make this stuffing spread into a dish or as scooped into muffin tins. I may actually make this more than twice a year for holiday meals. After all, when I was was testing driving this recipe to make it as easy as possible, my family dug in and kept going back for more. Even if I did burn the first batch.

stuffing muffins4

Indeed, my pictures feature over-baked Stuffing Muffins. It’s because I was baking them while having unfortunate cat drama. It was day 2 of baby kitties and Wiggams wasn’t sure she was cut out for the mama business. (WHAT?!) I told her she didn’t have a choice, that sometimes we all have hard days, and that she needed to get over it at go try to keep her last baby alive (yes, we’re down to only one). She ignored me. So I was trying to keep the last kitten alive by holding it to warm it up and by giving it milk from a dropper. This is when my muffins burned. I am not cut out to be the mother of a kitten.

Other bloggers would have started over in an effort to take better pictures. Me? I just took pictures of my burned muffins. There just are not enough hours in the day, okay? I get overwhelmed easily. It was either burned pictures or no pictures. At least we saved the kitten.

Easy Stuffing Muffins

Yum

5.0 from 1 reviews
Easy Make-Ahead Stuffing Muffins
 
Save Print
Author: Laura
Serves: 18 muffins
Ingredients
  • 6-8 slices of whole wheat bread
  • 1 pound ground sausage
  • 2 Tablespoons butter or oil
  • ½ cup yellow onion, chopped or 3 Tablespoons dried minced onion
  • 1 teaspoon ground sage
  • ¾ cup chicken broth
  • ½ teaspoon sea salt
  • ½ cup Parmesan cheese (optional)
  • 2 eggs
Instructions
  1. Cut bread into ½ inch cubes.
  2. Lay cubes on a cookie sheet and bake in a 300° oven for 10 minutes to toast.
  3. In the meantime, brown sausage with onion and sage.
  4. In a large bowl, stir toasted bread cubes, cooked sausage mixture, and the remaining ingredients together.
  5. Scoop mixture into 18 muffin tins or spread it into a 9x13 inch baking dish.
  6. Bake in a 400° oven for 25-40 minutes or until golden brown.
3.4.3177

Recipe links you might find helpful:

  • Homemade Turkey Sausage
  • Homemade Chicken Broth

To Freeze Stuffing Muffins

Allow muffins to cool completely. Place them in a freezer bag and seal, air tight. Freeze for up to one month.

To reheat: Thaw and warm muffins in a 250° oven in a covered dish for 10-15 minutes.

Easy Stuffing Muffins

You should know that saying Stuffing Muffins most often comes out of my mouth as Muffing Stuffers or Stuffern Muffings. It can’t be helped.

And now for some adorable cat pictures. I mean, if I’m going to show you burned muffins, I should at least show you the reasons they burned:

With assistance from our neighbor, some much needed help from a friend, and now some persistent work with Wiggams, I think we’ll be able to keep one little kitten alive. Wiggams seems to be getting the mama thing figured out, finally. If this isn’t the sweetest…

lionel2

Look at this little one’s face. See why we named it Lionel? (I mean, besides the fact that we named it after Lionel Messi. He just looks like a Lionel.) Look at his little lion cub face. We are in love.

lionel1
And that is why my muffins burned. 

Holiday Make-Ahead Tip:

Getting Ahead for the Holidays

If you are in charge of stuffing for this year’s holiday festivities, I suggest you make these Stuffing Muffins at least two weeks in advance. Freeze them until the night before your meal. Thaw in the fridge. Rewarm just before serving. These are great drenched in turkey gravy (recipe coming up during this series).

Here are the quick links to all the recipes we covered in this series:

  • Make-Ahead Turkey
  • Stuffing Muffins
  • Cheesy Mashed Potatoes
  • Oh Good Gravy
  • Green Bean Casserole
  • How to Make Frozen Pies
  • Simple Whipped Sweet Potatoes
  • How to make Whipped Cream
  • Whole Wheat Stir-and-Pour Dinner Rolls

~~~~~~~~~~~~~~~~~~~~~~~~~~~~~~~~~~~~~~~~~~~~~

Simple Meals is here! It’s saving my brain (and many of yours too!). If you haven’t joined yet, now’s the time. Get all the details here!

728x90

Heavenly Homemaker's Club Members: Access your homepage and all your fantastic resources here! Not a member yet? Please join us!

Getting Ahead for the Holidays – Join Us!

November 1, 2015 by Laura 110 Comments

This post may contain affiliate links. For more information, please see our disclosure policy.

There is oodles of info out there about how to have a simple season and how to relax and enjoy the holidays. I am all for it. Why go overboard and make life complicated? Pinterest can keep its 14-step recipes and perfect looking hand-crafted gifts. I’ve gotta stick with the basics.

But still. Making a holiday special means that I’m going to do extra work on top of all my normal work. There’s no way around it. No matter how simple I keep our holiday festivities, the cookies don’t bake themselves. Packages don’t arrive if I don’t order them. The turkey stays frozen when not baked. I could go on.

Now, I can keep things simpler if I buy pre-made food and gift packages. Sometimes I do. Sometimes in the name of saving my sanity, I feel that it’s worth the extra money and the gross ingredients (don’t read the label, don’t real the label, what you don’t know can’t hurt you, do not turn that package over!). But overall, I want to save money and put delicious real food on the table. While keeping life simple. Is it even possible?

Thus, we begin a fun two-week series here called:

Getting Ahead for the Holidays

This is the best way I know to keep life simple during the holiday season. If I do everything last minute, I enjoy nothing. But if I do a little each day in advance, prepping food and gifts and decorations – I can actually enjoy myself. What a lovely idea. Food can be put on the table (the good kind) without me standing on my feet for hours at a time. I can save dozens (or maybe even hundreds?) of dollars. Food tastes better. Gifts are more meaningful. I can actually look at the people around me and maybe I can even smile.

Getting ahead saves my holiday. Want to join me?

Getting Ahead for the Holidays Invitation

Most of the posts I’ll share will involve food prep suggestions and recipes. This doesn’t surprise you, I’m sure. Decorating is not my gift. Food though? I  love it! Nothing will be fancy; everything will be tasty. It’s all real food.

Would you like a peek at the menu we’ll be working through?

holiday menu plan

All of this (with the exception of the Stir-and-Pour Dinner Rolls) can be made in advance. Some can be made many days in advance. Some should be made the day before. All of the recipes are simple. I’ll walk you through the entire process of methods I use to make these foods efficiently so I can enjoy time with family and guests!

Make plans to join us here. If you want, subscribe so you won’t miss a post:

Daily Newsletter

Weekly Newsletter

There will be recipes, printables…and I’m thinking there should be prizes. What do you think? Should there be prizes? Yes. Let there be prizes.

Every time you see this banner on a post:

Getting Ahead for the Holidays

Leave a comment on that post.

There will be many posts in the coming days where you’ll spot that banner. The more you comment, the more chances you have to win! What will you win?

How about we give away three $25 Gift Certificates good toward any of our eCourses or downloadable items in the Heavenly Homemakers Shop? Three! Sound good?

Let’s get the comments rolling with this question:

Which of the recipes in the Holiday Menu above are you most excited to see first?

Heavenly Homemaker's Club Members: Access your homepage and all your fantastic resources here! Not a member yet? Please join us!

Wiggam’s Birth Story (Baby Kitties!)

October 30, 2015 by Laura 3 Comments

This post may contain affiliate links. For more information, please see our disclosure policy.

This is the post where I pretend to know everything that happened last night in regard to our mama cat, Wiggams. If she were to share her birth story, I’m sure it would be almost identical to the words I will write to share with you.

This, from the one who knows nothing about cats and didn’t even want a cat or any kind of pet until late July when Wiggams showed up and took over our porch. What can I say? She’s a sweet cat. And she eats bunnies. Love her.

wiggams coffee 3

Well, said sweet cat had been getting wider by the day (and not from eating bunnies). All day Thursday I felt she was moving slowly and sluggishly. Basically it reminded me of how I felt right before giving birth. Obviously, I could relate to Wiggams since cats and humans are almost exactly the same with so few differences. Hmmm, I wondered. Baby time?? We gave her some extra love and re-washed the towels we’d put in a box for her.

Around 5pm, I heard her meowing loudly right outside my office window. I didn’t realize she could see me through the window and screen from the porch, but as I looked over from my office chair, not only did she look me right in the eyes through the window, she meowed again loudly as if to say, “What is going on? I don’t feel right. Someone needs to do something!”

I gave her a look of, “Ohh, Wiggams. I have to get some work done. This is the first I’ve sat at my desk all day long. Go take a sip of water.” (Inside joke. That is always my go-to instruction to anyone with a need, “Go take a sip of water.” It is my be-all-and-end-all. It solves everything.)

Wiggams was less than okay that I didn’t move to get up. She responded by meowing again and slamming her front paws onto my office window screen, looking at me with wild eyes. “Get out here, NOW!” she screamed. I promise. I’m not making this up.

I left my chair and went outside. She meowed and rubbed up against my leg, then tried to crawl up my leg, then meowed loudly again. All the while, I was gently rubbing her back. She got sad anytime I stopped rubbing, so I kept rubbing. Dude, I never wanted anyone to touch my back when I was in labor. Maybe cats are different from humans after all.

Suddenly she bristled, which I took to mean, get your hand off my back. Okay then. You’re done with the rubbing. I get it. Don’t touch the back.

I ran back into the house and up to the dryer to get the clean towels, ran back outside and put them into Wiggams’ box, then walked Wiggams to the box. I put the box in a little cubby under our porch and told her, “Hey, if in fact you’re getting ready to have those kitties, this is the perfect spot. Clean towels, cozy environment…and conveniently we’ll know where to find you and the babes.” Yes, I really did say all of those words. I was certain she understood. Just call me Dr. Doolittle.

She was done with me at this point, so I went back to work in the house. I told Matt and the boys about Wiggams’ weird behavior and said that I wouldn’t be surprised if we had baby kitties the next morning.

To Be Continued

Just kidding. That’s just mean.

The next morning, I was getting ready to head to Lincoln again for a follow-up doctor appointment for our sick boy. At ten minutes before departure time, I heard a knock at the door. There stood our next-door neighbor, cautiously (so that the boys wouldn’t hear or see) letting me know that he’d found a baby kitten on a cement pad on his property. It hadn’t survived. What would he like me to do? He didn’t want our boys to be upset.

Side note: This neighbor has been so kind to Wiggams ever since she showed up here. He is the first to get to pick a kitten (we had already arranged this), especially after all his extra kindness today.

Knowing that Wiggams and (hopefully) more baby kitties were somewhere out there, several of us bundled up and searched all over our property and our neighbor’s.

Suffice it to say that I am not the Cat Whisperer that I claimed to be the night before. Wiggams certainly hadn’t taken me up on the box with towels plan. Or any of the other logical suggestions I’d made for potential birthing centers.

I had to stop my search to head out of town for the doctor appointment. We all figured Wiggams would come out of hiding when she was hungry. The day commenced.

Early this afternoon, Matt texted me this:

baby kitties

Kittens!

Our neighbor had finally found them. They were (of all places) in a trashcan full of sticks and debris on our neighbor’s property. I couldn’t get home fast enough. Sweet, sweet, baby kitties!

As far as we can tell at this point, there were four kittens total. Two did not survive. Two are safe and snug…with their mama in a pile of sticks in a trash can.

I have to continue to remind myself that cats have had babies for thousands of years without my help and that Wiggams is fine. I have asked her several times if she needs anything. After all, after I had my babies I needed people to bring me food and slippers. I just did. Right now, she’s pretty much like – Back off. I’ll see you in a few days.

She found her way to our porch this afternoon and ate an enormous amount of food. This was comforting to all of us.

I look forward to sharing more with you as I learn more. I’m sure that once Wiggams is up for it, she will give me all the details. In the meantime, we’re coming up with names for the two kittens.

The little gray/black one is Neymar (named after Neymar da Silva Santos Junior, a professional Brazilian soccer player). We’re considering Lionel for the little ginger-colored kitten (after Lionel Messi, pro Argentine soccer player). By the way, some pro soccer players we love really don’t have good cat names. Not criticizing. Just saying. Also, it’s possible we all take kitten naming way too seriously.

Stay tuned for more of the cat drama at our house. As Asa (our college freshman) said as I texted him throughout the day with updates, “I feel like there’s an episode of Curious George going on at our house today.” Yes. That describes this day perfectly. I may have to get myself a tall yellow hat.

Heavenly Homemaker's Club Members: Access your homepage and all your fantastic resources here! Not a member yet? Please join us!

54 Ounces of Coconut Oil for as low as $13.27!!

October 30, 2015 by Laura 2 Comments

This post may contain affiliate links. For more information, please see our disclosure policy.

I come across good deals for coconut oil, but never as good as this. Come closer my friends. This one is too good to pass up.

Right now, Vitacost lists their 54-ounce tub of Vitacost Brand Cold Pressed Extra Virgin Coconut Oil for just $18.27. This price, in and of itself, is amazing. But here’s an even better deal you can get!

vitacost coconut oil 54

This one has coconut flavor and scent.
It is wonderful for baking.

If you are a new customer with Vitacost, you can get a $10.00 off coupon code to use on your first order of $30.00 or more when you click through my referral link. On top of that, shipping is free if you buy at least $25 worth of Vitacost brand products. Here’s what this could mean for you:

  1. Click here to get a $10 off coupon code.
  2. Place two 54 ounce tubs of Vitacost Brand Cold Pressed Extra Virgin Coconut Oil in your cart. This will total $36.54. (This qualifies you for free shipping and meets your $30 order minimum.)
  3. Use your $10.00 off code to bring your total down to $26.54.
  4. This makes each tub cost only $13.27!

Don’t think you’ll use two 54-ounce tubs very quickly? Just put one in your cart and check out all the other Vitacost brand items that you would use. Those items will help you reach your $25 free shipping minimum as well as help you make your way toward the $30 order minimum.

Questions? Let me know. I’m stocking up even though I don’t get the $10 off since this is such a good price!

This post contains referral links.

Heavenly Homemaker's Club Members: Access your homepage and all your fantastic resources here! Not a member yet? Please join us!

Look At This Pretty Bread Loaf Pan (Is Glazed Stoneware Safe?)

October 30, 2015 by Laura 6 Comments

This post may contain affiliate links. For more information, please see our disclosure policy.

Someone was asking yesterday about what kind of loaf pan I use to bake my Stir-and-Pour Sandwich Bread. I went online to find something similar, but instead I found this.

ceramic bread panI mean, I also found what I have. But what I have. And it’s just plain ol’ stoneware. 

Also? It comes in red. Cranberry to be specific. That sounds even prettier than red. Bread would taste so good coming out of these! Obviously, the taste of the bread is directly related to the pan it comes out of. Obviously.

ceramic bread pan2

It is true though that just like cast iron makes food taste better, my experience is that bread baked in stoneware tastes better. Much better.

What I don’t know is this:

Is glazed stoneware safe and good and healthy?

What do you all know about glazed stoneware? I have not researched this. I was just drawn in by the prettiness of the bread pans. I love that they are stoneware. I love that clean-up on these looks very easy. I love the price. I love the colors. And I’m just a little bit obsessed with Stir-and-Pour Sandwich Bread.

Reading through some of the information listed along with the pans, it says that these are lead-free. I like that. Come to think of it, I do have some glazed stoneware like this. Here’s the bread pan version:

ceramic bread pan 3

I’m liking the price on this one even better. ($14.99!)

I guess I didn’t question the safety of these dishes since the inside looks more earthy. (I have the pie pan and the 9×13 casserole dish and love them.)

I’d love to hear your thoughts. Have any pans like these? Do you know anything about the safety of glazed stoneware?

This post contains affiliate links.

Heavenly Homemaker's Club Members: Access your homepage and all your fantastic resources here! Not a member yet? Please join us!

{Low Sugar} Lemon Melt-Away Cookies

October 29, 2015 by Laura 10 Comments

This post may contain affiliate links. For more information, please see our disclosure policy.

I’m almost embarrassed to admit to you how many batches of Easy {Low Sugar} Cookies our family has eaten since I posted the recipe in September. We all declare these to be the best “why would we ever need more sugar in these cookies” cookies. They are incredibly delicious just as they are. I make them often. You should too.

Easy {Low Sugar} Cookies

Low Sugar Lemon Melt-away Cookies

Yum

I’ve long since stopped rolling and cutting when I make those cookies. After all – if life is too short to knead bread dough, it’s certainly too short to get out a rolling pin and cookie cutters. (Although I will be rolling and cutting for the holidays because there are laws enforcing the making of cookies into the shape of trees and stars and candy canes at Christmastime.) Instead of rolling and cutting in the non-holiday season though, I’ve been either freezing and slicing or simply dropping and squooshing (as detailed below).

Every time during the past few weeks I’ve made the drop and squoosh sugar cookies, Malachi walks by and says, “Man, I always think these are some kind of lemon cookies. Mom, you should make these into lemon cookies.”

Either my kids are related to me, or they just naturally get inspired with, “great recipe. now let’s tweak it.” Some of my best recipe ideas come from the brains of my boys. Need I remind you of the Pineapple Fluff Salad? Or the 5-Minute Stove-Top Granola? Now, allow me to introduce you to {Low Sugar} Lemon Melt-Away Cookies.

Lemon Melt-Away Cookies

I simply added 2 Tablespoons of lemon juice to my Easy {Low Sugar} Cookies recipe and voila: {Low Sugar} Lemon Melt-Away Cookies. If we loved the regular version, we love the lemon version even more. I used the drop and squoosh technique, which is the method all the professionals use. To squoosh is a real thing. I definitely did not make up the term five minutes ago. All the famous chefs squoosh. Squooshing is a well-known culinary term just like saute, dredge, and braise. (Though it might be used more often by cooks who say “slap it down into a pan,” “toss in a little of that,” and “throw it down on the table.” Still. Professional.)

Simply put, to squoosh is to press down lightly on a ball of cookie dough with the bottom of a drinking glass. Dip the glass into a small amount of sugar if necessary to keep it from sticking. Drop a scoopful of dough, squoosh it down with the bottom of a glass. Drop, squoosh, drop, squoosh. Or, to be more efficient: drop, drop, drop, drop, drop (x24) – squoosh, squoosh, squoosh, squoosh (and so on).

It looks something like this:

squoosh

It must please you so much to be taught these professional terms so that you can impress everyone around you as you cook and bake. “What are you doing?” a friend will ask. “Oh, I’m just squooshing my cookies,” you’ll reply. Then your friend will nod in quiet appreciation at both your skill and your knowledge. They will also enjoy eating your cookies.

Now I shall give you the Low Sugar Lemon Melt-Away Cookie recipe that will have you squooshing in no time.

{Low Sugar} Lemon Melt-Away Cookies
 
Save Print
Author: Laura
Serves: 24-30
Ingredients
  • 1 cup melted butter
  • ½ cup sucanat or raw sugar
  • 2 Tablespoons lemon juice
  • 2 eggs
  • 1 teaspoon vanilla extract
  • 1 teaspoon baking powder
  • 3 cups of whole wheat pastry flour (give or take)
Instructions
  1. Stir together melted butter and sugar.
  2. Add lemon juice, eggs, vanilla, and baking powder.
  3. Stir in flour until a solid ball of dough forms.
  4. Drop teaspoon-sized balls of dough onto a cookie sheet, about an inch apart.
  5. Squoosh the dough down gently with the bottom of a glass.
  6. Bake in a 350° oven for 10-12 minutes or until cookies are lightly browned.
3.4.3177

Low Sugar Lemon Melt-Away Cookies ~ Easy!

It’s time to start squooshing, friends. Is this a skill you’ve already mastered, or is this one a new one for you? Let the squooshing begin.

Heavenly Homemaker's Club Members: Access your homepage and all your fantastic resources here! Not a member yet? Please join us!
« Previous Page
Next Page »

Join Our Community!

 Facebook Twitter E-mail Instagram Pinterest

Popular Posts

~ Will All of the Real Moms Please Stand Up?
~ Easy! Stir-and-Pour Whole Wheat Bread
~ How to Make Gatorade
~ 31 Real Food Breakfast Ideas
~ Dear Teenage Girls...
~ When Mom Takes a Step Back
~ The Inexpensive Health Insurance We Love!
~ Let's Talk Real Food Grocery Budgets

Check out our latest posts!

  • Big Family Food and Fun: May 31-June 6, 2026
  • Big Family Food and Fun: May 24-30, 2026
  • Free 7-Day Summer Menu Plan
  • Big Family Food and Fun: May 17-23, 2026
  • Easy Side Dishes for Summer
Home  ~  Simple Meals  ~  Club Membership  ~  Shop  ~  Privacy Policy  ~  Disclosure  ~ Contact

Copyright © 2026 · Beautiful Pro Theme on Genesis Framework · WordPress · Log in