Heavenly Homemakers

Encouraging women in homemaking, healthy eating and parenting

  • Home
    • About
    • FAQs
  • Recipes
    • Bread and Breakfast
    • Condiments
    • Dairy
    • Main Dishes
    • Side Dishes and Snacks
    • Desserts
    • Gluten Free
    • Instant Pot
    • Crock Pot
    • Heavenly Homemaker’s Weekly Menus
  • Homemaking
    • Real Food Sources
  • Store
  • Contact
    • Advertise
    • Disclosure
    • Privacy Policy
  • Simple Meals
  • Club Members!

Getting Ahead in the Kitchen (kind of but not really but maybe a just little bit)

April 10, 2011 by Laura 62 Comments

This post may contain affiliate links. For more information, please see our disclosure policy.

Our boys are now 6, 9, 11 and 13 1/2. I know that in a few more years, I’ll look back on these days of “how much they ate” and laugh because they’ll soon be eating even more than they are now. But wow. It is a fact that our family went through SIX DOZEN eggs last week. Six. Dozen. That’s seventy-two eggs. And I had to ration them or they would have been gone before the week was up. (I think we may need to take another look at our 2011 Grocery Budget!)

The boys seem to all be going through growth spurts lately and I’m not sure I’m going to able to keep up. Even if I can, I’m not sure the chickens can. I hate to ask my friends with chickens to squeeze their flock just a little bit harder so that they can keep up with the Coppinger boys, but I’m afraid I may have to. 

I decided over the weekend to get a bunch of food made up to make life easier during soccer season, and I think I got ahead a little bit…but with the way my family has been eating lately…I’m not really sure how “ahead” I actually got.

For instance, I made a double batch of Taco Corn Fritters, knowing they would be great for “grab and go” meals and snacks. I let the boys eat them for lunch that day, thinking that at the very least, we’d have 15 or so fritters left over for the freezer. Nope. There were four left. Emphasis on the word were, because now I think we’re down to one. So much for freezing our corn fritters. :)


I also re-created our Easy Breakfast Casserole and made Mini Breakfast Quiches as one of you ladies suggested during our Gluten Free Recipe Parade. I’ll share the recipe in a few days, but I used a dozen eggs, made 24 quiches and there are exactly zero left. I believe I, myself, got to eat a grand total of one quiche. It was good, if I remember right.

Ah well. This appears to be the new norm. I will embrace it and run with it and continue making mountains of food. God gave me boys and He gave me a love for cooking. I’m pretty sure He knew just what He was doing!

I made a batch of Breakfast Cookies, sending some home with a friend of ours who came over to celebrate his birthday. You’ve gotta love being able to give the gift of a plate of Breakfast Cookies. It was his request, after eating some at our house another time. 

Here are a few other food items I was able to make and HIDE from my children so that they would actually make it into the freezer:

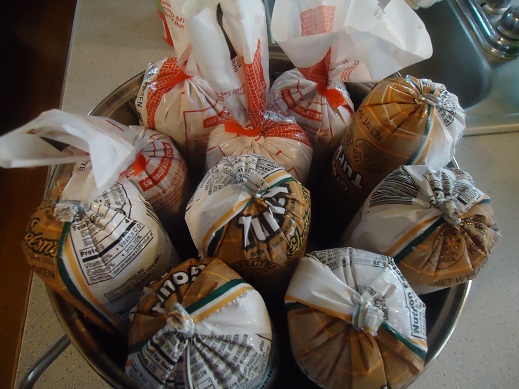
I cooked a whole chicken so I’d have a nice container of chicken and some broth for future meals. I also made a TRIPLE batch of Whole Wheat Tortillas. Yay, a tower of tortillas! (I have some rice tortillas in the fridge for Malachi to use right now.)

I made a quadrupal batch of Sloppy Joe Meat for the freezer. Then I adapted our Popcorn Chicken recipe to make Rice Flour Chicken Strips. They aren’t the prettiest things in the world, but now I have chicken strips to use this week for chef salads and tortilla wraps!

I was kind of on a roll with meat apparently, so I made six pounds of Turkey Sausage. I froze some of it in patties so that I can cook it up quickly for breakfasts and lunches. I cooked up the rest of it and froze it in meal sized bags. These bags of Turkey Sausage are wonderful to have on hand for Easy Breakfast Casserole and Pancake Sausage Muffins.

I made up a new batch of Taco Seasoning Mix, and I’m happy to report that everything I made is still in the jar. Nobody seems very interested in snacking on a spoonful of Taco Seasoning for some reason. At least I got ahead a little bit in the area of food seasoning. Score one for Mom. :)

Been doing any extra cooking lately? Can you keep food around your house, or does it get eaten before you can even put it on the table?

Heavenly Homemaker's Club Members: Access your homepage and all your fantastic resources here! Not a member yet? Please join us!

Homemade “Larabars” for a Gluten Free Snack!

April 6, 2011 by Laura 92 Comments

This post may contain affiliate links. For more information, please see our disclosure policy.

Ready to learn how to make homemade Larabars?

larabars_remade

Yum

Ever since I got to try some Larabars for a review back in March, I’ve been hooked. They are amazingly yummy, incredibly healthy and what do you know…they are gluten free!

I’m amazed that they contain so few ingredients…my favorite Cashew Cookie bar is made of only dates and cashews…that’s IT. And it really does taste like a cookie. Only better.  :)

Since doing that review, I’ve done two things regarding Larabars:

1)  I used some of my Swagbuck earnings to order more from Amazon. I wanted to have these awesome snacks on hand for grab and go moments. They have come in very handy!
2)  I used Katie’s Healthy Snacks to Go eBook to make my own.

You have GOT to try your hand at Homemade Larabars.

I can’t believe how easy they are, and the homemade bars taste even better (because homemade always tastes better, right?)!

Malachi is not a big fan of nuts in any form, mostly because he really just hasn’t given them a chance. :)   This has been a challenge during our Gluten Free Experiment because I would really like to be able to feed him nuts as a snack. So…I didn’t call these Larabars. I told him that these were a “gluten free bar” that I had made. He didn’t ask what was in them. I didn’t tell. He saw the chocolate chips. That’s all he needed to know. :)

He gobbled one right up, exclaiming over and over how good it was. (yay!) I think we may be going through a lot of nuts and dates while I continue to “play” in the kitchen. :)

Regarding nuts, be sure to check out Braga Farms as a wonderful source for organic nuts! Braga Farms is a fabulous family farm to purchase organic nuts from. You can not beat their quality or their prices! I just placed an order and I can’t wait to get my great box of organic nuts!

Ever tried making your own Larabars?  I think we’ve decided to call our homemade bars “Mamabars”. And wow, there’s only one left so I’m going to have to make another batch! :)

Homemade Larabars

Homemade "Larabars" for a Gluten Free Snack!
 
Save Print
Author: Laura
Serves: 12
Ingredients
  • 1½ cups raw cashews
  • 8 dates (remove pits)
  • 1 teaspoon vanilla extract
  • 2 Tablespoons water
  • ¼ cup add ins like mini chocolate chips, dried fruit, or fresh fruit like blueberries (optional)
Instructions
  1. Grind cashews in a food processor until fine.
  2. Slowly add dates, vanilla, and water and pulse until the mixture forms a dough.
  3. Fold in chocolate chips or fruit.
  4. Press mixture into a parchment paper-lined 8x8 inch pan.
  5. Refrigerate for about one hour.
  6. Cut into 12 bars.
3.4.3177

Homemade Larabars


Need more healthy snack ideas? You’ll love this wonderful and helpful eBook full of 227 Healthy Snack ideas and recipes!

Heavenly Homemaker's Club Members: Access your homepage and all your fantastic resources here! Not a member yet? Please join us!

Gluten Free Pasta that Tastes Good

April 4, 2011 by Laura 113 Comments

This post may contain affiliate links. For more information, please see our disclosure policy.

I decided early on in Malachi’s Gluten Free Experiment that I wasn’t going to buy lots of “specialty gluten free” foods. They are crazy expensive and many of them are void of any kind of nutrition. 

However, I’ve made a couple of exceptions, in the name of sanity and so that I can present something “normal” for Malachi. For instance,  if we’re eating pasta, I’d like him to be able to have pasta. I found and purchased one small bag of Tinkyada Brown Rice Pasta at Walmart, thinking that if he liked it and if it actually cooks up nicely, maybe I’d look into purchasing more to have on hand. The ingredient list didn’t even make me squeamish!

I am VERY happy to report that Tinkyada Brown Rice Pasta DOES cook up nicely and that Malachi DOES like it!!! Keep in mind, Malachi is six years old…he’s not just eating it to be polite. That means he really does like it! :)

The Tinkyada Brown Rice Pasta worked great for our Lasagna Casserole.

Yum

AND…you know my unique method for making Healthy Creamy Mac and Cheese? 
This Tinkyada Brown Rice Pasta even worked in THAT recipe!!! SO good!!!

I couldn’t be more excited!!! (Okay, c’mon. Sure I could.  Gluten free pasta that tastes good isn’t that amazing. There are more exciting things in the world.)

Still…I’m pretty excited. Now, when some of you leave comments on my various pasta recipes, asking if rice pasta will work…I’ll be able to say “yes!”. 

And for the record, the Tinkyada Brown Rice Pasta is, unfortunately, a significant amount more expensive than the Whole Wheat Pasta I normally buy. But since I’m just using it for one person in our household, that one bag of Tinkyada Brown Rice Pasta is lasting us a long time. 

Have you tried Gluten Free Pasta before? What has been your GF Pasta experience? Don’t you wish I would pass out forks so you could take a bite  of Malachi’s Creamy Mac and Cheese up in that picture?

Heavenly Homemaker's Club Members: Access your homepage and all your fantastic resources here! Not a member yet? Please join us!

Whole Foods Couponing…and a Thank You!

March 29, 2011 by Laura 50 Comments

This post may contain affiliate links. For more information, please see our disclosure policy.

As you may remember, I used to be a Coupon Queen. I was the one who would be in front of you in the check out line with 47 coupons and a cart full of groceries. After the cashier spent ten minutes subtracting out my coupons, my receipt total would be somewhere in the $24 range for a cart full of food.

If indeed we can call it food. I wasn’t exactly using coupons to get fruits and vegetables, you know?  But shucks…most of it was free! Free poptarts are great, right?

Learn to make healthier, homemade poptarts if you need a poptart fix!

Well, as you know, we’ve changed our ways a little bit entirely and now I shop completely differently. (You can read this post to learn how I grocery shop. And you can read this entire series to learn about our Healthy Eating Journey.)  I now recognize that spending money on good, whole foods is a perfect investment in our overall health.

But I still love finding great deals on great groceries!

This is where the “Thank You!” part of this post comes in. Remember how I mentioned that if you sign up for Shop it to Me…I could earn free gift cards?  Well…several of you signed up, which means that I earned several free gift cards. I appreciate it so much!  There were several gift card choices…but of course…I chose the cards for Whole Foods!! Who can pass up free groceries at Whole Foods??!

Matt and I were able to hit a Whole Foods store while we were away for the weekend at the Weekend to Remember conference. (Yes, part of our romantic weekend was spent shopping for asparagus. You know your relationship is solid when you can lovingly gaze at organic produce together.)

Not only did I have a few Shop it to Me Whole Foods cards to use…I had been doing my homework and had put together some coupons to use during our outing. It brought back memories and I have to admit that I felt quite giddy as I actually put coupons into an envelope again. I really haven’t done that (to this extent) for a long time. (Yeah I know…I’m a geek.)

The kids were pretty happy to see us when we got home…especially when they saw we had brought home cereal and yogurt!! (Hey guys…didn’t you even miss us just a little bit?)

We stocked up on chicken wings and boneless, skinless chicken breasts because I just don’t have a great source for those nearby. We found great deals on lettuce, asparagus, apples, pears and zucchini…Larabars, yogurt, butter and cheese.

And then, because they were on sale, because I had coupons and because they are gluten free…we splurged on a few items I lovingly call “organic junk food” that we’ll save for a rainy day. Cereal and chips…woohoo! Malachi sure does look disappointed with our loot, huh? :)

I had also been sent a Brat Hans Sausages coupon so that I could try them for free! We cashed in on that and WOW, you should have seen the boys when they found those in the bag! I thought they were going to eat me when they saw them! They must feel they have a brat deficiency or something?

So thank you to all who signed up for Shop it to Me …you made our Whole Foods shopping trip very fun!! If you haven’t signed up for Shop it to Me , you certainly can and it wouldn’t hurt my feelings even a little bit. :)  NOBODY  has to spend any money unless you want to – that’s the beauty of it!!! AND, more importantly, after you sign up, you can tell YOUR friends and family about Shop it to Me  so that YOU can receive free gift cards!!!

I did want to note:  I normally do the majority of this type of shopping through Azure Standard…Whole Foods is two hours away and I’m blessed to have an Azure Standard drop point right here in my town!! Azure is much less expensive and has everything I need. This Whole Foods trip was a fun splurge, gave me a “grocery store shopping fix” and well…I had gift cards. And coupons. And needed to get Brats, apparently. :)

Do you shop at Whole Foods? Do you have one close to you, or do you have to drive pretty far like I do? What do you like to get at Whole Foods?

Heavenly Homemaker's Club Members: Access your homepage and all your fantastic resources here! Not a member yet? Please join us!

How I Store Bulk Food

March 20, 2011 by Laura 57 Comments

This post may contain affiliate links. For more information, please see our disclosure policy.


I received my Azure Standard food co-op order last week…one of my favorite days of the month! It’s slightly ridiculous how much I get a thrill out of boxes and bags of food. I know not everyone  has the storage space to purchase food in bulk…but this method works very well for me and I am so thankful to have this option.

As I mentioned several months ago in this post about why I buy bulk food, I don’t just buy in bulk to save money. Saving money is a wonderful perk, but I also find that buying in bulk makes cooking so much simpler for me. I don’t have to think so hard or shop so often. I buy large quantities of food items, enough to last much longer than a week. This way, I save on gas, time, energy and brain power.

I am often asked how I store my bulk purchases. Here is a little bit of explanation for what works well for me for bulk food storage:

I could just leave the food right in their bags, but I don’t feel comfortable with that for sevaral reasons. We’ve had trouble with mice in the past. Yowza, there’s not much that makes me more frustrated in the kitchen that seeing that those little rodents have gotten into and pooped in my oats. What a waste! Beyond mice, we find that if we don’t transfer food out of their bags and into something more properly sealed, it is easier for bugs to get in and ruin food.

In addition…I just feel like buckets and containers are easier to stack and store than bags. I know I’m a nerd…but I LIKE the way food looks when it’s poured into nice jars and jugs. Crumpled up bags don’t look nearly as cute in my pantry.

When my bulk purchases arrive, out come my jars, buckets and containers. I’ve accumulate quite a nice collection through the years, purchased from garage sales, Walmart or the dollar store. You know how I LOVE jars.  And in general, I avoid plastics. However, for dry food that isn’t as likely to absorb chemicals from the plastic, I’m okay with using plastic containers for bulk storage.

I take a few minutes to scoop out the sea salt or sucanat or wheat or oats or whatever dry bulk item I’ve purchased into large storage containers.

From those, I will funnel smaller amounts into smaller jars for simple cooking use. I  keep these smaller jars in the cupboard right above my stove so I can easily grab them while I’m cooking. As they get low, I refill them from their larger storage container.

Once I have everything divided into the appropriate jars and containers (I stare at it in happiness for a while and then) I put them all away in either my storage room, or in my pantry if there is space.

I especially like to keep my nicest jars full of dry bulk items like beans, rice, popcorn and pasta in my pantry door where it looks pretty everytime I open it!

You may also want to read about how I store bulk grain. And, if you’d like to see a more thorough view of my whole kitchen, I invite you to join me on my kitchen tour!

Do you buy in bulk? What have you found that works best for you to store your bulk food?

Join us on Facebook

If you’re interested in learning more about my favorite health food co-op Azure Standard, join the Azure Standard facebook page!

Heavenly Homemaker's Club Members: Access your homepage and all your fantastic resources here! Not a member yet? Please join us!

Homemade Chocolate Chips

March 17, 2011 by Laura 30 Comments

This post may contain affiliate links. For more information, please see our disclosure policy.

After talking about the Enjoy Life Dairy, Soy, and Gluten Free Chocolate Chips on sale at Amazon the other day…I decided to make a batch of my own Homemade SF, DF, GF Chocolate Chips to have on hand while I wait for the others to come in the mail.

Homemade Chocolate Chips

I made these chips with coconut oil this time. (You can use butter instead, but coconut oil is a great option if you can’t have dairy. Read more about coconut oil here.)

Can I just say…these chunks of chocolate taste incredible sprinkled into a bowl full of peanuts. Or all by themselves if you need a quick chocolate fix. Or mixed into these easy and healthier Fudge Brownies. Or in these Chocolate Chocolate Chip Muffins. Or with a glass of milk. 

Or on a Friday afternoon at 2:47 just because.

These homemade chocolate chips make yummy Chocolate Chip Cookies too…but they don’t hold together when baked as well as commercial chocolate chips. They’re just too “pure” I guess, and tend to melt into the cookie. This isn’t a problem with taste…but can be a problem with appearance. 

Just send the ugly cookies to my house. They’ll get eaten. :)

Heavenly Homemaker's Club Members: Access your homepage and all your fantastic resources here! Not a member yet? Please join us!

Make Your Own Larabars

March 11, 2011 by Laura 4 Comments

This post may contain affiliate links. For more information, please see our disclosure policy.

It’s so easy to make your own Larabars!

Homemade Larabars

Larabars:

  • Are made with all real food ingredients
  • Have no added sugar (unless you add chocolate chips, and who can resist?)
  • Can be made with all varieties of ingredients
  • Are naturally gluten and grain free

Ever since I got to try some Larabars for a review back in March, I’ve been hooked. They are amazingly yummy, incredibly healthy and what do you know…they are gluten free!

I’m amazed that they contain so few ingredients…my favorite Cashew Cookie bar is made of only dates and cashews…that’s IT. And it really does taste like a cookie. Only better.  :)

Ready to make your own Larabars?


Make Your Own Larabars
 
Save Print
Author: Laura
Serves: 12
Ingredients
  • 1½ cups raw cashews
  • 8 dates (remove pits)
  • 1 teaspoon vanilla extract
  • 2 Tablespoons water
  • ¼ cup add ins like mini chocolate chips, dried fruit, or fresh fruit like blueberries (optional)
Instructions
  1. Grind cashews in a food processor until fine.
  2. Slowly add dates, vanilla, and water and pulse until the mixture forms a dough.
  3. Fold in chocolate chips or fruit.
  4. Press mixture into a parchment paper-lined 8x8 inch pan.
  5. Refrigerate for about one hour.
  6. Cut into 12 bars.
3.4.3177

larabars_remade

Need a great source for nuts when you make Larabars? Be sure to check out Braga Farms as a wonderful source for organic nuts! Braga Farms is a fabulous family farm to purchase organic nuts from. You can not beat their quality or their prices! I just placed an order and I can’t wait to get my great box of organic nuts!

These homemade Larabars are great to take on the road for a filling and nourishing snack. Make them with any combination of fruit and nuts for your family’s preferences.

Need more healthy snack ideas? You’ll love this wonderful and helpful eBook full of 227 Healthy Snack ideas and recipes!

[wp_eStore_fancy1 id=6]


Heavenly Homemaker's Club Members: Access your homepage and all your fantastic resources here! Not a member yet? Please join us!

Dairy, Soy and Gluten Free Chocolate Chips

March 10, 2011 by Laura 23 Comments

This post may contain affiliate links. For more information, please see our disclosure policy.

Usually, I make my own chocolate chips from sucanat and either butter or coconut oil…making for some much healthier chocolate chips! But I really like having pre-made chocolate chips on hand in the freezer for chocolate chip emergencies. Life can be full of chocolate chip emergencies.

My preferred purchased chocolate chips are:  Enjoy Life Dairy, Soy, and Gluten Free Chocolate Chips. I can only find these at Amazon…and then I can’t find them very often because they are snatched up quickly. I’ve had soy-free chocolate chip conversations with some of you in the past…so wanted to let you know really quickly that there are about 14 cases of these Enjoy Life Dairy, Soy, and Gluten Free Chocolate Chips left right now at Amazon if you’re interested in grabbing some! (There were 15…but well…one is on it’s way to my house now.)

I love using these Enjoy Life Dairy, Soy, and Gluten Free Chocolate Chips when I make Chewy Granola Bars…and just this week, I used some to make Chocolate Chip Muffins (recipe found in our What to Do With the Kids in Your Kitchen eBook).

Ever have a chocolate chip emergency? What’s your favorite kind of chocolate chip? Ever tried making your own homemade chocolate chips?

Heavenly Homemaker's Club Members: Access your homepage and all your fantastic resources here! Not a member yet? Please join us!

Two Simple Ways to Get Ahead in the Kitchen

February 25, 2011 by Laura 41 Comments

This post may contain affiliate links. For more information, please see our disclosure policy.

It may be apparent after you read this post that somebody got a little bit wheat grinder happy this week, thoroughly enjoying a small portion of the 300 pounds of hard white wheat that had been delivered. (You can read all my posts involving grain and grinding grain here, in case you’re interested in reading about my grainy obsession.)

I couldn’t help myself. After being sick myself and taking care of a family of sickies for the past four weeks (that influenza stuff is a BEAR), to have energy again and healthy children with appetites is truly delightful. I’ve been spending extra time in the kitchen, trying to make up for lost time it would seem. I loved every minute of it.

Okay, maybe not the dirty dishes part.

Dirty dishes aside (and really – I shouldn’t complain about the blessing of having so many people to dirty up dishes at my house), I loved being able to bake and cook a little extra this week in order to have healthy convenience foods in my freezer. Two things occurred to me as I was participating in this mad flour grinding, recipe mixing up, dough kneading, cooking ahead extravaganza this week, and I would like to share them with you.

Here are two of the simplest ways I’ve found to get ahead in the kitchen:

1. Cook or bake just one extra thing each day, if at all possible.  This might mean that you brown up several pounds of hamburger to have on hand for an easy casserole, tacos, sloppy joes, etc. Or it might be that you whip up some snacks to have on hand for the kids. Or maybe you could cook up some brown rice to have for simple meal prep the next day. It doesn’t have to be complicated or time consuming. But if you happen to be home and have a few extra moments during the day, utilize it for cooking up a little something extra to make for convenience on those days you barely have time to cook at all because you’re running around crazy-like. 

2.  If you’re mixing up one batch, you might as well mix up two (or three) batches.  You’re already making a mess. You’re already getting out the needed ingredients. Why not double or triple up the recipe and make plenty of extra of whatever it is you’re making, then put the leftovers in the freezer for a busy day. I love doing this with Whole Wheat Waffles, Easy Lasagnas, Muffins…whatever freezes well and reheats easily.

Here are just a few pictures of the food items I made this week in my efforts to get ahead. Let me clarify something though:  Not every week is this productive for me in the kitchen. I happened to be home most of the week without many outside engagements, allowing me to really focus on teaching my kids and working in the kitchen. Now I  have several quick foods in the freezer to easily warm up on those days where we’re running to ball games and practices, or dentist appointments or any other event that makes it difficult to spend time cooking.


Chocolate Chip Cookies and Easy Lasagnas

Honey Whole Wheat Bread (x2)

Whole Wheat Waffles (x2)

Homemade Whole Wheat Rolls (recipe found in Heavenly Homemaker’s Guide to Holiday Hospitality)

Whole Wheat Tortillas (x4)

Meat and Cheese Burritos

Sloppy Cornbread Muffins

Banana Muffins (x2)

Whole Wheat Vanilla Wafers (x2)

What did my kids do while I was doing this extra cooking? Most of the time, they were sitting in the kitchen with me, doing their school work. They also spent a fair amount of time playing with a huge box, shooting things, and eating the food I was making. 

What did my dust and clutter do while I was doing all this extra cooking? Let’s not talk about it.

Heavenly Homemaker's Club Members: Access your homepage and all your fantastic resources here! Not a member yet? Please join us!

The Chocolate Fix

February 22, 2011 by Laura 13 Comments

This post may contain affiliate links. For more information, please see our disclosure policy.

Matt and I were right in the middle of writing love letters to each other. We were at The Art of Marriage conference last weekend, sitting quietly in a room by ourselves, doing our assigned project. I was writing my heart-felt thoughts to him, reliving on paper about the time we met and about the qualities he had that attracted me to him. It was beautiful. I was teary eyed and feeling nostalgic.

And that’s when it hit me.

I’d forgotten to put the sucanat in the Chocolate Chocolate Chip Muffins I had baked for the kids to wake up to that morning. 

Why? Why does my brain work this way? We will probably never know. But somewhere in between writing “I love what a great daddy you are to our boys” and “Thank you for showing your love to me in so many ways” my brain shifted all the way back home and I began thinking about what the boys might be doing and if they were okay and if they’d found the muffins I’d made for them for breakfast. 

And somewhere within those few seconds of thinking about muffins, I thought through the steps I’d taken and recognized that I had not gotten out the jar of sucanat (sugar), opened it or measured it out. The muffins were made of flour, cocoa, baking powder, salt, milk, eggs and coconut oil…no sucanat. I’d thrown in a few chocolate chips, which may have added a little bit of sweetness, but probably not enough.

I didn’t mean to gasp, right there while we were writing our love letters. I didn’t mean to take Matt away from his “You’re so beautiful, I’m so glad God put you in my life” phrases. But I couldn’t help it. 

Our sweet silence was shattered as I blurted, “I forgot to put sucanat in the muffins for the boys!”

There was obviously nothing we could do about the muffins during that moment, so we had a little chuckle together about how quickly the boys might have realized that the muffins weren’t at all sweet and what else they’d found to eat. Then we carried on with our letter writing.

At home later we found exactly what we had expected:  Four muffins with one bite taken out of each of them and all of the rest of the muffins still on the tray.

So the next question of course was, “What should we do with all of these muffins?” We just didn’t have the heart to throw them away. Surely they could be salvaged somehow.

Matt was the one who had the brilliant idea. He’s always the brilliant one (and I may or may not have told him that in his love letter). He suggested that we make my yummy hot fudge sauce recipe to drizzle over the top of the muffins to add some sweetness.

Perfect.  I made some hot fudge, whipped some cream, and we had one of the most delicious breakfast treats ever.

It was a perfect chocolate fix, making us all hope that I will forget the sucanat in these muffins again sometime. :)

Oh, and by the way…all that love letter stuff I put in this post for you to read? All those phrases were cheesy ones that I just made up off the top of my head. What? You really think I’d tell you what we wrote in our love letters to each other? Yeah, I don’t think so. :)

Heavenly Homemaker's Club Members: Access your homepage and all your fantastic resources here! Not a member yet? Please join us!
« Previous Page
Next Page »

Join Our Community!

 Facebook Twitter E-mail Instagram Pinterest

Popular Posts

~ Will All of the Real Moms Please Stand Up?
~ Easy! Stir-and-Pour Whole Wheat Bread
~ How to Make Gatorade
~ 31 Real Food Breakfast Ideas
~ Dear Teenage Girls...
~ When Mom Takes a Step Back
~ The Inexpensive Health Insurance We Love!
~ Let's Talk Real Food Grocery Budgets

Check out our latest posts!

  • Big Family Food and Fun: May 3-9, 2026
  • Help Your Kids Become Independent in the Kitchen!
  • Big Family Food and Fun: April 26-May 2, 2026
  • Big Family Food and Fun: April 19-25, 2026
  • Big Family Food and Fun: April 12-18, 2026
Home  ~  Simple Meals  ~  Club Membership  ~  Shop  ~  Privacy Policy  ~  Disclosure  ~ Contact

Copyright © 2026 · Beautiful Pro Theme on Genesis Framework · WordPress · Log in