Heavenly Homemakers

Encouraging women in homemaking, healthy eating and parenting

  • Home
    • About
    • FAQs
  • Recipes
    • Bread and Breakfast
    • Condiments
    • Dairy
    • Main Dishes
    • Side Dishes and Snacks
    • Desserts
    • Gluten Free
    • Instant Pot
    • Crock Pot
    • Heavenly Homemaker’s Weekly Menus
  • Homemaking
    • Real Food Sources
  • Store
  • Contact
    • Advertise
    • Disclosure
    • Privacy Policy
  • Simple Meals
  • Club Members!

Almond Orange Paleo Salad Dressing

March 8, 2021 by Tasha Hackett 2 Comments

This post may contain affiliate links which won’t change your price but will share some commission.

Tasha’s here again with an awesome new recipe just in time for spring!

Almond Orange Paleo Salad Dressing

by Tasha Hackett

What’s with the Paleo, Tasha? Okay! Sorry, just read this instead: Sugar-Free, Dairy-Free, Soy-Free Salad Dressing that will make you and your family cry tears of joy. Better? Hmm. But really, I can hardly describe the level of happiness this paleo salad dressing makes me. I never knew a salad dressing was capable of bringing forth such an emotion. Almond butter and orange juice? Who knew! Don’t be scared. This paleo salad dressing is delicious on, wait for it, SALAD, but also works great as a veggie dip. In fact, it is even edible straight from the table as pictured below. Not recommended. But acceptable.

toddler messes

Yum

My salad dressing is better than your salad dressing.

The original recipe that I adapted had a few more ingredients and it only made one tiny serving of dressing. I don’t know about you, but if I’m going to go through all the trouble of making a salad dressing from scratch to eat with my paleo food . . . I’m making more than one tiny serving. Clearly, the chances are high that I will be eating salad again in the near future. I’ve made some version of this dressing at least 5 times in the last month. If you’re drinking your salad, skip the dressing and add some fruit. **Insert puking face if you just envisioned drinking a garlic and olive oil flavored smoothie.

Almond Orange Paleo Salad Dressing

Make as directed for a typical dressing consistency. Though if you want it thicker, just add more almond butter. My salads are usually quite epic. I will rarely just eat lettuce, but this dressing has enough going on, that I have eaten it on plain old leaves before. My kitchen hack with this paleo dressing is to make it in my almond butter jar when there’s about half a cup left. Saves times scooping almond butter AND I don’t have to wash any jars just yet. Sometimes I’m pretty smart like that.

My new favorite salad includes the following:

  • Mixed greens (heavy on the spinach)
  • Chopped romaine hearts
  • Pumpkin seeds
  • Sunflower seeds
  • Chopped avocado
  • Slivered almonds
  • Dried cranberries or cherries
  • Chopped cold meat of some kind (ham, chicken, salmon, tuna, or even boiled/scrambled eggs, etc)
  • Chopped dill pickles (tricks me into feeling like I’m having a sandwich)

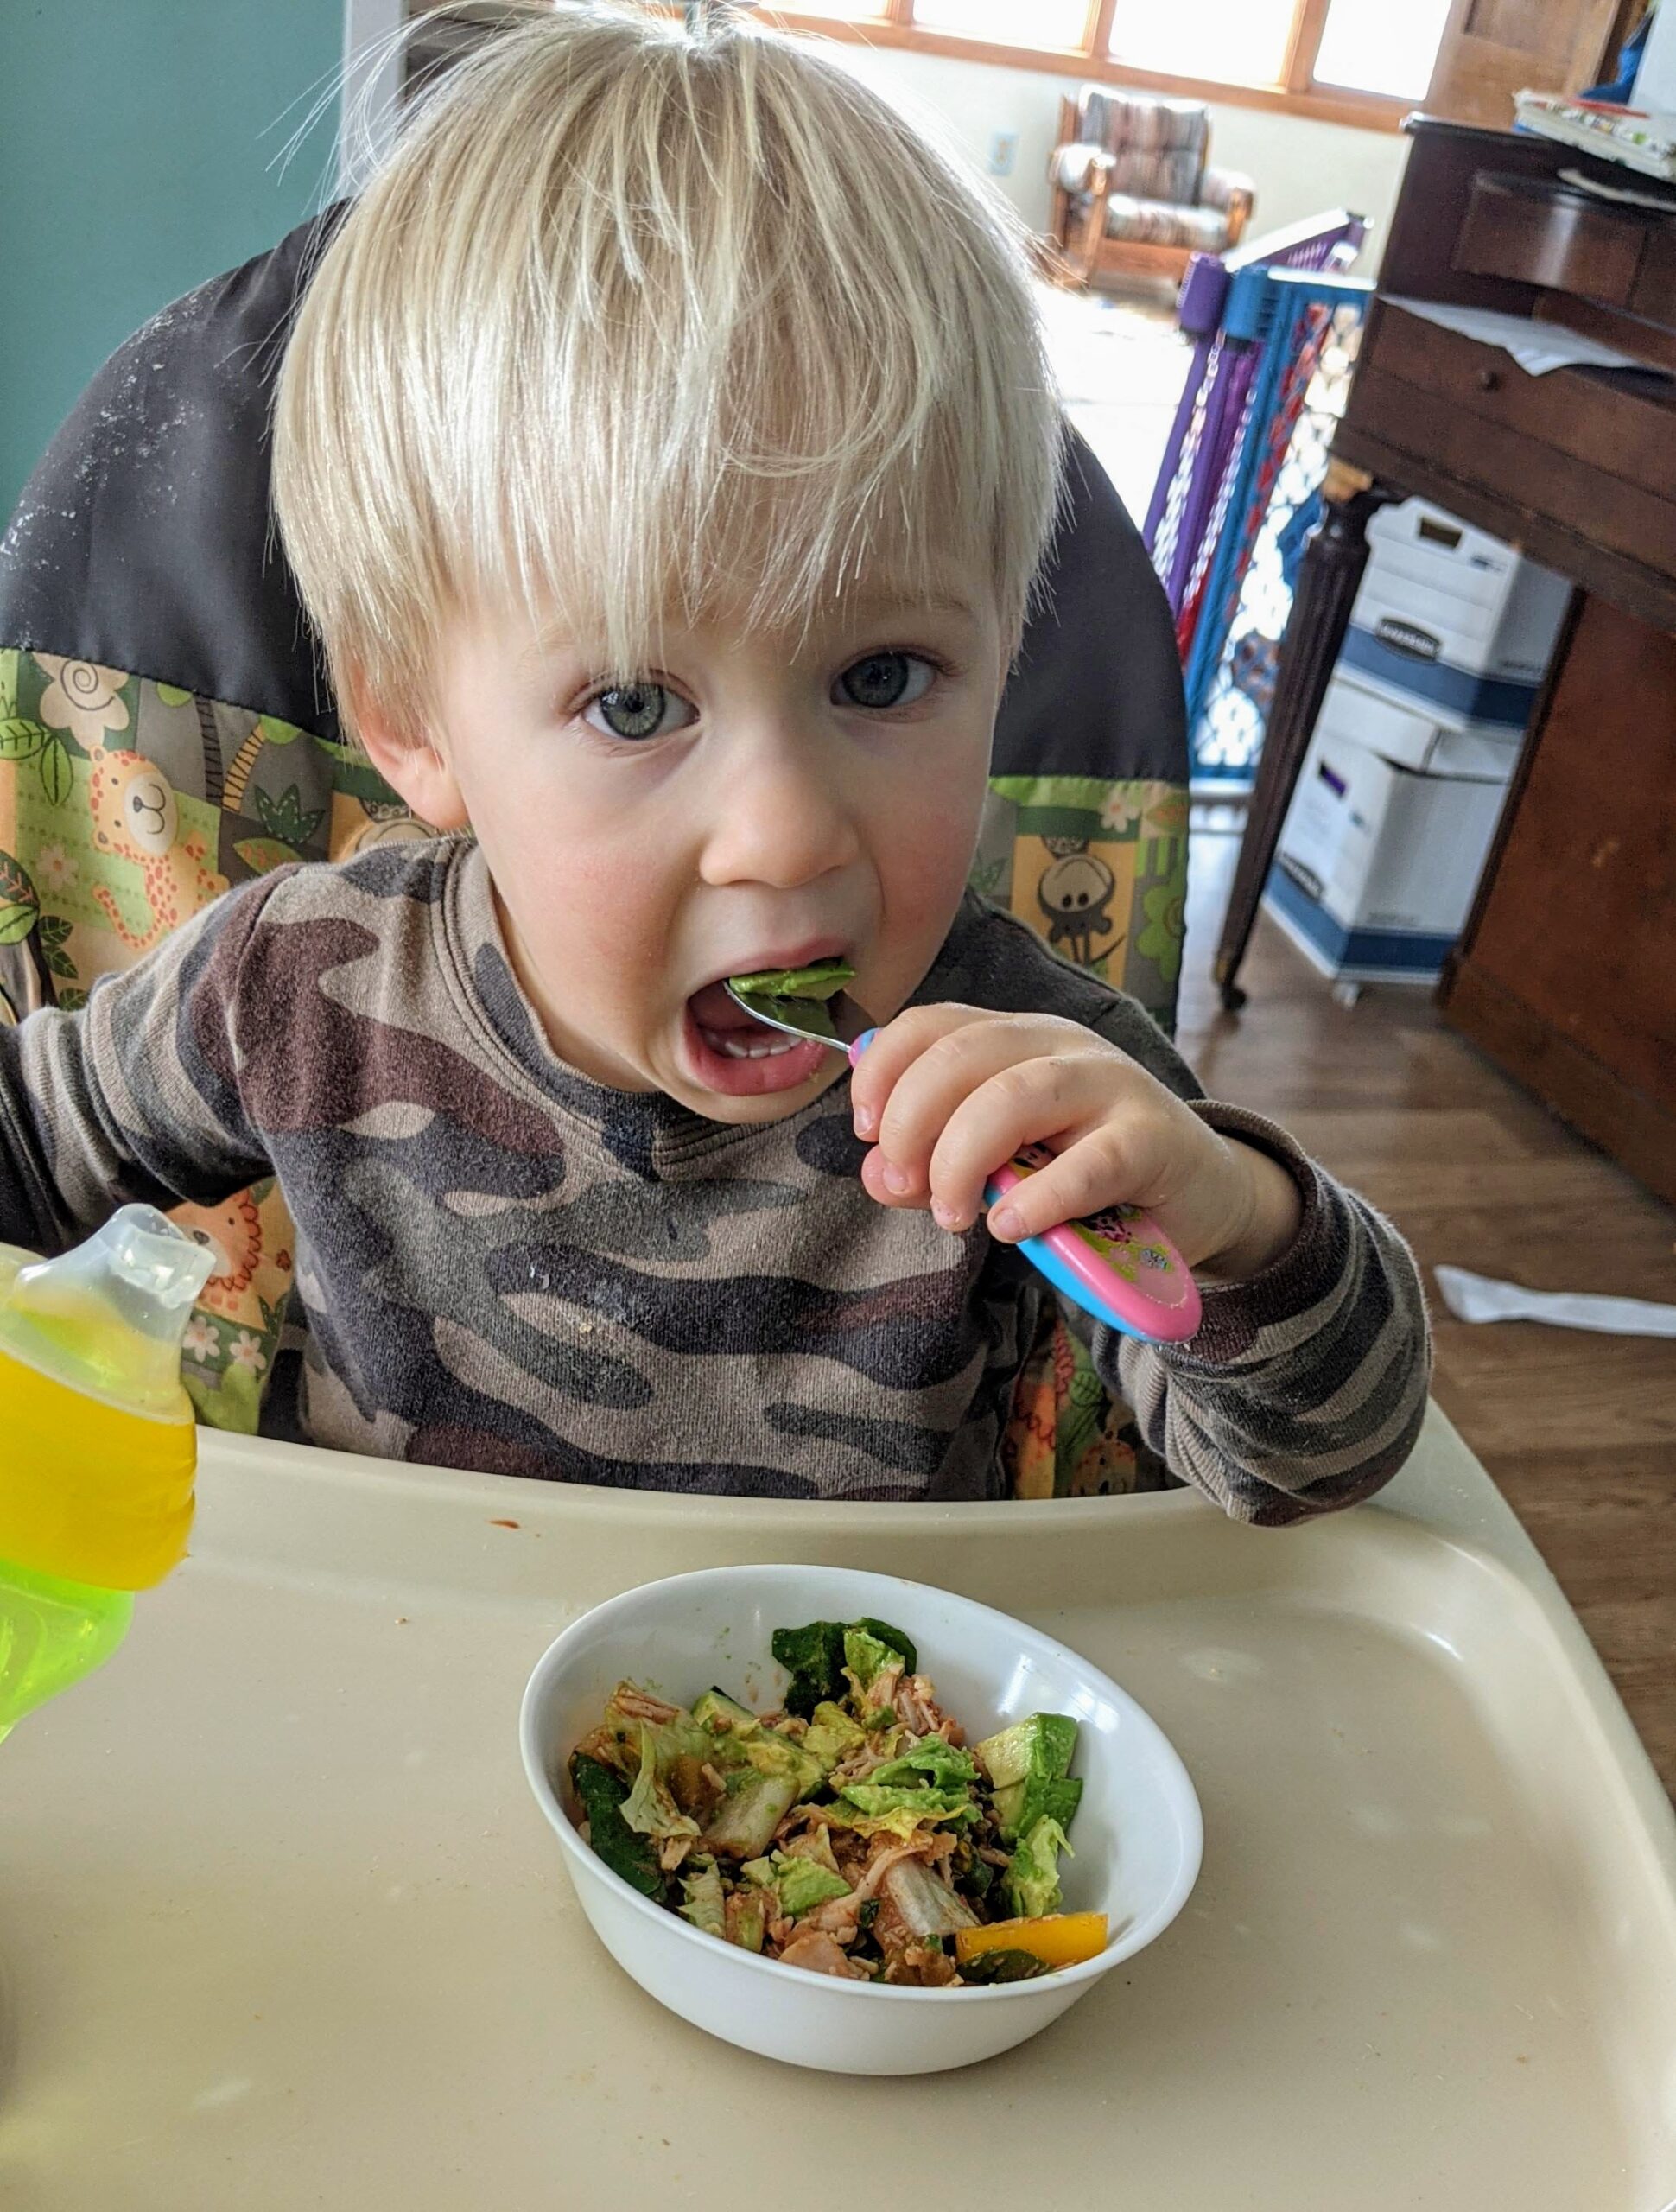
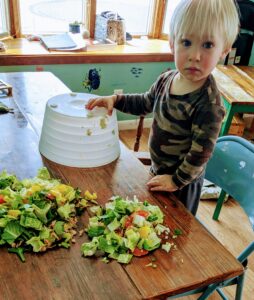
Yes. My toddler eats salad. What can I say? I think it’s the dressing.

Toss it all with Almond Orange Paleo Dressing and my kids fight for the last serving.

I’ve been serving my family made-from-scratch salad dressings for years and I absolutely love how freely we use them. No worries here about what we’re smothering our vegetables in. As a result, we don’t skimp on the dressings for health reasons. Everything in this dressing is Food. For. Fuel! Go make ya some and tell all your friends about how amazing it is and then invite them over for salad. I dare them to go home hungry.

Salad for dinner! Again! #paleohasmelike #sorrynotsorry #iheartsalad

Almond Orange Paleo Salad Dressing
 
Save Print
Prep time
5 mins
Total time
5 mins
 
Author: Tasha
Recipe type: Dressing
Serves: 2 Cups
Ingredients
  • ½ Cup Almond Butter
  • ½ Cup Red Wine Vinegar
  • 1 Cup Olive Oil (Can use part MCT oil or other oils)
  • 1 tsp Salt
  • ½ tsp Black Pepper
  • ½ tsp Granulated Garlic Powder (Or two fresh cloves, minced)
  • Juice of two Oranges
Instructions
  1. Mix all ingredients and stir or shake vigorously.
  2. Taste and adjust to preference.
  3. For a thicker dressing, add more almond butter.
  4. For a sweeter dressing, add a splash of apple juice.
  5. Store in the refrigerator.
3.5.3251


Quick! What’s your go-to salad dressing? Store-bought or make your own?

Lastly, be sure to check out some of the other dressings on our site.

  • Ranch Dressing
  • Italian Dressing
  • French Dressing
  • Thousand Island Dressing
  • Simple Vinaigrette

Tasha HackettTasha Hackett, friend of Laura and author of Bluebird on the Prairie, a Christian historical romance releasing Spring 2021, is fueled by sunshine, paleo pudding, or hot chocolate—whichever is more readily available. Though she often pretends to be a ballerina while unloading the dishwasher, her favorite thing is writing with hope and humor to entertain and encourage women. Her time is spent with four chatty children and an incredibly supportive husband. They give her the kind of love people write books about. You can connect with her at www.TashaHackett.com or Instagram @hackettacademy or for Laura @heavenlyhomemaker.

Heavenly Homemaker's Club Members: Access your homepage and all your fantastic resources here! Not a member yet? Please join us!

How to Use a Cast Iron Skillet like a Pro

January 27, 2021 by Tasha Hackett 1 Comment

This post may contain affiliate links which won’t change your price but will share some commission.

I’ve loved and recommended using a cast iron skillet for years. Today, Tasha will tell you how to use one like a pro!

How to use a cast iron skillet like a pro

by Tasha Hackett

I didn’t know how to properly cook with a cast iron skillet until very recently. 

Even though I have prepared food almost exclusively on my cast iron skillet, I continually burned food or the food stuck so badly I spent far too long scraping it off the bottom and reseasoning again. 

I burned the pancakes on my cast iron again and I was sad. As I served my family I said, “I know it’s burned. Sorry. It is what it is. This is the last of the flour, I’m not making anything else. Sorry. Just eat it. I know it’s burned. Sorry. Don’t ask me why it keeps burning.” 

I burned the zucchini patties and I was sad. “I don’t know why they’re burning! The bottom is burned before I can even flip them without it falling apart! I turned it down and they’re still burning.” 

The scrambled eggs stuck to the bottom of the pan so badly I felt like I sacrificed two whole eggs to the cast iron gods. 

Please tell me I’m not the only one who struggles with the cast iron skillet? 

Figuring out how to use a cast iron skillet shouldn’t have taken me this long.


With all my struggles, you may be asking, “Why do you even use it if it causes so much trouble?” A few reasons. 

Now that I know how to use a cast iron skillet, I love it even more.

Foremost, I like the simplicity of it. I use this one pan multiple times a day. I clean it after each meal and it lives on my stovetop. The nostalgia that this is the same type of pan the pioneers used hundreds of years ago speaks to my author soul. I don’t wear 1800’s dresses, or travel by horse or train or write letters with an inkwell, but by golly I can cook with the same pan! (In theory, except I was disproportionately burning everything.) Another main reason I like to use it is that I don’t trust modern technology when it comes to our health. Teflon is bad for you–correction, teflon is bad for you when heated. HA! 

I know there are other non-stick pans out there today that claim to be non-toxic, but I haven’t had the time to look into them yet. (I’ve been far too busy wondering why I keep burning the Simple Tuna Patties.)

cast iron eggs

Here are my how-to tips for using your cast iron skillet:

  1. Start with a well-seasoned cast iron skillet. Which I have. Many times. Keeping it well-seasoned was my problem. Seasoning a skillet is simple: Clean. Dry. Rub a teaspoon of vegetable oil or lard all over. Top, bottom, outside, underneath, and the handle. Bake upside down in a 350* oven for an hour. Let it cool in the oven before putting it away.
  2. Be patient. Let the pan preheat at a low temperature for up to five minutes before cooking on it. A drop of water should immediately sizzle and then you may add the oil. If the butter, oil, lard, etc., is smoking, that means your skillet is too hot. Heating a cast iron skillet/pot/pan on high heat right away, especially on an electric stove, causes the iron to expand and heat unevenly and can cause warping. This is one of the only things that will ruin your skillet.
  3. Preheat the oil. Do this after the pan is preheated. Again, if the oil smokes or burns, this is a bad sign. If the butter is burning, the pancakes will soon be burning. (You’d think I could have figured that out sooner.) On my gas stove, I do most of my cooking just above Low or directly between Low and Medium. On my stove, the butter burns at Medium. Once the pan is heated, if you turn the temperature down it will not immediately make a difference. One of the pan’s strengths is the ability to hold heat. Therefore, adjusting the temperature up and down while you’re cooking isn’t going to work well for your food or your taste buds. Or your family’s trust in your cooking abilities. Have patience while preheating, and you will quickly learn where to set the temperature and can leave it there.
  4. Do the sizzle dance.

  5. The food should sizzle as soon as it touches the pan. Food that doesn’t sizzle means your pan wasn’t preheated enough and now your food is going to stick and then probably burn. (Preheat the skillet even if you are baking cornbread in the oven. The sizzle as you pour in the cornbread batter will create a delicious crust and keep the wet cornbread from sticking to the pan.)
  6. A properly seasoned cast iron skillet is easily cleaned with a wipe-down of a paper towel or hot water and plastic scraper. Boiling water in the pan, using soap, or not properly drying will cause your pan to rust and this is bad. If the pan rusts, you get to scrub it off with a steel brush and do the reseasoning thing again.
  7. Whenever dry spots appear on the pan, it’s time to reseason. If you use enough oil while cooking on the pan, you shouldn’t have to do the reseasoning thing more than a few times a year. If that. But… if you were anything like me and frequently burned the food and then had to scour it off with hot water, reseason it as often as necessary until you’ve perfected the patience that is required for preheating your pan. 

And that’s how to use your cast iron!

cast iron onions

This pan was not preheated. There was no sizzle when the onions were added. The butter wasn’t melted and then it will later burn.

I’m curious, how many of you have skillets passed down from your grandma? Years of history and thousands of meals prepared in a pan that is still in great use today? Amazing!

I love to invest in things that will last. Cast iron is just one of those things. Now that I know how to really use mine, I foresee some delicious pancakes in my family’s future. 


Tasha HackettTasha Hackett, friend of Laura, is fueled by sunshine or chocolate, whichever is more readily available. Recently embarking on a paleo journey to combat some chronic inflammation, she is still finding ways to eat chocolate. Though she proudly sings every word of the Wee Sing Silly Songs albums and often pretends to be a ballerina while unloading the dishwasher, her favorite thing is writing with hope and humor to entertain and encourage women—specifically young moms. Most of her time is spent with four chatty children and an incredibly supportive husband. They give her the kind of love people write books about. Her debut novel, Bluebird on the Prairie, a heartwarming Historical Romance will release spring, 2021. You can connect with her at www.tashahackett.com or on Instagram @HackettAcademy. 

Heavenly Homemaker's Club Members: Access your homepage and all your fantastic resources here! Not a member yet? Please join us!

Summer Activities for Kids: Make Smoothies, Milkshakes, and Popsicles!

May 28, 2019 by Laura Leave a Comment

This post may contain affiliate links which won’t change your price but will share some commission.

Looking for some fun activities to do with your kids this summer? I’ve enjoyed 22 summers with kids (and counting!), so I certainly have a few ideas to share! Stay tuned during the next few weeks as we provide all kinds of suggestions for making your summer with your kids meaningful. (Subscribe here so you won’t miss out!) Today’s idea: Make Smoothies, Milkshakes, and Popsicles!

There are many glorious reasons to make smoothies, milkshakes, and popsicles with your kids. What are these reasons, you ask? Oh, I am more than happy to share:

  1. Smoothies, milkshakes, and popsicles are obviously perfect to enjoy on a hot day because they are so refreshing and cool.
  2. When you make food WITH your kids, they are much more likely to want to eat it.
  3. You can sneak all kinds of nourishing foods into smoothies, milkshakes, and popsicles – so basically, you are making treats that are very healthy!
  4. Making smoothies, milkshakes, and popsicles are a super simple way to get all your kids – from tiny to big – into the kitchen to learn some kitchen skills!

When our 5-year old Bonus Boy first moved in with us, one of the first fun activities we did together was to make “milkshakes.” (They are really considered smoothies, but he “doesn’t like smoothies – he only likes milkshakes.” Call them whatever you want! We load them with fresh greens, frozen strawberries and bananas, farm fresh whole milk, and sometimes even an avocado. He drinks these “milkshakes” right up! And he loves to help us make them, so we aren’t sneaking the healthy stuff in. He puts it all into the blender himself!

Below are 13 of our favorite smoothie, milkshake, and popsicle recipes. Take note that you can make a smoothie and then freeze it into a popsicle – a double good treat! Or look there at #13 – make homemade wholesome pudding, then freeze it into Pudding Pops! Creamsicles anyone? Yep! There’s a recipe for those too!

Make Smoothies, Milkshakes, and Popsicles!

  1. Pineapple Mango Smoothies
  2. Pineapple-Orange Slushies
  3. Creamy Orange Cooler
  4. Strawberry Peach Slushies
  5. Icy Cold Milkshake Treats
  6. Green Machine Milkshakes
  7. Easy Peppermint Milkshakes
  8. Fresh Peach Milkshakes
  9. Strawberry Milkshakes
  10. Strawberry Creamsicles
  11. Mock Frozen Yogurt
  12. Orange Creamsicles
  13. Homemade Pudding Pops

Sky’s the limit on the variety of milkshakes you can make with different fruits and fun combinations. The same is true for smoothies! Use whatever you have in your freezer or fridge. Use up odds and ends of leftover fruit that is starting to go bad. Use milk, cream, kefir, yogurt – whatever you have. There’s hardly a way to go wrong with these ideas!

HINT!

Do you think your kids would enjoy the taste of these milkshakes and smoothies? But they are turned off by the color of these goodies when you add greens to your blender? Yep, I hear ya. We’ve learned to pour the mixture into a solid cup so that it isn’t see-through. We top it with a lid and let the kids choose a fun straw. Ta-da! Problem solved. The kids can’t see the funny-looking mixture – they just know the contents inside their cups are delish!

Looking for the perfect blender?

Any ol’ blender will do. But nothing is amazing as a Blendtec or Vitamix if you want a perfectly smooth smoothie. Your family is much more likely to guzzle down their smoothies and shakes if they are seedless and chunk-less. :) Here are more details on why I love my Blendtec.

Looking for great homemade popsicle makers?

I just invested in the double-set of these. They are fantastic! Why the double-set? Well, because 6 popsicles just isn’t enough. Making 12 popsicles at once is much better, don’t you think!?

By the way, while the above 13 recipes are beyond great and extra full of nourishment, it is worth a mention that I often pour 100% juice into our popsicle molds to make simple fruit juice popsicles. Incredibly easy and a super money saver!

Looking for more help as you pull your kids into the kitchen with you?

  • Join our Kids Cooking Camp – it’s amazing!
  • Our Learn to Cook eBook has just been revamped and is perfect to hand over to your kids. :)
  • Grab our new and improved Teaching Your Kids to Cook eBook!
  • Here’s our Kids in the Kitchen discounted eBook collection.
  • This Kids Cook Real Food eCourse is fantastic! It is well worth the investment for all that it offers to your family!
  • Our Chocolate Covered Kids Cookbook and Resource Pack is filled with helpful tips, instructions, and of course, recipes!
  • Our Heavenly Homemakers Club Members get access to ALL of our eBooks and eCourses for an incredibly low price. Join here!

And if you really want to go all in and teach your kids to cook this summer, I encourage you to invest in Katie Kimball’s Kids Cook Real Food eCourse. I used this course with Malachi and plan to use it with Brayden too. It is FANTASTIC!!! Get the details here.

Psst! Did you see our other Summer Kid Activity ideas so far?

  • Make Donuts!
  • Have a Reading Party!

Stay tuned for more fun Summer Kid Activity ideas!

Heavenly Homemaker's Club Members: Access your homepage and all your fantastic resources here! Not a member yet? Please join us!

12 Fun and Wholesome Ways to Cook with Whole Rolled Oats

March 24, 2019 by Laura 3 Comments

This post may contain affiliate links which won’t change your price but will share some commission.

Why am I giving you so many fun ways to cook with whole rolled oats? Well…

If I confess to you that I do not enjoy eating a bowl of oatmeal in the morning (or any time of day) – can we still be friends? I’ve tried to like oatmeal. But I simply cannot eat it (Sam I am). I get to the third bite and try as I might, I can’t put one more spoonful into my mouth. I realize that this is because I am a spoiled, privileged person who has a plethora of food options, and in many other life settings I would be grateful to have a bowl of oatmeal.

So it is with gratitude that I share 12 other options for ways to use and cook with this wholesome ingredient!

How fun it is that delicious rolled oats can be stirred into these recipes and transformed into a wonderful breakfast option!

12 Fun and Wholesome Ways to Cook with Whole Rolled Oats

  1. Stir-and-Pour Honey Oat Bread
  2. Baked Oatmeal Cups
  3. Breakfast Cake
  4. Breakfast Cake Muffins
  5. Cracklin’ Oat Bran Cereal
  6. Cranberry White Chocolate Chip Breakfast Cookies
  7. Dark Chocolate Almond Granola
  8. Giant Breakfast Cookies
  9. Granola
  10. Granola ~ 5-Minute Stop-Top Version
  11. Raspberry Oatmeal Bars
  12. Oatmeal Breakfast Bars

Can you use Quick Oats in any of these recipes? Sure! I just always have Whole Rolled Oats on hand because I like them better. I mean, I like them better for baking. Not in a bowl. How spoiled is this girl? ;)

If you do happen to be an “oatmeal in a bowl” kind of a person, I highly recommend that you make yourself some of these: Instant Oatmeal Packets. It’s a wonderful time and money saver, plus you can include any of the favorite healthy ingredients that you like! I usually make big batches of Instant Oatmeal and put it into jars as pictured above. My family scoops out a “packet” amount and has a quick and easy breakfast!

What are your favorite, wholesome ways to eat oats?

Heavenly Homemaker's Club Members: Access your homepage and all your fantastic resources here! Not a member yet? Please join us!

17 Real Food Recipes That Use Pumpkin Spice

November 4, 2018 by Laura Leave a Comment

This post may contain affiliate links which won’t change your price but will share some commission.

Pumpkin Spice recipes tend to be full of sugar and empty carbs. So today, how about I give you 17 Real Food Recipes that use Pumpkin Spice? They are low in sugar, nourishing, and absolutely tasty!

Pssst! Not into Pumpkin Spice? Here are 36 fabulous Chocolate Recipes. Hey, I’m here for ya.

Did you see this list of 40 Real Food Fall Recipes? That list includes many of the recipes listed here. But I thought it would be fun to pull out the recipes that featured pumpkin and pumpkin spice!

Before diving into the Pumpkin Spice recipe list, you will first need my Pumpkin Spice Recipe. In a pinch, you can substitute 1 teaspoon ground cloves, 1 teaspoon cinnamon, and 1/2 teaspoon nutmeg for 1 Tablespoon of Pumpkin Spice. But to make life easier and the holiday season more delicious, bookmark and pin the following:

Pumpkin Spice Recipe

Now that you have that, you can make any and all of the following fabulous recipes. These are great for breakfast, snacks, desserts, parties, holiday feasts, and any time of the day you have a cup of coffee or tea in your hand.

17 Real Food Recipes That Use Pumpkin SpiceYum

  1. Overnight Pumpkin Spice French Toast Casserole (Such a wonderful recipe to put together at night, then bake and serve to guests in the morning!)
  2. Super Moist Sour Cream Pumpkin Bread
  3. Pumpkin Spice Roll-Out Cookies (Simple and sweet, one of my favorites!)
  4. Pumpkin Chocolate Chip Bread
  5. Pumpkin Chocolate Chip Muffins
  6. Pumpkin Donuts (I make these all year round as an excuse to feed my kids a vegetable for breakfast.)
  7. Warm Pumpkin Custard (Oh yes, you should drink your pumpkin.)
  8. Simple Pumpkin Pancakes
  9. Pumpkin Chocolate Chip Cake
  10. Pumpkin Pecan Pie Squares (Such a fun combination of two holiday favorites.)
  11. Pumpkin Pie
  12. Pumpkin Breakfast Cake
  13. Pumpkin Cheesecake (Making life better, one delicious bite at a time.)
  14. Pumpkin Pie Bars (These are a Thanksgiving tradition at our house.)
  15. Pumpkin Cream Cheese Muffins
  16. Easy Pumpkin Cheesecake Muffins (With chocolate chips on top. Amen.)
  17. Flourless Pumpkin Muffins (Flourless and fabulous!)

What are your favorite Pumpkin Spice recipes?

Chocolate Pumpkin Cake Recipe!!

Check out our fun video, showing you how to make one of our latest Pumpkin Recipes!

Get our Chocolate Pumpkin Cake Recipe!

Heavenly Homemaker's Club Members: Access your homepage and all your fantastic resources here! Not a member yet? Please join us!

Easy Chocolate Cheesecake Muffins

November 2, 2017 by Laura 4 Comments

This post may contain affiliate links which won’t change your price but will share some commission.

Allow me to share with you the story of day these Easy Chocolate Cheesecake Muffins were born.

chocolate cheesecake muffin11

One day I thought to myself, “What if I mixed up chocolate muffins as usual? Then what if I poured cheesecake topping on them before I baked them? What if?”

I did all of that, but then I one-upped my idea by sprinkling mini-chocolate chips on top just before sliding them into the oven. This, of course, completed the recipe as if I was baking perfection itself.

chocolate cheesecake muffin22

Upon the birth of these delicious chocolate cheesecake babies, I began to consider other cheesecake-topped muffin options and lo, their little muffin siblings were born into the world. Coming soon to a Heavenly Homemakers blog near you:

  • Pumpkin Cheesecake Muffins
  • Banana Cheesecake Muffins
  • Chocolate Chip Cheesecake Muffins

You see, once I started, I simply couldn’t stop. This resulted in 48 muffins atop my kitchen counter (and a significant number of dirty mixing bowls in my sink). Therefore, I had no choice but to invite approximately half the college campus to come over and eat muffins. I made for them a huge jar of Iced Coffee with which to wash them down.

And behold, it was good.

banana cheesecake muffins11

Additional Cheesecake Muffin recipes coming soon!

It is a fact that I was able to crank out 48 muffins in one setting because I had a container full of Muffin Mix just begging to be used. This made it so easy that I just kept scooping, mixing, playing, and creating.

simple mixes

I said it before. I’ll say it again. These Simple Mixes are my new super power.

chocolate chip cheesecake muffin11

I now present to you the first of the series of cheesecake muffin recipes. And if I’m you, I’d take advantage of the Simple Mixes that Save the Day eBook offer so that you, too, will be given this Super Power. Then we can all make all these muffins as quickly as possible and also we can teleport. What? If I’m going to have a Muffin Mix Super Power, I would also like to teleport. A girl can dream.

Easy Chocolate Cheesecake Muffins

Easy Chocolate Cheesecake Muffins
 
Save Print
Author: Laura
Serves: 12-15
Ingredients
  • 2 cups Muffin Mix** or...
  • 1½ cups whole grain flour
  • ⅓ cup brown sugar or sucanat
  • ½ teaspoon baking power
  • ½ teaspoon sea salt
  • ¼ cup unsweetened cocoa powder
  • 1 egg
  • ½ cup milk
  • ½ cup sour cream
  • ¼ cup melted butter
  • Cheesecake topping:
  • 8 ounces softened cream cheese
  • 1 egg
  • 2 Tablespoons real maple syrup
  • ½ teaspoon vanilla extract
  • ¼ cup mini chocolate chips
Instructions
  1. Scoop Muffin Mix or measure dry ingredients together in a bowl.
  2. Add egg, sour cream, milk, and melted butter, stirring until ingredients are combined.
  3. Scoop batter into 12-15 prepared muffin tins.
  4. Prepare cheesecake topping by blending (in a blender or with a hand mixer) cream cheese, egg, maple syrup, and vanilla until smooth.
  5. Spoon 2-3 Tablespoons of cheesecake topping over each unbaked muffin.
  6. Sprinkle chocolate chips over the top of each.
  7. Bake in a 400 degree oven for 18-22 minutes or until muffins are golden brown.
3.4.3177

**If you have our Simple Mixes to Save the Day eBook, save time and energy by using the Muffin Mix for this recipe instead!!

Easy Chocolate Cheesecake Muffins

Heavenly Homemaker's Club Members: Access your homepage and all your fantastic resources here! Not a member yet? Please join us!

What I Think About My New Instant Pot

August 3, 2017 by Laura 19 Comments

This post may contain affiliate links which won’t change your price but will share some commission.

I finally did it. After so many of you told me how great the Instant Pot is, after so many insisted that I would love it, after all kinds of hemming and hawing and rebelling about getting one more appliance for my kitchen…I finally got myself an Instant Pot.

Instant Pot

It was Amazon Prime Day. It was a good deal. It was a big pot for my family’s big needs. It was time.

I’m sure you’re all wondering, has my new Instant Pot completely changed my life? Am I a better mom now? Do I sleep better at night because of it? Does it help my house stay in a less cluttered state? Do I get mail to the box in better time? Am I finally wearing matching socks? In other words, does the Instant Pot help make my world go round?!

The answer to all of the above is “no.” But I do make mean batches of hard boiled eggs in record time, so I think we can all give a cheer and feel that this was definitely a worthwhile purchase.

eggs

I’ve truly had fun with my new toy, which isn’t taking up any extra room on my counter because it has actually taken the place of my coffee pot if you can believe it! (I realized after I started drinking this healthy coffee that I no longer need a coffee-maker taking up space on a daily basis. Away went the coffee pot. In its place went the Instant Pot. A pot for a pot. It just seemed logical.)

At the very moment our Instant Pot arrived on our porch, I was making Tuna Salad. Matt decided he definitely wanted boiled eggs in his tuna since we now had an Instant Pot in which to make them quickly. I read the “how to boil eggs” instructions while he got it set up, and while I’m pretty sure we didn’t do everything right, nothing blew up, our eggs hard boiled like they were supposed to, and Matt got eggs in his tuna the way he wanted. Good story, huh?

Not long after the arrival of the pot and the making of the eggs, we headed back out to church camp for a week. So our Instant Pot sat forlorn and lonely on our counter-top all week. Since coming back from camp, I’ve been playing with it as I’ve had time. Here’s what I’ve tried, though please don’t get excited because my stories might bore you to sleep…

For instance, one night we had company and my stove was full of other big pots cooking other food. So I tried steaming our broccoli and carrots in the Instant Pot. The recommended seven minutes was way too long and our broccoli came out dead and mushy and completely unappetizing. Perhaps it’s not a good idea to try a new appliance when you’re serving food to company?

instant pot2

See, look. My full stove, which is what led me to steam veggies in my Instant Pot. Fascinating.

A few days later I put a whole chicken into my Instant Pot, dumped on some BBQ Sauce, and turned it on. That was ridiculously simple and we ate chicken for lunch 35 minutes later. I served it with okra. It was very good. The end.

instant pot3

instant pot4

The part of the story you don’t want to hear is that I asked Matt to please take the leftover meat off the bones, but I didn’t communicate clearly about saving the bones so I could try making broth in my new Instant Pot. Learning to make broth in my new pot will have to be a lesson for another day.

instant pot beef

Perhaps my favorite of anything I’ve tried so far is cooking frozen ground beef! As soon as I perfect this method, I will for sure share the details. I think this will be a HUGE time saver!

Sooo, while none of this Instant Pot news was super exciting to read about at this point, you can be sure that as we settle into a new school year with lots of teenage mouths to feed, we will be absolutely making the most of our new Instant Pot! And when I figure out all the great food we can make with it, I’ll share all the fabulous details!

I’d love to hear from you if you have an Instant Pot. What are your favorite time-saving recipes to make?

Heavenly Homemaker's Club Members: Access your homepage and all your fantastic resources here! Not a member yet? Please join us!

How To Make Your Own Popcorn Flavor Shakers (7 Varieties!)

March 16, 2017 by Laura 6 Comments

This post may contain affiliate links which won’t change your price but will share some commission.

Hey! You should make your own Popcorn Flavor Shakers. This makes a great gift!

Two Christmases ago, we surprised our older boys with this Vintage Popcorn Machine. It’s been super fun for family movie nights – but especially fun to use when we invite friends over.

popcorn machine

I’ve had it on my to-do list since then to make fun flavor shakers to go with our popcorn. (Not that coconut oil and sea salt aren’t amazing in and of themselves.) These turned out amazing!

This is a great Father’s Day gift!!

Not the Popcorn Machine, unless you want to go all out!

But I’m talking about spending just a few dollars to make some fun Popcorn Flavor Shakers to give to Dad or Grandpa or Uncle this Father’s Day. Package it with a big bag of popcorn. Maybe promise him some game nights or movie nights to go with it. What fun!

popcorn-shaker-collection2

The beauty of these Popcorn Flavor Shakers is that they taste just as good, if not better than, the commercial ones you can buy at the store. But of course, when we make our own we will save money and include only healthy ingredients.

You may find it helpful to blend these ingredients together to make a fine powder for easier sprinkling. Here are the recipes, and click here so we can send you all of the recipes plus shaker labels too!

7 Popcorn Flavor Shaker RecipesYum

Taco

2 Tablespoon dried minced onion
1 Tablespoons chili powder
2 teaspoons onion powder
1 teaspoon garlic powder
1 teaspoon paprika
1 teaspoon sea salt
1/2 teaspoon cumin

Ranch

2 Tablespoons dried minced onions
3 teaspoon parsley flakes
1 teaspoon salt
1/4 teaspoon garlic powder

(These ingredients are the same as my Ranch Dressing Mix, so if you have that on hand, simply blend it and pour it into a shaker.)

Barbecue

3 teaspoons smoky paprika
1 teaspoon sucanat or brown sugar
1/2 teaspoon garlic powder
1/2 teaspoon onion powder
1/2 teaspoon chili powder
1/2 teaspoon sea salt

Hot Chocolate

2 Tablespoons cocoa powder
3 Tablespoons sucanat or brown sugar
1/4 teaspoon sea salt

Salted Caramel

3 Tablespoons sucanat or brown sugar
1/4 teaspoon sea salt

Cinnamon Sugar

3 Tablespoons sucanat or brown sugar
1 teaspoon ground cinnamon
1/4 teaspoon sea salt

Pizza

1½ teaspoon garlic powder
1 Tablespoon onion powder
2 teaspoon oregano
1 Tablespoon dried parsley
2 teaspoons sea salt
1 teaspoon pepper

make-your-own-popcorn-flavor-shakers

Want a printable that includes the shaker labels and easy recipe reference? We’ll email it to you! Click here to tell us where to send it. :)


Heavenly Homemaker's Club Members: Access your homepage and all your fantastic resources here! Not a member yet? Please join us!

Simple Parmesan Broiled Fish (10-minutes from start to finish!)

January 8, 2017 by Laura 7 Comments

This post may contain affiliate links which won’t change your price but will share some commission.

I was going to call this Simple Cheesy Fish Dish – you know – because it rhymed and was cute. But then I was like, “What a weird and not-very-appetizing name. Let’s change it to Simple Parmesan Broiled Fish. People will want to make it if it has a better name.”

broiled-parmesan-fish

I sure hope you all appreciate all the thought and trouble I go to in preparing these recipes and laboring to come up with their names. There is no end to all the decisions I have to make around here.

But in actual news, and what you really need to know about this recipe is how easy it is. You broil the fish. While it is broiling, you mix up a few ingredients to spread over the top. You spread it on. You broil it all a little longer. In ten minutes the fish is completely done and ready to serve.

Ten minutes. Maybe I should have called this Ten-Minute Fish Dish. But seriously, though.

Simple Parmesan Broiled FishYum

5.0 from 1 reviews
Simple Parmesan Broiled Fish
 
Save Print
Author: Laura
Serves: 4-6
Ingredients
  • 2 pounds fish, any kind (cod, tilapia, halibut, flounder, salmon)
  • ¾ cup shredded Parmesan cheese
  • ⅓ cup melted butter
  • ¼ cup mayonnaise (I use Hain Safflower mayo)
  • 3 Tablespoons lemon juice
  • 3 Tablespoons dried minced onion
  • Sea salt and pepper to taste
  • Splash of hot sauce (we like Cholula)
Instructions
  1. Lay fish pieces in a buttered 9x13 inch baking dish.
  2. Broil for 8-10 minutes in the oven.
  3. In the meantime, mix the remaining ingredients in a bowl.
  4. Removed broiled fish from the oven and spread on the cheese mixture.
  5. Broil for an additional 2 minutes.
3.4.3177

simple-parmesan-broiled-fish

This fish has incredible flavor! We have also found that the sauce tastes great with the steamed veggies we eat with this meal. There’s just something about cheese and butter and mayo all together that makes a great sauce. So if the sauce from your fish runs over your plate into your veggies – be grateful. The entire meal will taste better this way!

Other Simple Recipes I’ve Shared Recently:

  • Simple Baked Salmon and Asparagus
  • Simple Crock Pot Chicken Soup with a Kick
  • Simple Skillet Taco Pasta
  • Simple Sweet and Sour Baked Chicken Legs
  • 20-Minute Taco Soup
  • Simple Cheesy Baked Chicken
  • Simple Creamy Chicken Stew in the Crock Pot
  • Simple Italian Beef and Broccoli Skillet
  • Simple Bacon Ranch Chicken
  • Simple Hawaiian Crock Pot Chicken
  • Simple Taco Rice Dinner
  • Simple Last Minute Nacho Plate
  • Simple Chicken Cheeseballs with a Kick
  • Simple Beanie Weanies
  • Simple Crock Pot BBQ Spareribs
  • Simple Pizza Chicken Bake
  • Simple Italian Chicken and Green Bean Bake
  • Last Minute Creamy Bacon Spaghetti
  • Simple Hamburger Soup

It’s recipes like this that makes Simple Meals such a life saver for families. We’ll provide the plans. We’ll provide the recipes. We’ll provide the grocery list. All you have to do is take a deep breath and enjoy how simple your life in the kitchen has become! Join Simple Meals!

728x90


Heavenly Homemaker's Club Members: Access your homepage and all your fantastic resources here! Not a member yet? Please join us!

Simple Bacon Ranch Chicken

November 3, 2016 by Laura 11 Comments

This post may contain affiliate links which won’t change your price but will share some commission.

You probably saw the title “Simple Bacon Ranch Chicken” and thought to yourself, “Well, with ingredients like that, you can’t go wrong.” Right? Is that what you were thinking?

simple-bacon-ranch-chicken-1

Indeed. With ingredients like bacon, ranch, and chicken you know it’ll be a great combination of flavors. And did I mention you top it all with cheese? Mmmhmm!

Now let me get you even more excited by letting you know that these four ingredients can be put together in a dish with about 5 minutes of effort. You know that’s my favorite way to cook right now. The simpler the better – healthy whole foods with plenty of time to enjoy family time.

The last time I made this chicken dish, I let it bake while I steamed some green beans, stir-fried some asparagus, and cut up a cantaloupe. Clean up was minimal. The combination of flavors was wonderful.

TIP: If needed, put this together quickly in the morning, cover, and put it in the fridge. In the evening, slide it into the oven for an effortless meal!

Simple Bacon Ranch ChickenYum

Simple Bacon Ranch Chicken
 
Save Print
Author: Laura
Serves: 4-6
Ingredients
  • 4-6 chicken boneless breasts or thighs
  • ½ pound bacon
  • ½ cup ranch dressing*
  • 1 cup shredded cheddar or Colby jack cheese
Instructions
  1. Lay chicken pieces in the bottom of a 9x13 inch baking dish.
  2. Spread ranch dressing over the chicken.
  3. Lay strips of uncooked bacon over the ranch-covered chicken.
  4. Sprinkle cheese over the top.
  5. Bake, uncovered, in a 350 degree oven for 25-45 minutes or until chicken is no longer pink.
3.4.3177

*Find my Ranch Dressing recipe here.

simple-bacon-ranch-chicken

Want some more Simple Recipes? Here are others I’ve shared recently:

  • Simple Baked Salmon and Asparagus
  • Simple Crock Pot Chicken Soup with a Kick
  • Simple Skillet Taco Pasta
  • Simple Sweet and Sour Baked Chicken Legs
  • 20-Minute Taco Soup
  • Simple Cheesy Baked Chicken
  • Simple Creamy Chicken Stew in the Crock Pot
  • Simple Italian Beef and Broccoli Skillet

Those simple recipes are just the beginning. We’re taking it all to the next level so that not only are our recipes easy and nourishing – you don’t even have to think about what to prepare or purchase! Jump in with all the others who have joined…

Simple Meals

page_header

Here’s what Chelsea said about Simple Meals: I signed up for this and I’m very excited about it. It takes me about 4 hours each time I menu plan and make my list but for .81 per week, you do it for me. It’s a small price to pay for my busy family to eat well thought out, whole foods. I compared prices and recipes to other services before signing up and this was the best fit by far. Thank you!!

That is exactly what I was going for when the idea of Simple Meals came to be!

Check out Simple Meals, take advantage of the lovely coupon savings, then promote it yourself so you can earn some great referral money!

Heavenly Homemaker's Club Members: Access your homepage and all your fantastic resources here! Not a member yet? Please join us!
Next Page »

Join Our Community!

 Facebook Twitter RSS E-mail Instagram Pinterest

Popular Posts

~ Will All of the Real Moms Please Stand Up?
~ Easy! Stir-and-Pour Whole Wheat Bread
~ How to Make Gatorade
~ 31 Real Food Breakfast Ideas
~ Dear Teenage Girls...
~ When Mom Takes a Step Back
~ The Inexpensive Health Insurance We Love!
~ Let's Talk Real Food Grocery Budgets

Check out our latest posts!

  • Inexpensive and Fun Valentine’s Day Treats
  • Easy Chocolate Waffles
  • 4 Meals You Can Make for $1/Person
  • Easy Chili Cheese Dip
  • How to Make 5 Meals with 1 Pork Roast
Home  ~  Simple Meals  ~  Club Membership  ~  Shop  ~  Privacy Policy  ~  Disclosure  ~ Contact

Copyright © 2023 · Beautiful Pro Theme on Genesis Framework · WordPress · Log in