Heavenly Homemakers

Encouraging women in homemaking, healthy eating and parenting

  • Home
    • About
    • FAQs
  • Recipes
    • Bread and Breakfast
    • Condiments
    • Dairy
    • Main Dishes
    • Side Dishes and Snacks
    • Desserts
    • Gluten Free
    • Instant Pot
    • Crock Pot
    • Heavenly Homemaker’s Weekly Menus
  • Homemaking
    • Real Food Sources
  • Store
  • Contact
    • Advertise
    • Disclosure
    • Privacy Policy
  • Simple Meals
  • Club Members!

How to Make Delicious Iced Coffee that is ACTUALLY Healthy

August 1, 2019 by Laura Leave a Comment

This post may contain affiliate links which won’t change your price but will share some commission.

It really is possible to make delicious Iced Coffee that is ACTUALLY healthy! And not that it matters, but is there anything prettier?

Yum

Confession: I didn’t take this photo. I grabbed it from an online photo subscription source that I love to utilize. Occasionally using their photos has enabled me to continue writing here since I don’t have the work time I used to have now that we have little ones in the house again! Without a doubt, their photos are better than mine anyway!

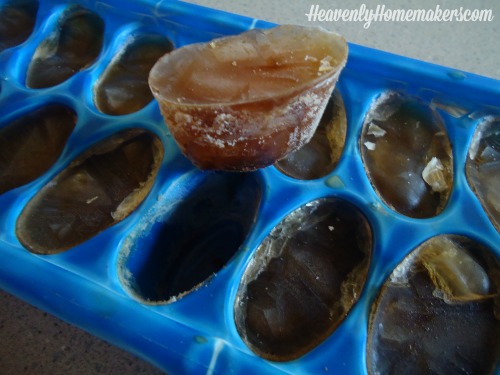
I tell you that for one big reason. When I make iced coffee, I use coffee ice cubes instead of water ice cubes. No need to water down our delicious coffee, right? And making coffee ice cubes is fun and easy!

There, now you know. Shall we talk about healthy iced coffee now?

How to make Iced Coffee that is Actually Healthy

1. I begin with a Dollar Coffee Club coffee packet. 

They have two coffee options, but I prefer the taste (actually, I love the taste!) of their Burn and Control coffee. Here’s a quick summary of why their coffee is actually healthy!

Dollar Coffee Club coffee (formerly known as Javita) is filled with fabulous God-given herbs and mushrooms that our bodies need for great health. We could grow these herbs ourselves and utilize them every day to help cleanse our systems, give us energy, regulate our blood sugar, and so much more. Or we can take advantage of the fact that the hard work has been done and the wonderful herbs are already prepared for us in these delicious drink packets!

Typically, I make my coffee packet into a regular hot coffee. But to make it into an iced coffee, I simply heat a little water and dissolve the packet in the hot water (about 3 Tablespoons). Then, I add cold water, my coffee ice cubes, and voila! I have healthy iced coffee!

2. Next, I add 1/2 and 1/2 or heavy cream.

Lest you fear that the cream makes the coffee unhealthy, I will remind you that it is a real, natural fat that our bodies recognize and can utilize for nourishment. Hooray for cream! This makes it sweet enough as for my taste and preference, therefore I declare that coffee with cream is absolute perfection! My family disagrees and prefers something sweet with their cream. And so…

3. They add this NuNaturals Chocolate Syrup.

It is sweetened with stevia, but you can’t even tell! My family is a bit picky over most stevia-sweetened treats. But this chocolate syrup wins them over and is perfect to add to coffee and cream for a fabulously sweet (but not sugary!) coffee treat!

So, coffee filled with wonderful, healing herbs, plus cream, with or without stevia sweetened chocolate. THAT is how you can make an iced coffee that is actually healthy!

Are you an iced coffee lover?

—-> Read more about Dollar Coffee Club coffee and other products here The entire business structure has been revamped, making it so much better for everyone! AND the prices had gone up, but they just went back down, oh yeah!<—-

Heavenly Homemaker's Club Members: Access your homepage and all your fantastic resources here! Not a member yet? Please join us!

Easy Low Sugar Strawberry Cream Cheese Cake

May 9, 2019 by Laura 2 Comments

This post may contain affiliate links which won’t change your price but will share some commission.

There are so many wonderful reasons to love the month of May. The school year ends (for most), the frigid weather finally becomes pleasant (in Nebraska), and strawberries are everywhere (in bowls, in plates, in my hand…). I will now introduce you to my most recent recipe experiment involving strawberries: Easy Low Sugar Strawberry Cream Cheese Cake.

This cake is moist. It’s flavorful. It’s low in sugar. It’s whole grain. It offers the wonderful taste of early summer joy. And friends, it is topped with Cream Cheese Frosting. I declare that to be the MVP of this cake – along with the strawberries, of course!

Cutting Back on SugarYum

If you’ve been around here long, you know that I’ve taken the liberty of cutting down the sugar in many recipes, making sure they still taste amazing. I believe a lower sugar ratio is something we can get our taste buds used to! I recommend cutting back on sugar gradually, starting with homemade desserts and muffins.

Hoping to cut back on sugar? Read some simple ideas here to help make that happen!

And now, I reward your cutting-back-on-sugar efforts by giving you this recipe:

Easy Low Sugar Strawberry Cream Cheese Cake

Easy Low Sugar Strawberry Cream Cheese Cake
 
Save Print
Author: Laura
Serves: 15
Ingredients
  • 2½ cups whole wheat pastry flour
  • ½ cup sucanat or sugar
  • 2 teaspoons baking powder
  • 1½ cups fresh or frozen strawberries
  • ½ cup milk
  • ½ cup sour cream
  • ½ cup melted butter
  • 2 eggs
  • 1 teaspoon vanilla extract
Instructions
  1. Combine dry ingredients in a bowl.
  2. Puree strawberries until smooth.
  3. Add pureed strawberries, milk, sour cream, melted butter, eggs, and vanilla.
  4. Mix with beaters until smooth.
  5. Pour into a buttered 9x13 cake pan.
  6. Bake in a 350° oven for 25-30 minutes or until a toothpick inserted in the middle comes out clean.
  7. Allow cake to cool.
  8. Frost with Cream Cheese Frosting (recipe options below)
3.5.3229

Want to keep the frosting low in sugar too?

Here are my favorite Low Sugar Cream Cheese Frosting recipes!

Stevia-Sweetened Cream Cheese Frosting

2 cups heavy whipping cream
2 Tablespoons softened butter
8 ounces softened cream cheese
1 teaspoon vanilla extract
Liquid stevia to taste (I use about 20 drops)

In a large bowl, whip cream until soft peaks form. Add softened butter, cream cheese, vanilla, and stevia – whipping until well combined and smooth. Spread over cooled cake. Store in refrigerator.

If you prefer, here’s a slightly sweeter but still not too sugary frosting option:

Maple Cream Cheese Frosting

8 ounces softened cream cheese
¼ cup softened butter
3-4 Tablespoons real maple syrup
1 teaspoon vanilla extract

With a hand mixer (or in your blender), whip together all ingredients until smooth. Spread over cooled cake.

Looking for more Low Sugar Recipes?

Here are just a few of our favorites!

  • Easy {Low} Sugar Cookies
  • Low Sugar Lemon Melt-Away Cookies
  • Low Sugar Almond Melt-Away Cookies
  • Low Sugar Orange Melt-Away Cookies
  • Low Sugar Lime Melt-Away Cookies
  • Low Sugar Strawberry Cheesecake Parfaits
  • Low Sugar Chocolate Fudge Cookies
  • Low Sugar Chocolate Cheesecake Parfaits
  • Low Sugar Pumpkin Cheesecake Cups
  • Low Sugar Sunshine Cake
  • Low Sugar Super Moist Chocolate Cake
  • Coconut Fudge Bars
  • Low Sugar Lemon Loaf
  • Low Sugar Oatmeal Cookies
  • Low Sugar Peanut Butter Cake with Peanut Butter Frosting
Heavenly Homemaker's Club Members: Access your homepage and all your fantastic resources here! Not a member yet? Please join us!

How to Cut Back on Sugar

May 7, 2019 by Laura 7 Comments

This post may contain affiliate links which won’t change your price but will share some commission.

We all know too much sugar isn’t good for us. Oh, but why must it taste so goooood???? It’s ok! We understand and we’re here to help. Here are some suggestions for how to cut back on sugar that are actually not terribly difficult!

How to Cut Back on Sugar

I’ll give you a step-by-step. BUT!!! If the order of these suggestions is too difficult for you, don’t give up and walk away! Instead, pick just one thing from the list that you feel is doable and go for it. Then once you’ve mastered that one thing, go on to another one. Put these in any order that works for you!


1. Wean yourself off of sugary drinks.

Are you drinking your sugar? Oooof, guzzling down the sugar in the form of soda or juice can be really hard on your body and your teeth. It’s amazing how much sugar is in just one cup of juice or soda. Work on weaning yourself back. You can do it!

Consider enjoying sugary treats only in the form of food instead of drinks. That way you can enjoy your sweet treats more, but will consume less sugar!

Suggestion:
These Javita drinks are delicious, healthy, and help provide a sweet drink that actually benefits your health!! My favorites are the Peach Mango (I drink one every morning to help with digestion), the Defend (I drink one every day to keep my immune system strong), and the Flex (I drink one every day to help with inflammation). I love that they taste sweet and are FUN!!! (Get more details about these drinks here.)

2. Put less sugar in your tea and coffee.

My southern sweet tea drinker friends are not gonna like hearing this one. ;) But what if, when making a gallon of tea, you start gradually cutting back on the amount of sugar you add? Your taste buds probably won’t even notice the difference if it’s just a little bit at a time.

And your coffee? Can you gradually start spooning in less sugar or pouring in less sugary, flavored creamer? If you like your coffee to be creamy and the idea of cutting back on creamer doesn’t appeal to you, I’d suggest still cutting back on creamer, but adding heavy whipping cream or half-and-half to provide the creaminess and even some natural sweetness!

Suggestion: Try adding a squeeze of this Stevia Sweetened Chocolate Syrup, plus some heavy whipping cream into your coffee! From college kid to adult to teen – everyone I’ve made coffee for like this has LOVED it and had no idea there was no added sugar!


3. Only eat candy on special occasions, or work to give it up altogether.

This is a tough one if you have some candy favorites that you consider staples for traveling or game watching or TV watching. But I’ve found that eating candy really ruins a persons desire for real fruit and other naturally sweetened foods. (Right? Who wants a real strawberry after eating licorice?)

Try to cut back on making candy a snack, and maybe only treat yourself on a special occasion here and there. Or stop eating it altogether so you can enjoy other sweet treats that aren’t so high in sugar!

Suggestion: Buy something fun like a box of this variety of Fruit Leather and let it become your “candy.” Now that I’ve stopped eating so much sugar, these really taste like candy to me – but they are 100% fruit!

4. Gradually add less sugar when baking homemade treats.

A few years ago I decided to start experimenting with regular cake, cookie, and muffin recipes to see if cutting back on the called-for amount of sugar would still turn out a good baked good. I have been so pleasantly surprised and pleased with this experiment! It doesn’t take nearly as much sugar as a recipe typically calls for to turn out a delicious cake, cookie, or muffin!

Don’t want your family to rebel against your cookies? Again, I recommend cutting back gradually until everyone’s taste buds have adapted to the lower sugar content. After a while, you’ll find that a treat made with full sugar will taste too sweet! How about that?

Suggestion: Check out this Low Sugar Treat list of recipes we’ve shared here!

  • Easy {Low} Sugar Cookies
  • Low Sugar Lemon Melt-Away Cookies
  • Low Sugar Almond Melt-Away Cookies
  • Low Sugar Orange Melt-Away Cookies
  • Low Sugar Lime Melt-Away Cookies
  • Low Sugar Strawberry Cheesecake Parfaits
  • Low Sugar Chocolate Fudge Cookies
  • Low Sugar Chocolate Cheesecake Parfaits
  • Low Sugar Pumpkin Cheesecake Cups
  • Low Sugar Sunshine Cake
  • Low Sugar Super Moist Chocolate Cake
  • Coconut Fudge Bars
  • Low Sugar Lemon Loaf
  • Low Sugar Oatmeal Cookies
  • Low Sugar Peanut Butter Cake with Peanut Butter Frosting

Why cut back on sugar?

Here are my top reasons to encourage a smaller sugar intake every day:

  1. Sugar kills our immune systems. It’s so much harder to avoid catching illnesses when we’re eating sugar!
  2. Sugar can make us fat. Boo, I know. Our bodies only need a small amount of sugar each day to help us function properly. After that small amount is used up, any extra we consume has no use inside our bodies, so it goes to our fat reserves. Yuck.
  3. Sugar wrecks our teeth. But we already knew that.
  4. Sugar tricks us into not eating other more nutritious foods. As I mentioned before, who wants a real fresh strawberry after you’ve eaten licorice? When we eat sweet treats, we are less hungry for nourishing, whole foods. So our bodies become depleted of nutrients, and we are more likely to get sick (see #1) or fat (see #2).

Well, that wasn’t much fun to read, was it? Never fear…

Cutting back on sugar is possible!

If I can do it, you can do it! Set some small goals for yourself and get started. You’ll be surprised by how one change can lead to another! Ready, set, go!


Heavenly Homemaker's Club Members: Access your homepage and all your fantastic resources here! Not a member yet? Please join us!

Easy Low Sugar Peanut Butter Cheesecake Balls

February 21, 2019 by Laura Leave a Comment

This post may contain affiliate links which won’t change your price but will share some commission.

I served these Low Sugar Peanut Butter Cheesecake Balls to a group of college kids, wondering what they would think since they were made with stevia. Five out of five college students were none the wiser, and declared this treat to be delicious. After all, how can we go wrong when cream cheese, peanut butter, and chocolate chips are the main ingredients?

I love having several jars of Homemade Peanut Butter on hand to use in quick recipes like this one. And of course, I like having several packages of cream cheese in the fridge, seeing as cream cheese makes everything better.

By the way, have you tried this Simple Cream Cheese Corn yet? Just when you think sweet corn can’t taste any better than it already does, you add cream cheese and it turns into a plate full of amazingness!

But back to the Peanut Butter Cheesecake Balls. Our 5-year old Bonus Boy and I were looking through Pinterest (a dangerous idea when you’re hungry) and found a recipe similar to this one. Since I had all the ingredients on hand to tweak it into a healthy treat for us, he and I got started mixing these up right away. Success! And according to college kids who didn’t know these were on the healthier side, no one can tell these are low in sugar. Double success!

Easy Low Sugar Peanut Butter Cheesecake Balls

Easy Low Sugar Peanut Butter Cheesecake Balls
 
Save Print
Author: Laura
Serves: 15-18
Ingredients
  • 8-ounces softened cream cheese
  • 3 Tablespoons creamy natural peanut butter
  • 20 drops liquid stevia
  • ½ cup mini chocolate chips
Instructions
  1. Stir cream cheese, peanut butter, and stevia together until well combined.
  2. Scoop out small balls of the mixture and roll the balls into a bowl of chocolate chips to coat them.
  3. Chill balls for at least one hour before serving.
3.5.3229

Here are some quick links to some of the finer ingredients in this recipe:

  • Homemade Peanut Butter
  • NuNaturals Liquid Stevia (my favorite brand)
  • Enjoy Life Mini Chocolate Chips (soy free!)

Want more Low Sugar Treat recipes?

[wp_eStore_fancy1 id=18]

Some of these links are my affiliate links.

Heavenly Homemaker's Club Members: Access your homepage and all your fantastic resources here! Not a member yet? Please join us!

The Easiest No-Churn Strawberry Ice Cream

July 23, 2017 by Laura 12 Comments

This post may contain affiliate links which won’t change your price but will share some commission.

As one who types for a living, I often find myself shocked at the words my fingers produce without asking me first. It’s as if they go on auto-pilot, typing with a mind of their own. There’s nothing I can do about this, and we can all be thankful for my ability to edit the words my fingers type without first asking my permission.

For instance, I’m so used to typing “Heavenly” (because I type HeavenlyHomemakers.com at least twelve times a day) that every time I write the words “heavy whipping cream” into a recipe my fingers automatically type “heavenly whipping cream.” In this case, I do think my fingers are brilliant because heavy whipping cream is quite heavenly, is it not?

The recipe I’m about to share with you happens to include said heavenly whipping cream. But also? According to my fingers that type on auto-pilot, this ice cream is of the un-churched variety. Sad, isn’t it? Allow me to explain…

strawberry ice cream

Without exception, each time I’ve typed the title of this recipe, it has come out like this: The Easiest No-Church Strawberry Ice Cream. Every single time. So this recipe is “the easiest” because you don’t even have to churn it. But no matter how much I concentrate on telling you that, my fingers type the words “No-Church” and this leads us to believe that this ice cream needs Jesus.

Do not miss the irony of this, because as we’ve already discussed, this “no-church ice cream” is made with none other than “heavenly whipping cream.” Thank you, fingers, for keeping me on my toes and confusing my brain. From now on, please let me tell you what to write instead of taking matters into your own hands. Literally.

The Easiest No-Churn Strawberry Ice Cream

5.0 from 1 reviews
The Easiest No-Churn Strawberry Ice Cream
 
Save Print
Author: Laura
Serves: 6-8
Ingredients
  • 4 cups heavy whipping cream
  • 3 cups fresh or frozen strawberries
  • Maple syrup to taste (1/4-3/4 cup)
  • 1 teaspoon vanilla extract
Instructions
  1. Blend all ingredients thoroughly until smooth, creamy, and slightly thickened.
  2. Pour mixture into a 9x13 inch pan.
  3. Cover and freeze for 2-3 hours.
  4. Scoop out ice cream and serve!
  5. If Ice Cream is in the freezer for a long time, simply set it on the counter for about 15 minutes before serving to make it easier to scoop.
3.4.3177

The Easiest No Churn Strawberry Ice Cream2

So as you can see, you don’t need to churn this Strawberry Ice Cream. And contrary to the message my fingers are trying to convey, you and I can actually take this to church if we want (because my fingers are not the boss of me.)

If we do take this treat to church and people ask how it’s made, we can tell them about the “heavenly whipping cream” that is the not-so-secret ingredient that makes the ice cream taste so good.

Who knew that an easy ice cream recipe could be the gateway to deep spiritual discussion? Who even knew?

Want more No-Churn Ice Cream recipes?

  • Low Sugar No-Churn Chocolate Ice Cream
  • Low Sugar No-Churn Vanilla Ice Cream

A note about sugar content:

In this Strawberry Ice Cream recipe as well as the Chocolate and Vanilla versions shared above, replace maple syrup with stevia or the other way around. My preference is to use about 1 Tablespoon of maple syrup and about 30 drops of liquid stevia. The stevia cuts the sugar content dramatically while the maple syrup takes away any bitterness the stevia leaves behind.

Enjoy not churning your ice cream. Or not churching it. Whatever.

Heavenly Homemaker's Club Members: Access your homepage and all your fantastic resources here! Not a member yet? Please join us!

Easy Low Sugar Pumpkin Cheesecake Whip

December 4, 2016 by Laura 1 Comment

This post may contain affiliate links which won’t change your price but will share some commission.

Who even cares about a cheesecake crust? I’ve always been in it for the cheesecake filling anyway. Therefore, I have been making Pumpkin Cheesecake Filling and eating it with a spoon right out of a bowl.

For breakfast.

pumpkin-cheesecake-in-a-bowl

The way I see it, I’m eating a vegetable for breakfast, so I’m getting nourishment. I’m also eating good fat, so I stay full for longer than five minutes.

What else? Well, there’s hardly any sugar in this, so I feel no guilt that way, nor do I experience a mid-morning sugar crash. I should add to all of the above that this Pumpkin Cheesecake Whip tastes like spoonfuls of holiday happiness.

So between the vegetable thing, the good fats, the low sugar content, and the fact that this tastes wonderful – I think our holiday season will continue to get better by the bowlful.

Also, it only takes five minutes to make. This is what every Christmas recipe should be like.

Easy Low Sugar Pumpkin Cheesecake WhipYum

Easy Low Sugar Pumpkin Cheesecake Whip
 
Save Print
Author: Laura
Serves: 6-8
Ingredients
  • 2 8-ounce packages softened cream cheese
  • 1½ cups heavy whipping cream
  • 2 cups pureed pumpkin
  • 1½ teaspoons ground cinnamon
  • ½ teaspoon ground nutmeg
  • ½ teaspoon ground cloves
  • 2 Tablespoons real maple syrup plus liquid stevia to taste (I used 2 droppers full of stevia)
Instructions
  1. Blend all pumpkin cheesecake filling ingredients together until smooth.
  2. Chill in refrigerator for at least two hours before serving.
3.4.3177

easy-low-sugar-pumpkin-cheesecake-whip

Now let’s just say you’re a “gotta have a cheesecake crust” sort of a person. This is no problem. I have a crust recipe that is also low in sugar and incredibly delicious. You’ll find this recipe here.

no-bake-pumpkin-cheesecake

Or say you want a cheesecake crust, but you also want your cheesecakes to be cute and little and ready to serve to individuals. This is also no problem. I have Pumpkin Cheesecake Cups for you. You’ll find that recipe here.

Pumpkin Cheesecake Bites

Now, it doesn’t take too much reading to realize that these are all the same recipe, just tweaked slightly to make them crustless, regular crust, or individual cup-sized crusts. We aim to please, and also we are suggesting that you eat cheesecake for breakfast, so now’s who’s your best friend?

No need to answer that. I mean, go ahead, though, if you want to.


Heavenly Homemaker's Club Members: Access your homepage and all your fantastic resources here! Not a member yet? Please join us!

5-Minute Low Sugar Peanut Butter Ice Cream (No-Sugar Option!)

July 25, 2016 by Laura 4 Comments

This post may contain affiliate links which won’t change your price but will share some commission.

Of all the low sugar, no churn ice creams I’ve tried and loved, I like this Peanut Butter Ice Cream the best.

Low Sugar Peanut Butter Ice Cream

This time around, I tried using only stevia. The result?? Well…if you’re used to not eating any sugar, a stevia-only ice cream will taste very good to you. But if you’re used to sugar or even maple syrup? A stevia-only ice cream will only taste so-so.

Therefore!! I suggest using a combination of both. Sweetening your ice cream with mostly stevia (to give it the sweetness it needs) and a tiny bit of maple syrup (to take away any bitterness) seems to be the perfect combination. The second time I made this, instead of using only stevia, I used 2 droppers full of stevia and 1 Tablespoon of real maple syrup. Boom. Major hit – even with others who are used to eating sugar!

As always, feel free to sweeten this according to your preferences, needs, and tastes. I’m just thankful I can continue to make low sugar, super lazy ice cream in fun varieties! What a fun treat!

Low (or no!) Sugar Peanut Butter Ice Cream

5-Minute Peanut Butter Ice Cream (No-Sugar Option!)
 
Save Print
Author: Laura
Serves: 6
Ingredients
  • 2 cups heavy whipping cream
  • ¾ cup natural peanut butter (I use homemade, creamy)
  • 3 droppers full of liquid stevia (or 3-4 Tablespoons real maple syrup or a combination of some stevia and some syrup)
  • 1 teaspoon vanilla extract
Instructions
  1. Blend ingredients together with a hand mixer or in a high power blender until they have thickened - but have not yet turned into stiff whipped cream. (The mixture should still be runny.)
  2. Pour mixture into a small casserole dish.
  3. Cover and freeze for about three hours.
  4. Scoop and serve right away.
  5. If ice cream is left in the freezer overnight, you may need to let it sit on the counter a few minutes before serving!
3.4.3177

Low Sugar No Churn Peanut Butter Ice Cream

Other Low Sugar, No Churn Ice Cream Recipes:

  • Low Sugar Vanilla Ice Cream
  • Low Sugar Chocolate Ice Cream

Have you tried any of these recipes? Someone suggested adding some arrowroot powder to the mix to make the ice cream more scoopable. I’ve not tried it because I’m out of arrowroot. What are you finding that is working for you with these ice cream recipes?

Heavenly Homemaker's Club Members: Access your homepage and all your fantastic resources here! Not a member yet? Please join us!

Low Sugar Pumpkin Cheesecake Cups

November 24, 2015 by Laura 4 Comments

This post may contain affiliate links which won’t change your price but will share some commission.

Pumpkin Cheesecake Bites

In preparation for Thanksgiving Day, I made a big Turkey, Cheesy Mashed Potatoes, Gravy, Stuffing Muffins, Green Bean Casseroles, Sweet Potatoes, Cranberry Sauce, Pineapple Fluff Salad , Pumpkin Pies, Pecan Pie Bites, Whipped Cream, and Apple Pies. I know what you’re thinking. You’re thinking the same thing I’m thinking. There may not be enough food! What will we do if we run out of food?

So I made more food. Just in case, you know?

Actually, I’m not worried about having enough food. But looking over that list, there is a definite shortage of cheesecake. It also occurred to me that I might enjoy a low sugar dessert on Thanksgiving day. That is why I took my Low Sugar Pumpkin Cheesecake recipe and adapted it to make fun these Pumpkin Cheesecake Cups.

We can all sleep better now knowing that along with the other 26 dishes on the Thanksgiving buffet, there will also be low sugar cheesecake. I’m not sure the day would have been complete otherwise.

Low Sugar Pumpkin Cheesecake Cups

Yum

Low Sugar Pumpkin Cheesecake Cups
 
Save Print
Author: Laura
Serves: 24
Ingredients
  • Shortbread Crust:
  • 3 cups whole wheat flour (I use freshly ground hard white wheat for this)
  • ½ cup sucanat (or brown sugar if you prefer)
  • 1½ cups melted butter
  • Pumpkin Cheesecake Filling:
  • 2 8-ounce packages softened cream cheese
  • 1½ cups heavy whipping cream
  • 2 cups pureed pumpkin
  • 1½ teaspoons ground cinnamon
  • ½ teaspoon ground nutmeg
  • ½ teaspoon ground cloves
  • Real maple syrup or liquid stevia to taste (I used 4 droppers full of stevia)
Instructions
  1. Make crust by stirring flour and sucanat together in a bowl.
  2. Add melted butter, combining well.
  3. Press mixture into 24 paper-lined muffin cups.
  4. Bake in a 350° oven for 10-15 minutes or until golden brown.
  5. Allow crust to cool completely.
  6. Blend all pumpkin cheesecake filling ingredients together until smooth.
  7. Scoop into prepared shortbread crust cups.
  8. Spread until smooth.
  9. Chill in refrigerator for at least two hours before serving.
3.4.3177

I found it fun to use fall-colored muffin cup liners for the occasion. Come Christmastime, I’ll use red and green. :)

Low Sugar Pumpkin Cheesecake Cups

I made the filling with stevia and was concerned that others might not like them as a result. But since the shortbread crust has a little sucanat and is so buttery and yummy, that balances the taste out for others. As for me, I think they are perfectly sweetened. In fact, I’m having to hold back to save the majority of these for Thanksgiving day. After all, there would be a definite void on the table if there were only 26 food choices and no cheesecake whatsoever.

Here’s to a wonderful holiday weekend! Happy Thanksgiving!

Heavenly Homemaker's Club Members: Access your homepage and all your fantastic resources here! Not a member yet? Please join us!

Low Sugar Sunshine Cake

July 2, 2015 by Laura 8 Comments

This post may contain affiliate links which won’t change your price but will share some commission.

Of course I named this “sunshine cake.”

sunshine cake 12

I don’t know if you know this about me or not since I hardly ever mention it or at the very least I haven’t said it in the past five minutes – but here it is: I LOVE SUNSHINE!!! I have decided that I need large doses of vitamin D in order to avoid all kinds of conditions and disorders. Bring on the hot, bright, beautiful days of summer!

My love of sunshine along with my love for this cake led me to call this recipe Sunshine Cake. Indeed, that’s exactly what this tastes like: a delicious drop of sunshine.

What does sunshine taste like, you ask? Well, it tastes like this cake. Do I need to keep explaining this?

If you can possibly believe it, I think I like this cake even better than the Low Sugar Super Moist Chocolate Cake – and we all know that I love that cake almost as much as I love sunshine.

Just like the chocolate cake, two key players in this recipe are whole wheat pastry flour and sour cream. The pastry flour helps this cake remain light, and the sour cream keeps it moist. But let’s not forget the Cream Cheese Frosting. It goes without saying that Cream Cheese Frosting makes everything in life better. Even cloudy days with no sunshine.

Low Sugar Sunshine CakeYum

Low Sugar Sunshine Cake
 
Save Print
Author: Laura
Ingredients
  • 2⅔ cups whole wheat pastry flour
  • ½ cup sucanat or sugar
  • 2 teaspoons baking powder
  • 1 cup milk
  • ½ cup sour cream
  • ½ cup melted butter
  • 2 eggs
  • 1 teaspoon vanilla extract
Instructions
  1. Combine dry ingredients in a bowl.
  2. Add milk, sour cream, melted butter, eggs, and vanilla.
  3. Mix with beaters until smooth.
  4. Pour into a buttered 9x13 cake pan.
  5. Bake in a 350° oven for 25-30 minutes or until a toothpick inserted in the middle comes out clean.
3.4.3177

Stevia-Sweetened Cream Cheese Frosting

2 cups heavy whipping cream
2 Tablespoons softened butter
8 ounces softened cream cheese
1 teaspoon vanilla extract
Liquid stevia to taste (I use about 20 drops)

In a large bowl, whip cream until soft peaks form. Add softened butter, cream cheese, vanilla, and stevia – whipping until well combined and smooth. Spread over cooled cake. Store in refrigerator.

If you prefer, here’s a slightly sweeter but still not too sugary frosting option:

Maple Cream Cheese Frosting

8 ounces softened cream cheese
¼ cup softened butter
3-4 Tablespoons real maple syrup
1 teaspoon vanilla extract

With a hand mixer (or in your blender), whip together all ingredients until smooth. Spread over cooled cake.

Low Sugar Sunshine Cake

Tell me which Low Sugar recipes you’ve tried so far. Which are your favorite? Are you a chocolate or a vanilla kinda friend?

Heavenly Homemaker's Club Members: Access your homepage and all your fantastic resources here! Not a member yet? Please join us!

Make Orange Creamsicle Ice Cream – No Ice Cream Freezer Required

June 18, 2015 by Laura 2 Comments

This post may contain affiliate links which won’t change your price but will share some commission.

Orange Ice Cream

Knock, knock.

Who’s there?

Orange.

Orange who?

Orange you glad I didn’t bore you with the ridiculous banana knock-knock joke your three year old thinks is funny every time he tells it over and over? Between my four boys, I heard that joke 45,000 times. It was so hilarious every single time, of course. If you don’t know which joke I’m talking about, I am very, very jealous and and also very happy for you. Look it up if you must, but I’m warning you: do not tell your three year old.

All jokes aside, orange you excited to try this recipe? You should be! It’s very refreshing – and super easy. No need to dig out the ice cream maker and rock salt. You do need a high power blender, however. I invested in a BlendTec about a year ago, and I’m not sure how Ma Ingalls and I ever lived without it. That thing is a power horse and makes my kitchen life so much easier. I probably use it three times every day – no exaggeration.

But speaking of exaggeration, check out this orange:

orange ice cream 1

I got two of these giants in my Bountiful Basket order last week. As you can see, this one was so huge, I could barely hold it in my hand. This recipe calls for two medium-sized oranges. The above orange does not qualify as “medium-sized.” He is an over-achiever and we are so proud. I used about 1 1/2 of this size orange for this recipe. And really, this recipe isn’t rocket science because I don’t know what rocket science is and also because this recipe is flexible in its ingredient quantities. Just freeze some orange wedges and throw them in a blender with the other stuff and it makes a really great treat.

Knock, knock.

Just kidding.

Alrighty, here is the very easy recipe, which I found here and tweaked only slightly. Thank you for the great idea, SuperHealthyKids.com!

Low Sugar Orange Ice CreamYum

2 cups whole milk or coconut milk
2 medium-sized oranges
3 Tablespoons maple syrup or 20 drops liquid stevia
1 teaspoon vanilla extract

Peel oranges and divide them into sections. Lay them flat on a cookie sheet. Place them in the freezer for about two hours or until they are frozen solid.

Put half the frozen orange segments into a high power blender. Add milk and blend until smooth. Add remaining oranges, maple syrup or stevia, and vanilla. Continue blending until smooth.

Pour mixture into a 9×13 inch dish. Place in the freezer for 1-2 hours before serving. (If it is in the freezer longer than 1-2 hours, remove from freezer a few minutes before serving to make scooping easier.

Orange Ice Cream with dairy free option!

Do you have a BlendTec or other high power blender (like Vitamix)? What all do you do with it? Isn’t it great?!

 Some of the links in this post are affiliate links.
Heavenly Homemaker's Club Members: Access your homepage and all your fantastic resources here! Not a member yet? Please join us!
Next Page »

Join Our Community!

 Facebook Twitter RSS E-mail Instagram Pinterest

Popular Posts

~ Will All of the Real Moms Please Stand Up?
~ Easy! Stir-and-Pour Whole Wheat Bread
~ How to Make Gatorade
~ 31 Real Food Breakfast Ideas
~ Dear Teenage Girls...
~ When Mom Takes a Step Back
~ The Inexpensive Health Insurance We Love!
~ Let's Talk Real Food Grocery Budgets

Check out our latest posts!

  • Inexpensive and Fun Valentine’s Day Treats
  • Easy Chocolate Waffles
  • 4 Meals You Can Make for $1/Person
  • Easy Chili Cheese Dip
  • How to Make 5 Meals with 1 Pork Roast
Home  ~  Simple Meals  ~  Club Membership  ~  Shop  ~  Privacy Policy  ~  Disclosure  ~ Contact

Copyright © 2023 · Beautiful Pro Theme on Genesis Framework · WordPress · Log in