Heavenly Homemakers

Encouraging women in homemaking, healthy eating and parenting

  • Home
    • About
    • FAQs
  • Recipes
    • Bread and Breakfast
    • Condiments
    • Dairy
    • Main Dishes
    • Side Dishes and Snacks
    • Desserts
    • Gluten Free
    • Instant Pot
    • Crock Pot
    • Heavenly Homemaker’s Weekly Menus
  • Homemaking
    • Real Food Sources
  • Store
  • Contact
    • Advertise
    • Disclosure
    • Privacy Policy
  • Simple Meals
  • Club Members!

No-Bake Chocolate Fudge Bites (Low Sugar, Gluten Free, Dairy Free)

July 28, 2015 by Laura 7 Comments

This post may contain affiliate links. For more information, please see our disclosure policy.

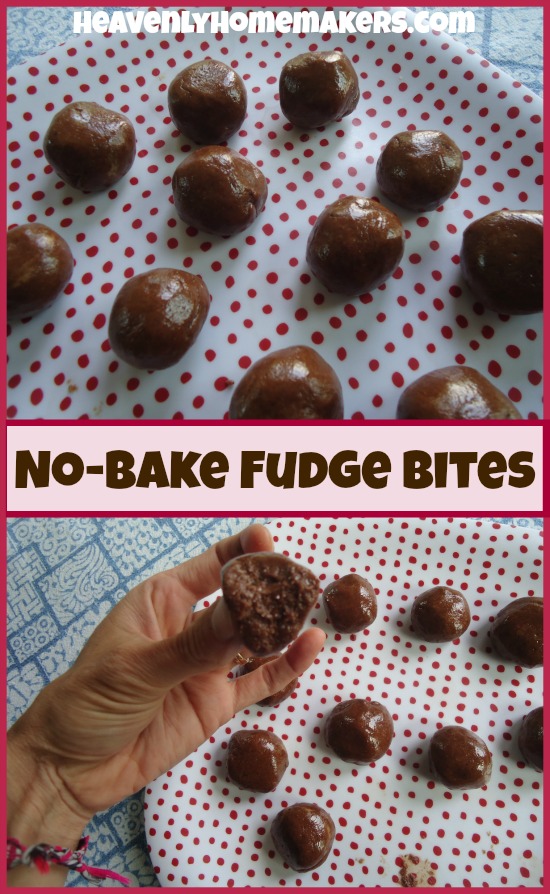
Happiness is found in No-Bake Chocolate Fudge Bites!

I always hesitate to put “Gluten Free” or “Dairy Free” in the title of a recipe. Why? Because some people see it and think, “I don’t need to eat gluten free (or dairy free) so I don’t need to look at this recipe.”

No wait! Come baaaaaaack! Do you eat apples? Strawberries? Chicken? Carrots? Then sometimes you eat gluten and dairy free. Right? Because that’s what those foods are, without even having to try.

There are soooo many foods that are naturally gluten and/or dairy free because God made a big variety of food to provide nourishment and balance. I wanted to put “GF” and “DF” in the title of this recipe so that the “GF” and “DF” people would know they could join this party. Everyone wins. Especially because this recipe involves chocolate. Amen and amen.

So gather around all you gluten free and dairy free and I can eat anything people. There are fudge bites to be had! These are cousins to No-Bake Snickerdoodle Bites (which are also GF and DF). Both of these snacks are awesome to have in the fridge for a quick pick-me-up.

Note: I noticed two things about this recipe when I tried them on my family:

  1. They were too sweet for me but my boys wished they were sweeter. Add or subtract that 1/4 cup honey amount as you wish.
  2. These tasted a thousand times better after they had been in the fridge an entire day. I don’t know why. Eat them right away if you wish, but chilling these in the fridge for over 24 hours makes these much fudgy-er and tastier.

No-Bake Chocolate Fudge BitesYum

5.0 from 1 reviews
No-Bake Chocolate Fudge Bites (Low Sugar, Gluten Free, Dairy Free)
 
Save Print
Author: Laura
Ingredients
  • 1 cup almond butter or peanut butter
  • ¼ cup honey (more if you prefer)
  • 1 teaspoon vanilla extract
  • 2 Tablespoons cocoa powder
  • ⅓ cup coconut flour
Instructions
  1. Mix the ingredients together in a bowl until well combined.
  2. Roll the mixture into teaspoon-sized (or whatever sized) balls.
  3. Refrigerate before serving.
3.4.3177

No-Bake Fudge Bites

Have you tried the No-Bake Snickerdoodle Bites yet? These No-Bake Bites are my favorite way to add coconut flour to our diet (which is rich in fiber, protein, and other great nutrients). It doesn’t hurt that they only take a few minutes and little effort to make. :)

~~~~~~~~~~~~~~~~~~~~~~~~~~~~~~~~

Heavenly Homemaker's Club Members: Access your homepage and all your fantastic resources here! Not a member yet? Please join us!

Gratituesday: How Much You Mean to Me

July 27, 2015 by Laura 25 Comments

This post may contain affiliate links. For more information, please see our disclosure policy.

I decided it’s high time I wrote another Gratituesday post. Please join me today as I celebrate God’s goodness in my friend Edith.

gratituesday[2]

She first emailed me in 2009 to say, “I want to tell you how much I enjoy your blog newsletters. I have shared many of them with our two daughters.”

That email came when my blog was a baby. She was one of my first blog followers. Her name was Edith. She was from Ohio.

Edith and I continued to email from time to time during the next few months. Then something I said in one of my posts sparked an interest, and would you believe? Her husband was born in the very same town where I grew up. Wonderful thing, this internet – connecting people who otherwise would not have met.

The email she sent in June, 2010 took our relationship to a new level. I had just written a blog post about our oldest son becoming a teenager. She wrote to tell me how wonderful teenagers are. Then she went on to say:

“Count your blessings every day – treasure every moment. And I know it’s trite, but do live each moment as though it truly were the last moment you have with your loved ones. We recently unexpectedly lost our elder daughter at age 36 in a matter of just a few hours.”

This began a friendship that was absolutely God given and beautifully selected. You see, the daughter Edith had lost was just my age. And my mom. Well, my mom had been gone already for a few years.

No one takes the place of a lost loved one. But Edith and I – well, I suppose we needed each other. She continued to send me emails of encouragement every few weeks, often to let me know she was praying for me. She sent me beautiful eCards for every holiday, which she personalized.

Edith loved me. Her love blessed me in ways I cannot describe. She was on my team. She was my prayer warrior. She was my friend. I loved her so.

Edith died unexpectedly last week. When I received the email from her younger daughter, who was so kind to think of me and share the news, I fell tearfully onto Matt’s chest. Not my Edith. I need my Edith.

I am going to miss this precious lady. Edith – the lady I never met face-to-face. The lady I could count on hearing from every few weeks as she cheered me on in my parenting, my writing, and my Christian walk.

My dear readers, I share this to let you know how much you mean to me. You’re not just “some people out there who read my blog.” You are a part of my life – a God given part that I do not take for granted. I treasure you and I am thankful for you.

When her oldest daughter died in 2010, this is what Edith said to me in her email:

“We are truly at peace even in our sadness. We know she’s having the time of her life in the presence of her beloved Lord and Savior. As her sister said, ‘She beat us home.’ And in that we rejoice.”

Now I say goodbye to my dear friend Edith, using her very words.

Thank you for loving me, Edith. Thank you for allowing God to work through you to be such a blessing in my life. I miss you already. But you’re having the time of your life in the presence of your beloved Lord and Savior. You beat us home. In that, I rejoice.

Heavenly Homemaker's Club Members: Access your homepage and all your fantastic resources here! Not a member yet? Please join us!

About Our Garden and Our Cat. Wait. We Have a Cat?

July 26, 2015 by Laura 27 Comments

This post may contain affiliate links. For more information, please see our disclosure policy.

Did I just say our cat?

I don’t even know where to start.

Mostly I want to tell you about our garden, but what I have to share isn’t terribly exciting because most of our garden produce isn’t ready yet. (Yes I know it’s almost August. It’s a Nebraska thing. It’s also a Coppinger thing as we got our garden planted a little bit late this year. We blame this on the Nebraska thing.) So just pretend to be interested when I say, oh look – it’s a picture of green tomatoes that aren’t ready to eat yet.

garden2

We do have a single yellow squash that appears to be an over-achiever. It got nice and big while we were away at camp, and while we wish it wasn’t so big and stringy, it will taste nice sliced and grilled along with some barbecue chicken. Otherwise though, there are no more squash ready.

garden1

As you can hopefully see below, we have two tiny zucchini which will be ready soon. All the squash plants are full of flowers, so in a couple weeks I’ll be begging you to come take some off my hands. At the very least, you should share your favorite squash recipes with me.

garden4

While we are lacking in abundant produce from our garden so far this year, there is one thing we are not lacking:

Bunnies.

I am here to tell you that bunnies are not cute. Bunnies are naughty. Like wag your finger and tsk like your great aunt naughty. Would you look at this?

garden5

What is that in the picture, pray tell? That is a nothing. It was a green bean plant. But now it is a nothing. We have two whole rows of nothings. That is because all the bunnies (every single one of them in the whole wide neighborhood) held a meeting to announce that the Coppinger fam was doing this thing called church camp which means that they were not around to say “scat bunny!” for 14 whole days. They decided to get their party on. In our garden. Within our rows of green beans. Naughty, naughty, naughty.

We have about 1.5 green bean plants that just might survive, which of course will feed our family of six for two bites each. This leads me to tell about our cat.

I can’t believe any of what I am about to write, mostly because we don’t have a cat, nor do we want a cat, nor do we want any pet at all because do I or do I not have enough mouths to feed said the mother of many, many teenage boys.

So this cat. It showed up in our yard over the weekend all hungry and meowy and stuff. Before I knew it, my husband – my husband – was outside giving it some milk. Wha??? We know better than to feed stray cats, do we not? I think we do. “Why are you doing that?” asked the mother of many, many teenage boys.

He was doing it because he was mad at the bunnies.

Oh, well in that case.

Wait. Wha???

No, but really. Matt explained to me (and I’m assuming he’s done hours of research on this) that bunnies do not like cats. Having a cat around might make the bunnies run the other way.

Being quite mad at the bunnies myself, I suddenly joined my husband in liking and wanting the cat.

Seriously, who is writing this? Like, want, cat, same sentence – I don’t even know who I am anymore. But I weighed the benefits. Bunnies eating all my bean plants or a cat rubbing its back against my porch rail? It’s a no brainer.

By the next morning, our ten year old had named the cat Wiggams (or Wigs for short) (or Wiggie if it’s being especially cute). He asked for string to play with it, and made it a home out of a cardboard box (because cats love this).

Then somebody else – who shall remain nameless – found herself scooping some pieces of chicken and tuna from the fridge onto a little plastic lid to put into the cat’s house, calling “here Wiggams” while doing so, because poor little Wiggie looked hungry and oh my goodness what in the world and who even am I??

So are you missing this cat? If so, call 555-BUNNIESARENAUGHTY. Trust that your cat is well fed but now answers to the name Wiggams. If you take the cat, you have to also take all of the bunnies.

cat1

I learned that if you say “look at the camera” to a cat, the cat will not respond accordingly. It’s like he doesn’t even appreciate the tuna. Dude. Wiggams. Just look up for a second.

cat2

Okay, then.

I suppose this story is “to be continued.” Stay tuned to hear more about garden produce and a camera shy cat named Wiggams. But not about fresh green beans -because bunnies are naughty.

Heavenly Homemaker's Club Members: Access your homepage and all your fantastic resources here! Not a member yet? Please join us!

The First Thing I Did When I Got Home From Camp – Plus What I’ll Be Up to This Week

July 25, 2015 by Laura 2 Comments

This post may contain affiliate links. For more information, please see our disclosure policy.

I bet you can guess. What’s the first thing I did the moment I got out of the van after being at camp for two weeks?

Okay fine. I went potty. But after that? Well, yes I started a load of laundry. But then??? Well I filled a glass of water to make sure I was hydrated.

But none of those count. What’s the really first thing I did after being away from my kitchen for two weeks?

groceries725Home from camp!

Ahhhhh, yes. I made a big price-matching list and headed to the store. The fridge was all but empty, we’re craving more fresh produce, and I’ve missed cooking. I loved the break (especially from the dishes!) – but I am so excited about being back in my kitchen!

I must admit that our three teenage boys are still at camp for another week and a half which means that I might have over-purchased just a wee bit. All you see in the picture up there? That’s just for Matt, Malachi (age 10), and me. We’re that hungry for freggies. I couldn’t hold back.

Case in point: Matt washed one of the containers of blueberries as soon as I gave him permission (aka, as soon as I got a picture taken – it’s a food blogger thing). I snagged a few of the berries as I scrubbed refrigerator shelves and put away groceries. A few minutes later, Matt appeared with the blueberry container and a grin. The blueberries were almost completely gone. The guy ate an entire pint (minus the 17 little berries I ate) in about 5 minutes. We’re craving this stuff, I tell ya.

Cravings aside, I would not have gotten 6 pounds of strawberries and 6 pints of blueberries for just the three of us – but I was able to price match them for just $1.00 each. Who can pass up filling the cart when they’re only a buck?? If we can’t finish them before they go bad, we’ll just freeze them for muffins and smoothies. It’s too easy.

So here’s what I’m thinking. I’m thinking that while I still just have one boy at home and therefore don’t need to prep large meals – I’m going to do some freezer cooking this week. My list is too long, which means I won’t likely get around to all of this since I have so much other work to catch up on after being away for two weeks. But here’s my crazy-lady list nonetheless:

1. Defrost the freezer.

We’re getting a quarter of grass-fed beef this week, so that along with putting prepped food in the freezer means I need to get rid of the terrible ice build up I’ve been ignoring for way too long.

2. Make a few batches of Strawberry and Blueberry Cream Muffins – freezing the batter to bake fresh later. (Read more about this wonderful freezer tip here.)

3. Work through my Eat Right Away Beef and Chicken Slow Cooker Editions to get easy meals in the freezer ready for upcoming school/soccer/busy days.

4. Make Whole Wheat Pizza Crusts for the freezer so the boys can quickly make their own pizzas on busy days.

5. Make and freeze Chicken Fried Steak Strips with the beef we’re picking up from the butcher.

6. Stop making this list before I become overwhelmed.

There are too many great freezer cooking ideas. I made myself stop adding to the list so I don’t overwhelm myself. I’ll take pictures of my progress throughout the week and share an update with you soon!

What are you going to be doing this week?

Heavenly Homemaker's Club Members: Access your homepage and all your fantastic resources here! Not a member yet? Please join us!

How to Store Leftovers in Jars

July 23, 2015 by Laura 80 Comments

This post may contain affiliate links. For more information, please see our disclosure policy.

This post was originally published in June, 2011. I still love jars.

It is no secret that I love jars.

Big jars, little jars, tall jars, short jars…they’re all useful. One of my favorite ways to use jars is to store leftovers.

Many have asked how in the world it works to store leftovers in jars – isn’t it hard to get the food in and out of the jar?? I have two words for you:  Wide Mouth. (No-no, I’m not calling you a Wide Mouth. Oh dear. I’m just saying that wide mouth jars are my favorite and the most wonderful for storing leftovers.)

The regular jars are fine and I like to use them for canning produce and such, but give me a wide mouth jar and I can do all kinds of things with it. You can fit your whole hand into a wide mouth jar, making it easy to wash or to put food in and take food out.

The best thing about having leftovers (and other food) in jars is that you can clearly see what is in the jar, unless of course the jar somehow got shoved to the back of the fridge and forgotten, causing it’s contents to change somewhat in appearance.  Not that any of us would ever let that happen.  But really, I can open my fridge and easily see if I need to make more Ranch Dressing, if we have any homemade sour cream, if we have enough cooked chicken to make dinner and what kinds of leftovers are available for lunch. As you saw in this post, my fridge is full of jars of all shapes and sizes. Let’s talk just a little bit about those jars, because many of you have asked what kind I have and where I get them.

Pint and Half Pint wide mouth jars are wonderful for storing leftover vegetables, small bits of casserole, little portions of leftover meat, etc. I have a nice variety of wide mouth pint and half pint jars that I can grab depending on what I need to store. These wide mouth pint jars are great for my homemade dressings and homemade peanut butter.

Someone gave me this set of Ball Wide Mouth 1/2 Pint Elite Jars for Christmas last year and I LOVE them. They are short and perfect for small amounts of leftovers. They’re also quite cute, not that it matters, but shucks cute jars are fun.

My favorite, favorite, absolute all time favorite kinds of jars for leftovers are the Elite Pint Sized jars.  When we were going through my mom’s canning supplies after she died, I found loads of them and brought them home. I love canning with them and using them for leftovers. They are the perfect size for me to use at least 80 different ways in my kitchen. And they are from my mama.  Of course I love them best.

I also use Quart Sized Wide Mouth Jars constantly, both for canning and for storing leftovers. I find the quart sized wide mouth jars work great for storing leftover soup, sloppy joe meat, cooked chicken, creamy mac and cheese, etc.

In addition, I have several sets of Wide Mouth 1/2 Gallon Sized Jars, which I use mostly for our milk, but also for chicken broth and large amounts of soup. I buy these Wide Mouth 1/2 Gallon Sized Jars from Azure Standard, but you can also get them from Amazon or sometimes at hardware stores.

Which leads me to:  Where is the best place to buy jars? That’s hard to say. You can get several different kinds from Azure Standard if this is accessible to you. The best place to find jars for very little money is yard sales or auctions.  I’ve also acquired many jars from people who are simply not canning anymore. It pays to ask around to see who might have jars they’re not using anymore – they are usually happy to get rid of them!

If you’re going to purchase jars, like some of the specialty sizes I mentioned such as the Elite which are harder to find, I’d say you are making a pretty good investment. They’re less expensive than tupperware, and because they are glass, they are safe and will not leach plasticy chemicals into your food. Being able to see your food in the fridge is an invaluable time saver.

By the way, I love having a drawer full of Wide Mouth Plastic Lids, which makes it super simple to fill the jar and throw leftovers in the fridge. I have Regular Mouth Plastic Lids as well, I love having both. They’re so clean and nice!

One last thing:  for storing leftovers like lasagna or hamburger patties – foods that would be hard to put into a wide mouth jar, I love having these Pyrex dishes with lids. They are fantastic for storing leftovers and warming them up in the oven or toaster oven right in the dish.

Phew. Well, you just found out way more about my leftovers than you ever wanted to know. Again, let’s just be clear that I was not calling you a Wide Mouth. Although, after reading my post, you would realize that even if I was calling you a Wide Mouth (which I wasn’t), it would have been a compliment.

How do you store your leftovers?

Heavenly Homemaker's Club Members: Access your homepage and all your fantastic resources here! Not a member yet? Please join us!

Some Of My Favorite Summer Kitchen Tips

July 21, 2015 by Laura 1 Comment

This post may contain affiliate links. For more information, please see our disclosure policy.

I’m at church camp teaching Bible classes and have been since July 12. Since there are not 42 hours in a day, there was no way to get ahead on two week’s worth of writing before I left. Therefore, today I am offering you a little more linky love from past posts. Summer kitchen tips are always welcome, right?

But first, let us be amazed together. While you’re reading this on July 24th-ish, I really put this together on July 8 because I knew that for 2 weeks I would be unplugged. In summary, I’m not really here. It’s like I’m writing this for the future, but you’re reading it in the present, but these posts you’re about to click on were written in the past. I don’t know about you, but I find that completely fascinating. {snore}

So here you go – some of my favorite summertime kitchen stuff. Stay cool, friends. Stay cool.

Favorite Summer Kitchen Tips

Because Iced Coffee is da’ bomb: How to Cold Brew Coffee

How to Cold Brew Coffee

Then once you have that, you need to know How to Make a Healthy Homemade Chocolate Frappe.

Healthy Homemade Chocolate Frappe

Which means to need to know this lovely tip about Making Coffee Ice Cubes. (I promise these links are not all about coffee. See below.)

Freeze Coffee in Ice Cube Trays

You don’t want to rely on cereal every day, but you don’t really want to turn on the oven to bake muffins either. Here are 14 Oven Free Breakfast Ideas.

14 Oven Free Breakfast Ideas For Summer

While we’re at it, you probably want 10 Oven-Free Lunch and Dinner Meal Ideas too.

10 Oven Free Meals for Summer

If they haven’t taken over your life already, zucchini season is on the way. Here are 8 of My Favorite Ways to Use Zucchini.

Zucchini Recipes - Easy, Healthy, Delicious

Want a cold treat that doesn’t include high fructose corn syrup on a stick? Here are 10 Cold Treats That Are Good For You.

10 Cold Treats That Are Good For You

And with that, I’m gone again – even though technically I’m not really here, I’m just pretending to be here. What in the world?

Heavenly Homemaker's Club Members: Access your homepage and all your fantastic resources here! Not a member yet? Please join us!

You Know My Family Hasn’t Always Eaten Healthy, Real Food – Right?

July 20, 2015 by Laura 2 Comments

This post may contain affiliate links. For more information, please see our disclosure policy.

When people read about the way I feed my family now, many assume I’ve known about healthy eating forever and that nothing about this is difficult for me.

Not true. We have not always eaten healthy.

Several years ago (when my blog was a baby) I wrote a series sharing my family’s healthy eating journey. Ugh, was it ever a journey. It still is.

All the fears and unknowns that many of you feel when you start reading about what is healthy and what isn’t – I totally get it. I’ve been there. Sometimes I’m still there. I haven’t arrived at perfect eating and never will. I’m pretty sure it’s not even possible.

So to encourage you to take some baby steps and to reassure you that you are not alone – I’d love for you to go back and read through this series of posts: Our Healthy Eating Journey. If nothing else, you’ll enjoy reading about how I  became completely convinced that I should be eating organic food and free range everything, but like a crazy lady, I still guzzled down a Pepsi to go with my meals. (I told you. I get it.)

healthyeatingjourney

Our Healthy Eating Journey

  • Part 1 
  • Part 2 
  • Part 3 
  • Part 4
  • Part 5
  • Part 6
  • Part 7 
  • Part 8 
  • Part 9
  • Wrapping it Up

If you’re interested, we have put together a simple eCourse to walk you through some steps to begin your Real Food Journey. You can tailor make this to fit your family’s needs. It’s called You Can Do This! Because truly, you can, do this. :)

What are some steps you’ve taken on your healthy eating journey?

Heavenly Homemaker's Club Members: Access your homepage and all your fantastic resources here! Not a member yet? Please join us!

What to do with Stinky Shoes (Not that You Have Any of Course)

July 19, 2015 by Laura 25 Comments

This post may contain affiliate links. For more information, please see our disclosure policy.

You know what really stinks?

Shoes. After they’ve had feet in them.

And after they’ve gotten wet. Or sweaty. Or dirty. Or wet, sweaty and dirty. You may think something large and furry crawled into your closet and died. Oh no. It’s just the shoes.

Thankfully there is hope. You do not have to dread being in the same vehicle with (or within a ten mile radius of) the wearer of said shoes.

What to do with stinky shoes

Wad up a big bunch of newspaper and stick them down into the shoes for a day or two. Set them outside in the sunshine if possible. Severely stinky shoes may require a removal of newspaper and re-stuffing of fresh newspaper after the first day for a continued de-stinking treatment.

newspapershoessm

If you enjoy sitting back with a nice cup of coffee while reading your newspaper, I highly recommend reading the newspaper before wading them into the shoes as the newspaper not be nearly as enjoyable after taking on the stink of the shoe.

And now I will end this post by saying that I find it comical that only a weird blogger such as myself will take the time to snap a picture of newspapers stuffed into stinky tennis shoes.

This post was originally published in August, 2009.

Heavenly Homemaker's Club Members: Access your homepage and all your fantastic resources here! Not a member yet? Please join us!

The “I’m Not Here So You Might As Well Steal Everything From My Shop” Sale

July 17, 2015 by Laura Leave a Comment

This post may contain affiliate links. For more information, please see our disclosure policy.

No really. I’m not here. I’m at church camp and I’m mostly offline because the internet doesn’t like church camp as much as the rest of us do.

So while I’m gone, I figure you might as well go raid my shop. No really, go ahead. No one is watching. You won’t even have to sneak. I’m giving you permission.

Heavenly Homemakers Books and eCourses

I’ll even give you a coupon code – let’s call it LAURAISGONE – so that you can go fill your cart with anything you want (except for our printed items) at a 35% discount. Yep, 35% off!!!

To be clear: I’m nice, but if you buy any of our printed items with the coupon code I will reappear as soon as I’m able to refund your purchase and say, “Sorry, I’m not that nice and I can’t eat all of our printing and shipping costs.” So again: DO NOT use the code on our printed books. (Somebody sure is bossy. Good thing she’s gone.) <—Hey, I heard that.

The good news is, when you sneak into my shop you will find over 30 other e-products in our shop for immediate download. That’s a lot to pick from along with a very healthy discount.

So go to the Heavenly Homemakers Shop now. Spend as long as you want looking though all of the eBooks, Curriculum, eCourses, and more. Put everything you want (except the printed items – I can’t remember if I said that already) into your cart, then use the code LAURAISGONE to knock off 35% of your total.

You can use this code through Wednesday, July 22.

Okeedokee? Don’t have too much fun without me while I’m gone. But do enjoy the discount – on everything but the printed items. (I just can’t let it go.)

Heavenly Homemakers Shop is Here
Use the code LAURAISGONE for a 35% discount

Heavenly Homemaker's Club Members: Access your homepage and all your fantastic resources here! Not a member yet? Please join us!

Switching to Whole Wheat Flour – making the transitions easier

July 16, 2015 by Laura 111 Comments

This post may contain affiliate links. For more information, please see our disclosure policy.

This post was originally published in February, 2011.

simplesteps

I want to take some time to address some of the many whole wheat flour questions I receive from those of you making the switch from white to brown. So many of you email me to say “I wish we liked whole wheat flour…we just don’t. What ideas do you have?” or “When I bake with whole wheat flour, my food often feels and tastes heavy and grainy. My kids won’t eat it.” or “Laura, you look really good with flour in your hair, what’s your secret for getting it right there on your bangs?” Just kidding about that last statement. Thankfully.

My suggestion (and hear me out on this, because I think I know all of your arguments) is…okay actually I have two suggestions.

Switch to Whole Wheat Flour

  1. Use a Grain Mill to grind fresh flour.
  2. Use Hard WHITE Wheat.

Here’s the deal:  I have NEVER liked store-bought whole wheat flour. Still don’t like it very much. The idea of switching to whole wheat flour to me was NOT appealing and I DIDN’T want to.

Until I had a piece of my friend’s bread made with freshly ground hard white wheat flour. That was all the evidence I needed.

I really didn’t believe her when she said that the bread was 100% whole wheat. It didn’t taste whole wheat. It didn’t look whole wheat. It didn’t feel whole wheat. Oh, but did it ever smell and taste good.

It was at that moment (after she answered more of my questions and after I talked it over with Matt of course) that I decided that I would save any extra money we had toward getting my own grain mill. The problem was…we had NO extra money to save toward a grain mill.

What I Did:

I started buying Hard White Wheat and letting my friend grind it for me. She was so sweet to do this, and it worked, but it certainly wasn’t convenient. I then began making these soft pretzels to sell at our local farmer’s market to save for my Nutrimill. It took just a few weeks before I had enough money saved. I ordered my Nutrimill right away! That was five years ago, and I’ve gotta say that saving up for and buying my Nutrimill was SUCH a great investment. My whole family thinks so.

Why Freshly Ground Flour Made from Hard White Wheat is Different (and tastes so good):

Well, fresh flour is…fresh. It’s amazing the difference in taste you’ll notice when you eat bread and other goodies made from flour that has been freshly ground. The whole wheat flour from the store is a little on the old side and is likely even to be rancid. It is usually often made from RED wheat.

Which leads me to my second point about why freshly ground flour from hard white wheat is different and tastes so good:  White wheat is lighter in texture and color than red wheat. Whole wheat flour made from Hard White Wheat produces lovely bread, tortillas, pizza crust, muffins…everything you need flour for.

The Question of the Hour:

But Laura, doesn’t white wheat turn into white flour?

Ah, I didn’t get that at first either. But NO, it absolutely doesn’t. Hard White Winter Wheat is simply a different variety of grain.  Hard Spring Red Wheat has the same nutritional value as Hard White Winter Wheat…but white wheat makes (in  my opinion) a nicer and more palatable whole wheat flour.

I think you’ll notice a big difference.

(White flour that you buy at the store, by the way, is flour made by sifting out the bran and germ after the grain has been ground. This was originally done to give it a longer shelf life. Now, unless otherwise noted, the white flour is bleached to make it whiter. Yum.)

What Do I Suggest?

See if you can find someone who has a grain mill and will let you try out freshly ground flour made from hard white wheat. Hey, if you come over to my place, I’ll let you try some of mine! (I may even share my secret of getting flour in my hair.)

If you like it (the freshly ground flour…not the flour in my hair), I recommend doing a little something to save up for a grain mill. I love my Nutrimill!!! Here’s a video of me showing how to use the Nutrimill. I love Paula’s Bread as your go-to source for purchasing a Nutrimill. She offers great prices and offers wonderful customer service.

And…you may want to look into this online Bread Class offered by Lori. She teaches you to use freshly ground flour to make a perfect loaf of bread…and other great baked goods too! It’s a very helpful class!

Lastly…I will recommend that if you just aren’t able to grind fresh flour right now, try to find store bought whole wheat flour made from white wheat, labeled, White Whole Wheat. King Arthur has a nice variety. It’s not quite the same (because it isn’t fresh), but it’s the best store-bought flour I’ve used.

Those of you who’ve been grinding your own flour…share what you love about it! How were you able to make the investment to get a grain mill? Which is your favorite grain mill and wheat to grind?

(You’ll find more posts I’ve written about grinding grain, where I recommend getting grain, which grain I recommend and ALL kinds of grainy questions answered in this section!)

Disclaimer:  No one here is going to force you to grind your own flour, eat white wheat or get flour in your hair. If you like flour make with red wheat, enjoy! If you can’t afford a grain mill, this is not a guilt trip. I’m just answering many readers’ questions. Hopefully you all found it helpful. And hopefully you are much cleaner bakers than I am. Not only is there flour in my hair, it is also on my kitchen floor and counter tops.  I need to go clean my kitchen. 

Heavenly Homemaker's Club Members: Access your homepage and all your fantastic resources here! Not a member yet? Please join us!
« Previous Page
Next Page »

Join Our Community!

 Facebook Twitter E-mail Instagram Pinterest

Popular Posts

~ Will All of the Real Moms Please Stand Up?
~ Easy! Stir-and-Pour Whole Wheat Bread
~ How to Make Gatorade
~ 31 Real Food Breakfast Ideas
~ Dear Teenage Girls...
~ When Mom Takes a Step Back
~ The Inexpensive Health Insurance We Love!
~ Let's Talk Real Food Grocery Budgets

Check out our latest posts!

  • Big Family Food and Fun: May 31-June 6, 2026
  • Big Family Food and Fun: May 24-30, 2026
  • Free 7-Day Summer Menu Plan
  • Big Family Food and Fun: May 17-23, 2026
  • Easy Side Dishes for Summer
Home  ~  Simple Meals  ~  Club Membership  ~  Shop  ~  Privacy Policy  ~  Disclosure  ~ Contact

Copyright © 2026 · Beautiful Pro Theme on Genesis Framework · WordPress · Log in