Heavenly Homemakers

Encouraging women in homemaking, healthy eating and parenting

  • Home
    • About
    • FAQs
  • Recipes
    • Bread and Breakfast
    • Condiments
    • Dairy
    • Main Dishes
    • Side Dishes and Snacks
    • Desserts
    • Gluten Free
    • Instant Pot
    • Crock Pot
    • Heavenly Homemaker’s Weekly Menus
  • Homemaking
    • Real Food Sources
  • Store
  • Contact
    • Advertise
    • Disclosure
    • Privacy Policy
  • Simple Meals
  • Club Members!

How to Keep a Good Attitude While Being Debt-Free

June 10, 2020 by Tasha Hackett 3 Comments

This post may contain affiliate links. For more information, please see our disclosure policy.

Sometimes being debt-free isn’t much fun.

When I look around at the world driving nice cars and eating at nice places and going on nice vacations I can get discouraged. But then I remind myself that I am choosing this! (And then I also remind myself that 80% of Americans are in credit card debt.)

“I’m choosing this!” is more than just semantics. That little phrase can change your life. Hear me out: If you’re on some kind of diet that doesn’t allow cake, it’s only because they didn’t know about Laura’s cakes. (Like this Low sugar Strawberry Cream Cheese Cake or this Low Sugar Banana Cake.) But let’s pretend you’re not eating cake because a diet book told you not to. So now you’re sad about not eating cake, and you sigh and feel bad for yourself because you really want cake and it’s all somebody else’s fault for deciding that high sugar and processed fats and carbs are unhealthy and you struggle with attitude problems every time you are put in a cake situation.

Let’s not blame the cake.

What if you turned the whole thing around and told yourself, “I’m choosing this!” Nobody is forcing me to give up anything. “I am choosing to make better food choices. Eating healthier options is my choice! I don’t even want all that cake because I know what’s in it, and it’s nothing good!” And then you can use your freshly ground flour to make your own densely nutrient cake and you can choose to have your cake and eat it too.

What if you wanted a new car instead of cake?

Something my husband and I have embraced the last few years of paying off debt is “We’re choosing this!” We are choosing to not spend money so that we can use it for other things. We could choose to not pay our bills, but then the electric company could choose to turn off our lights. If we choose to ignore our mortgage payment, the bank will choose to take our house. See how this works?

There are exceptions to everything.

I do understand there are times when life spirals out of control and things you had carefully planned fall apart. My sister was in a car accident years ago and was left with over $40,000 in uncovered medical bills. Sometimes the job situation doesn’t work out, I get it. But for the vast majority of Americans we have put ourselves in our own financial messes. We made the choice to move out of our tiny apartment to buy a house we really couldn’t afford. And we had such fun in that house! But if you give a man a house he’s going to want a dog to go with it… and a lawn mower and snow shovels and two cars and another phone and the internet and a video streaming plan and a grill and… and… before you know it, the $9/hour secretary job just isn’t enough.

We absolutely love being debt free.

I haven’t always had a great relationship with money. I would get so mad at people who said, “I can’t afford…” and yet they lived a lifestyle that said differently. But then I found myself saying, “I can’t afford…” and I realized it’s all in perspective. We made a combined total of $8000 our first year of marriage. As we worked more and made more we bought more and being debt-free wasn’t as much of a priority because we didn’t even know where the money was going. When I sit down and look closely at the choices we’ve made the past 12 years of marriage I can see huge financial mistakes we made that put us back. With each raise we started living just a little more comfortably. And that’s okay! That was OUR CHOICE. But to then go and say, “Well, I can’t afford…” doesn’t really make sense.

Being debt-free sometimes means making the choice to nail shingles on your own garage.

I’m choosing this.

When I say, “I’m choosing this.” It brings ownership back on my shoulders. Playing the victim isn’t possible with that phrase. I am choosing to save money! I am choosing to pay extra on the mortgage! I’m choosing to do family birthdays differently. I am choosing to live beneath my means because I have something better in mind for later. Here are some choices we’ve made and continue to make because we absolutely love being debt-free: Paying the internet bill instead of keeping chips on hand. Putting gas in the car instead of going out to the movies. Finding extremely loved used vehicles instead of buying new clothes for everyone in the family. Living in a 600 sq foot home until we got a better paying job in another state.

Being debt-free sometimes means making the choice to watch the sunset on a beautiful date on the prairie.

You get to choose!

I am giving you a phrase that has the power to completely change your outlook on life and money whether you are debt-free or not. “I’m choosing this!” You get to choose and you don’t have to be ashamed about it either. I am (97% of the time) not ashamed about the vehicles I drive because we bought them on purpose. We used to buy them on purpose because it was that or nothing. Now we buy used vehicles on purpose because we have really exciting plans for our money.

What are you choosing? Are you pleased with your choices?

My intention is most definitely not to make you feel bad about yourself or your money, but the opposite! If you find yourself feeling sad and thinking, “I can’t afford…” try pepping yourself up with a little “I’m choosing this!” attitude change. It could rock your world. And then go make cake. Because cake is yummy and actually quite affordable.


Laura’s friend Tasha is passionate about encouraging women. She’s a homeschooling mamaX4 who loves to make silly faces in the mirror with her toddler. She and her husband Ben have worked hard to be debt-free (except for their mortgage) and try to choose people over things everytime. She can be found playing on Instagram @hackettacademy and @heavenlyhomemaker and has too many hobbies to name. Most recently she’s been making chocolate cake for breakfast and sending her kids out to pick asparagus for lunch.


Heavenly Homemaker's Club Members: Access your homepage and all your fantastic resources here! Not a member yet? Please join us!

Easy Salads for Summertime

June 7, 2020 by Laura Leave a Comment

This post may contain affiliate links. For more information, please see our disclosure policy.

Need some easy salads for summertime?

I’ve confessed here before that I often just grab mixed greens out of the fridge and eat them on the fly. No dressing. No bowl. No fork. Mixed greens are finger food for this busy mom.

But do I truly enjoy them that way? Not really. I just eat them because I need them and know that they will give me nourishment. Weird and boring…I know. But it works because I need it to work.

Meanwhile, these awesome salad recipes are sitting here waiting to be actually enjoyed. They taste amazing, include fantastic and flavorful add-ins, and they don’t take a lot of time to prepare.

My favorite by far is this BLT Chopped Salad. Wow is this a fantastic combination of flavors! This salad is worth getting out a bowl and a fork for!

Some of the salads in this list are an entire meal all by themselves. Some make a wonderful side dish. All of them are wonderful to take on a picnic or potluck. Some have fruit, some include greens, some even include cream cheese because God is good.

Easy Salads for SummertimeYum

  • Bacon, Egg, and Avocado Salad
  • Black Bean Taco Salad
  • BLT Chopped Salad
  • Easy Taco Salad
  • Chicken Chef Salad
  • Tuna Salad
  • Perfect Pasta Salad
  • Simple Bacon Broccoli Salad
  • Easy Blue Raspberry Salad
  • Strawberry Spinach Salad with Vinaigrette
  • Easy Salsa Chicken Salad
  • Strawberry Christmas Salad
  • Pineapple Fluff Salad
  • Build-a-Fruit-Salad Bar
  • Hawaiian Fruit Salad
  • Simple Strawberry Fluff Salad

What are your favorite summertime salads?

Heavenly Homemaker's Club Members: Access your homepage and all your fantastic resources here! Not a member yet? Please join us!

Simple Salsa Burgers

June 3, 2020 by Laura Leave a Comment

This post may contain affiliate links. For more information, please see our disclosure policy.

Need a fun idea for a tasty new burger to grill this summer? You have to try these Simple Salsa Burgers!

Yum

You know me. I love to make food extra special, but I don’t like to spend a lot of time doing it. I’m simply not a gourmet cook.

But how easy is it to stir a little something special into regular ol’ hamburger meat? So easy. In fact, you might remember these three super easy Burger Recipes I’ve shared through the years:

  • Simple Make-Ahead Parmesan Burgers
  • Simple Cheese-Stuffed Burgers
  • Cheddar Ranch Burgers

Not that regular ol’ burgers aren’t pretty awesome in and of themselves.

But now we’ll do something wild and crazy and dump some salsa into our meat before we shape patties. If you want, you can also stir in some shredded cheese. We prefer to leave out the cheese and instead melt a slice of cheese on top of our Salsa Burgers.

And we like to top it with this Easy Guacomole. So good!!!


Simple Salsa Burgers

Simple Salsa Burgers
 
Save Print
Author: Laura
Serves: 8
Ingredients
  • 2 pounds ground hamburger
  • 1 cup salsa
  • 1 cup shredded cheese (optional)
Instructions
  1. Mix together ground meat and salsa.
  2. Stir in shredded cheese if you like.
  3. Shape mixture into 8 patties.
  4. Grill or fry per your preference!
3.5.3229

What are your favorite ways to make burgers?

~~~~~~~~~~~~~~~~~~~~~~~~~~~~~~~~~~~~~~~~~~~~~~~~~~~~~~~~~~~

Psssst! Everyone be sure to grab our Simple Real Food Recipes cookbook full of amazingly tasty and simple real food recipes like this one!

Heavenly Homemaker's Club Members: Access your homepage and all your fantastic resources here! Not a member yet? Please join us!

Final Day: FREE Family Size Bug Block Bar!

June 2, 2020 by Laura Leave a Comment

This post may contain affiliate links. For more information, please see our disclosure policy.

Don’t forget to get your free Family Size Bug Block Bar today!

Renee at MadeOn is so awesome to offer this for us! Don’t miss out. We love this Bug Block and use it all summer with our crew!

How to Get a FREE Non-Toxic Family Size Bug Block Bar

Get a free FAMILY SIZE Bug Block on MadeOn orders over $35.00!! This is so amazing, because the Family Size Bug Block Bar is normally $16.95. And we get it for FREE!!

To redeem, first place $35 worth of products in your cart, then add a Family Size Bug Block to your cart. At check out, apply code HHBUGBLOCK and your Bug Block will be free. (retail: $16.95)  Code expires Wednesday, June 3.

BONUS! When we spend $45, we also get free shipping! So when I took advantage of this offer, I put $45 worth of my favorite products into my cart, then the Family Size Bug Block, then the coupon code. So I got the free Bug Block and free shipping too!
Head to MadeOn to take advantage of this offer before it expires!
Heavenly Homemaker's Club Members: Access your homepage and all your fantastic resources here! Not a member yet? Please join us!

Calling all Kids!! Join us for a Kids Cooking Camp this Summer!

June 2, 2020 by Laura 22 Comments

This post may contain affiliate links. For more information, please see our disclosure policy.

We excitedly invite your kids to join our Kids Cooking Camp!

Don’t worry one bit about this whole camp thing being educational. The kids don’t have to know about that part. They’ll just think they get to make and enjoy treats like ice cream and mudballs and fruit dip. So what that they’ll learn some valuable cooking skills? Who cares that they’ll learn about family teamwork? Whatever that they’ll get to help with meal planning and meal prep? They won’t even realize they are learning because they will simply be having fun and doing something special just for them!

Aha! But it isn’t just for them. It’s for parents too! Because when the kids learn great cooking skills, the parents win big time!!!

This entire Kids Cooking Camp package is worth $99 because of its loaded content and lifetime access.

What is Kids Cooking Camp?

It’s an online “camp-in-the-kitchen” experience. Your kids can have fun with you, with their siblings, and/or with their friends and neighbors while enjoying the Kids Cooking Camp activities and recipes! Here’s what you and your kids will find when you first access this awesome online resource:

Heya Kids! Welcome to the Kids Cooking Camp!

We hope you’re ready to have some fun. Maybe you’ll learn a thing or two while you’re here?!? But mostly we want you to find some new favorite recipes and figure out some ways to have a blast in the kitchen!

  • To make this happen, we created a great list of Challenges and Activities for you to choose from.
  • Then we created an entire stack of printables for you to use as you work your way through the Challenges and Activities.
  • Of course, we put together huge lists of recipes that you can pick from and enjoy.
  • And we topped it all off with a Campfire. Because you can’t have camp without a campfire!

You’ll find a Parent Letter to give you more of the information you need. The huge list of delicious recipes is kid-friendly, easy, and fun. There’s even a brand new eBook full of Non-Food recipes (for things like slime and moon sand!!) to give your kids an extra fun recipe-reading-and-following experience.

Well, you just need to get signed up and dig in with your kids. That’s all there is to it. Then you can see for yourself how fantastic this is!!

Who is this Kids Cooking Camp for?

Really, it’s for kids of all ages.

Little ones can have fun doing activities and creating recipes with a grown-up. Older ones can take the entire package and run with it! And adults? Well, have I mentioned that we all get to eat the tasty treats our kids will be making?

Everything is great about this Kids Cooking Camp! Everyone wins!!

It’s so easy! We look forward to enjoying this with you and your family! Ready to dive in?

Enjoy our Kids Cooking Camp – awesome for everyone in your family – HERE —>

Maximum quantity exceeded
Minimum purchase amount of 0 is required
Maximum purchase amount of 0 is allowed
99.000


Heavenly Homemaker's Club Members: Access your homepage and all your fantastic resources here! Not a member yet? Please join us!

How I Get Ahead and Make Mealtime Less Stressful!

May 31, 2020 by Laura Leave a Comment

This post may contain affiliate links. For more information, please see our disclosure policy.

I have discovered lots of tricks through the years for putting meals on the table quickly and simply. But this is by far the best one I’ve found for how to get ahead and make mealtime less stressful!

How I Get Ahead and Make Mealtime Less Stressful

Ready for the tip? It’s simply this:

Make as much of your meal as you can before you actually need to serve it.

Eh?

Here’s an example: While my family was finishing lunch today, I made tonight’s Sloppy Joe Meat. Then I got out a couple of cans of pineapple, olives, and buns and set them on the counter. Carrots and ranch are already ready in the fridge to pull out. When dinner-time rolls around, I’ll simply warm up the Sloppy Joes and we’ll sit down and eat.

sloppy_joe_1

Why do I try to do this?

Well, right now we have eight kids living in our home. Five of those kids are high maintenance and some are even labeled “intensive.” So most of my time is spent caring for and chasing babies while helping traumatized teenagers learn better coping skills. Or I’m talking to case workers, or making therapy appointments, or changing diapers, or trying to help my older boys with whatever they need, and hey! I’m even trying to take care of myself too. Ah, and my hubby/favorite teammate. (UPDATE: I wrote and scheduled this post in April. We’re back down to just 7 kids for now. Praise God, he found other homes for the traumatized teenagers!)

All this – plus there’s all the normal laundry, food, and other homemaking tasks that need to be done.

So now more than ever, I’ve found that I must both keep our meals simple AND prep food ahead of time if possible. Otherwise meal prep is quite stressful.

I don’t always get food made ahead.

Not even close. Sometimes I’m throwing food together at the last minute. Sometimes I haven’t even had a chance to think of a plan for a meal before it’s actually meal time.

But if I possibly can, I try to think ahead and do as much prep as possible (and of course, I get every capable boy involved in helping with this prep!). Making food ahead is about the only way I can stay functional in my kitchen right now because we never know when someone might have a melt-down or a blow-out or another big need.

Ways to make food ahead of time

1. Make part of dinner during and/or after lunch. 

While the family is still at the table or still in the kitchen after lunch, it works wonderfully to get veggies chopped, meat browned, or at the very least needed ingredients rounded up for the evening meal. Our Take Ten Challenge books give you great options and tips to help with this!

2. Make breakfast after dinner.

This is the same concept as making dinner during lunch – but I find it’s key for being able to get ahead on all of our meals the next day. If I have an ounce of energy left after a long day, it’s nice to mix up tomorrow morning’s muffins or pancake mix or breakfast bars in preparation for the next day. Even if we’re just going to have cereal, I can have one of my kids get the boxes out along with bowls and spoons so we save a few minutes the next day.

There’s something really refreshing about waking up and knowing I don’t have to do much work before feeding everyone the first meal of the day.

3. Start a crock pot meal cooking right after breakfast.

This is even better than making dinner at lunchtime because the meal prep has been done before I day gets started!

4. Do some sort of meal prep any time you find a few minutes to spare.

Sure, sometimes we might feel like there’s not an extra 5-minutes anywhere in the day. Or it might seem like 5-minutes isn’t worth much. But I find it to be amazing what I can do with a spare 5-minutes here and there. That’s when I’ll grab ingredients for the next recipe I’m planning to make. Or throw meat into the crock pot and dump on sauce. Or wash some grapes and put them into a bowl for later. Or stir together a loaf of Stir-and-Pour Bread. Or start grinding wheat so that I’ll have flour ready to bake with another time. Or give instructions to my big kids about what they can put together for a meal.

What are some helpful tricks that help you get ahead in the kitchen?

Heavenly Homemaker's Club Members: Access your homepage and all your fantastic resources here! Not a member yet? Please join us!

Time Sensitive: How to Get a FREE Non-Toxic Family Size Bug Block Bar!

May 29, 2020 by Laura 1 Comment

This post may contain affiliate links. For more information, please see our disclosure policy.

Heads up! We can all get a FREE Family-Size Bug Block Bar, which is beyond perfect for us all this time of year! It’s non-toxic, free of Deet, and courtesy of MadeOn Hard lotion – my favorite lotion company!!!

I’ve been in happy denial that bugs are about to become a problem around here. So far we’ve played outside for hours, eaten lots of dirt, and have not been attacked by the swarms. Yet. I’d like to think it will stay that way. But who am I kidding? It’s almost summertime.


We love dirt. And mud. But not bugs.

You know that I’ve used MadeOn Hard Lotion for years and it has saved my skin! Then I started using their Bug Block and am so amazed by how well it works!!! So I keep a supply of both on hand at all times. Well, I keep the Bug Block on hand just during the summer/fall months. But still.

We always need several Bug Block Bars during the summer – some for home, some for the van, and several to send with all the big boys when they go to camp. Also, my bigs find this Bug Block especially helpful when they are out mowing lawns and doing other yard work.

How wonderful to find a product that works so well but that doesn’t hurt our skin and bodies!!

So Bug Block!! We can all get a big ol’ free one!!

How to Get a FREE Non-Toxic Family Size Bug Block Bar

Get a free FAMILY SIZE Bug Block on MadeOn orders over $35.00!! This is so amazing, because the Family Size Bug Block Bar is normally $16.95. And we get it for FREE!!

To redeem, first place $35 worth of products in your cart, then add a Family Size Bug Block to your cart. At check out, apply code HHBUGBLOCK and your Bug Block will be free. (retail: $16.95)  Code expires Wednesday, June 3.

BONUS! When we spend $45, we also get free shipping! So when I took advantage of this offer, I put $45 worth of my favorite products into my cart, then the Family Size Bug Block, then the coupon code. So I got the free Bug Block and free shipping too!

Here’s what I bought:

  • Simply Shea Facial Emollient x2 (because I love this for my hands and my face!)
  • Family Size Soothing Rash Cream (because the babies need this!)
  • Family Size Bug Block Bar (because it’s FREE and it WORKS!!!)

That order scored me the free bar and the free shipping. Plus all the great products I love to use!

Want to know more about the Bug Block?

From the MadeOn website: Bug Block doesn’t reek of chemicals, is free of Deet, and naturally nourishes your skin while keeping the pesky mosquitoes and bugs away.

The Bug Block not only acts as a lotion, but doubles as a bug repellent.

Ingredients: 76 degree naturally refined coconut oil, unbleached beeswax, naturally refined shea butter, essential oils of citronella, cedarwood, and rosemary.

No Deet!

Have questions about the essential oils used in our Bug Block? See full report here.

Features

  • Long-lasting lotion
  • Non-greasy
  • Nourishes extremely dry skin
  • Relieves some cases of mild eczema
  • Travel-friendly
  • Bug-repelling

We can get one for free!

This offer expires Wednesday, June 3. Head here to take advantage!

Quick rundown: Place $35 worth of products in your cart, then add a Family Size Bug Block to your cart. At check out, apply code HHBUGBLOCK and your Bug Block will be free.

OR place $45 worth of products in your cart to start with if you also want to get free shipping!


Heavenly Homemaker's Club Members: Access your homepage and all your fantastic resources here! Not a member yet? Please join us!

How to Make Stick-of-Butter Rice in the Instant Pot

May 27, 2020 by Laura 2 Comments

This post may contain affiliate links. For more information, please see our disclosure policy.

If you have an Instant Pot, this method for cooking Stick-of-Butter Rice cuts the cook time in half!

Yum

Once I learned to make Stick-of-Butter-Rice, I’ve never gone back to making it the “regular” way again. This recipe is TOO DELICIOUS. My entire family likes this – even the ones who never really cared about rice before. It’s the butter, of course. Also the onion. And the broth. The mixture makes incredibly tasty rice!

If you bake this recipe in an oven, it takes a solid hour. This is fine if you have an hour. If you don’t, and you have an Instant Pot, try it this way instead! It can be done in just a half hour!

I love making batches of rice ahead of time. Typically I’ll make this and use what we need for a meal, then use the rest to stir into recipes like:

  • Beef and Cheese Burritos
  • Chicken Burritos
  • Cheesy Beef and Rice
  • Spanish Rice

Then I can get two meals out of one!

Here’s how we often eat our freshly made rice, served with:

  • Hawaiian Crock Pot Chicken
  • Simple Overnight Saucy Crock Pot Chicken
  • Simple Overnight Melt-in-Your-Mouth Beef Roast
  • Simple Barbecue Beef Roast
  • Simple Hawaiian Beef Roast
  • Simple Crock Pot Salsa Shredded Beef

But truly, this rice is so flavorful that it’s perfect as a side dish all by itself. I think you’ll be like me once you try this and never go back to regular rice again!

How to Make Stick-of-Butter Rice in the Instant Pot

How to Make Stick-of-Butter Rice in the Instant Pot
 
Save Print
Author: Laura
Serves: 6-8
Ingredients
  • 2 cups brown rice (uncooked)
  • 2 cups beef or chicken broth
  • ¼ teaspoon sea salt
  • 2 Tablespoons dry minced onions
  • 1 stick of butter, cut into 6 chunks (1/2 cup)
Instructions
  1. Place ingredients in your Instant Pot and stir.
  2. Seal pot and cook on the manual setting at high pressure for 22 minutes.
  3. Allow the pot to release naturally after cooking.
  4. Stir and enjoy!
3.5.3229


Heavenly Homemaker's Club Members: Access your homepage and all your fantastic resources here! Not a member yet? Please join us!

Simple Way to Actually Save Your Cash

May 24, 2020 by Tasha Hackett 1 Comment

This post may contain affiliate links. For more information, please see our disclosure policy.

Wish you could actually save your cash instead of spending it? I love this helpful tip from Tasha!

Simple Way to Actually Save Your Cash

by Tasha Hackett

Saving cash sometimes doesn’t seem like much fun. Paying off debt was fun. So much fun? Yes. So much fun. We celebrated little victories all the time. “Yes! Another $1000 down!” or most often, “Another $50 sent off!” Woo-hoo! Paying off debt was so much fun, that we really don’t ever want to do it again. Therefore, saving cash for our next projects is almost as much fun. But, Tasha… How!?!?! How do you find room in your budget for all that extra cash?

There goes that “B” word again. That budget is a fantastic thing. If only I were disciplined enough to keep to a budget! Even after all these years, I’m still not super great at keeping one. If I want to buy a book for myself, and I do so love buying books for myself, I will usually buy it if there is money in the bank. My secret Pay-Off-Debt or Save-Up-Cash plan is simple:

Put the cookie jar on a higher shelf.

If you like to eat cookies and you’re sitting next to a jar of them, you are much more likely to eat them. If you take that cookie jar, place it up on a high shelf with a door that locks, it’s going to be a lot more work to get a cookie. Oh, you can still have one. But you’re not going to be able to sneak one as you walk through the kitchen on the way to the laundry room. You with me?

How badly do you want a cookie?

Just imagine! You have to go all the way to your underwear drawer to find the keyring with all the little keys, and then get a ladder and set it up, climb the ladder, carefully open the door, remove the jar, etc. I do like cookies. But I’m also a little bit lazy. So I don’t eat so many that way. And I surely don’t have kids asking for one all the time because not only is the cookie jar a lot harder to get to, but the kids don’t see it sitting there on the counter full of cookies! Not only does it have cookies in it, but it gets more put in every payday! (Because, in case you’ve forgotten I am talking about saving cash and not cookies. How silly to put cookies in a locked cupboard. Cookies are meant to be eaten… especially on the way through the kitchen to the laundry room. Especially these Super Soft Chocolate Cookies and Giant Breakfast Cookies and Sweet and Simple Cranberry Cookies.)

Saving cash is better than saving cookies.

Please don’t save the cookies. Eat them! You get a cookie! You get a cookie! Everyone gets a cookie! But the cash, we should be saving up some of it so we can buy the things we need. Like a new-to-us 1997 Buick, or a huge trampoline for the kids to work out some of their energy before they come back in for more cookies OR even possibly the down payment for the construction loan for the house we’re going to build next spring. (Yay!!!!!!)

No, I don’t lock my money in a cupboard.

I don’t have hoards of cash in my house. And if I did, I wouldn’t have just told you where it was. Sheesh. Simmer down, folks. But here’s the secret plan. You ready for it? Bank Transfer.

I actively take the money out of one bank and I electronically transfer it into another bank. Are you scratching your head wondering how this is helpful? Bank #1 is easy to access. I have a checkbook to Bank #1, I have a debit card for Bank #1, I have automatic payments and subscriptions, Paypal, and electronic payroll deposits go into Bank #1. The other account is difficult to get to: No check-books or debit cards. If I want money from Bank #2 I have to walk into the bank and request cash or transfer the money to Bank #1. (Warning: This is a terrible long-term savings plan. This is for funds you wish to access within a year.)

Here’s how we stash cash fast.

(Say that 10 times. I bet you can’t. I tried, I made it to four.)

Work (If we are paying debt or saving, we work some extra and hustle.)

Get paid

Deposit money into Bank #1

Budget for what is needed: Bills, Food, Gas, Clothes, School, etc.

Anything extra, no matter how meager, immediately transfer from Bank #1 to Bank #2

Congratulations! You just put the cookies out of reach

Repeat forever and ever amen. (Or until the cookie jar is full.)

Buy the thing with the cookies, I mean cash

In conclusion, stash the cash before rather than later. If I have an extra $5 hanging around, it will turn into a cookie and I will eat it.

How do you save money? Am I the only one who has to lock up the cookies on a higher shelf?


Tasha sitting at sewing machineLaura’s friend Tasha Hackett is a book writing, dress sewing, fitness coaching, instagramming, homeschooling mama of four. Whew! Sometimes she tries to do it all and then remembers she’d rather rest on a blanket in the grass and read picture books to her kids. When she’s not guest blogging here she can be found sneaking cookies instead of folding laundry, sewing instead of cleaning, writing instead of cooking, and reading aloud instead of teaching math.

Heavenly Homemaker's Club Members: Access your homepage and all your fantastic resources here! Not a member yet? Please join us!

Can You Save Money Making Vanilla Again?!

May 20, 2020 by Laura 21 Comments

This post may contain affiliate links. For more information, please see our disclosure policy.

It’s been a long time since I’ve been able to share this wonderful idea of making homemade vanilla! Is it possible that we can save money making vanilla again?

I did the math! I secured a discount! It’s possible! During this time when people are looking for ways to cut back and save money (and even make money) – I am so happy to share this idea again!

Laura’s Vanilla Bean and Homemade Vanilla Extract History

Way back in 2009, I discovered how wonderful it is to make homemade vanilla extract. The positives:

  • It is completely pure
  • It saved lots of money
  • It is beyond delicious
  • We could use half the amount of vanilla called for in recipes because this homemade vanilla is so strong, which results in even more money savings!

Many of you jumped on the Homemade Vanilla Extract train. It was so much fun!

Then a few years ago, there was a crop failure and the price of vanilla beans went through the roof. No longer was I able to share that we should all make vanilla. :( I kept waiting and waiting for the prices to finally go down. But year after year, the prices of vanilla beans have remained crazy high.

This, of course, has affected the price of pre-made vanilla extract at the store. I’ve watched those prices creep up through the years, too. Such a bummer!

But what if here in 2020 we can now make vanilla extract affordable again!!!

How to make homemade vanilla extract affordable

I have always purchased my vanilla beans online from Olive Nation. They consistently offer the best price for the highest quality. And because they like working with us here, they offer all Heavenly Homemakers readers a 20% off discount code (HOME)! Plus they offer free shipping on orders over $50!

I’ve checked their site for the past few years to see how the vanilla bean prices are doing. Ouch. They’ve been so high! And I’ve known that if they are high at Olive Nation, they are higher from other places. So I’ve waited.

This week I saw that one of their varieties of beans is LOWER again!!! (Plus they give us a 20% off discount when we use the code HOME at checkout.)

Of course, the price is higher than it was when I started making vanilla in 2009. But seeing as the price of almost everything is higher than it was in 2009, I can be okay with that. Especially since the price I found for beans today is finally making it a possibility for us all to make Homemade Vanilla Extract again!!

Take note: Your initial look at the current vanilla bean pricetag may shock you still. Vanilla beans aren’t cheap!! But that’s why I did a complete price breakdown for us so we can see that when it’s all said and done, our Homemade Vanilla Extract can be made for HALF of what we can purchase it for at the store!!

To make 1/2 gallon of Homemade Vanilla Extract you need:

  • 25 vanilla beans = $54 after coupon code HOME
  • Shipping = FREE on orders over $50
  • 1.75 liter bottle of vodka = Approximately $11

Total cost for 1/2 gallon of Homemade Vanilla Extract = Approximately $65

This breaks down to $1.02/ounces which makes 4-ounces of vanilla cost $4.08!

Compare this to the cost of lesser quality, but still good vanilla purchased elsewhere:

  • $15.77 for 4-ounces of Flavorganics brand at Azure Standard
  • $8.98 for 2-ounces of McCormick brand at Walmart (I couldn’t find a 4-ounce price to compare, but look at the huge savings compared to the 2-ounce price!)

BONUS

You can save your beans after you make a batch of vanilla and reuse them to make a second batch!!

I put my used beans into a lesser amount of vodka to get more bang for my buck. So for instance, for the first round, I use 25 beans in 1.75 liters of vodka. Then for the second round, I use the same 25 beans soaked in half that amount of vodka (.88 liters). The result is still amazing and I just spent a few dollars for a quart of great vanilla extract!

How to Make Vanilla Extract

5.0 from 3 reviews
Can You Save Money Making Vanilla Again?!
 
Save Print
Author: Laura
Serves: 64 ounces
Ingredients
  • 1.75 liters of inexpensive vodka
  • 25 Vanilla Beans enter code HOME for a 20% discount on Vanilla Beans through Olive Nation!!
Instructions
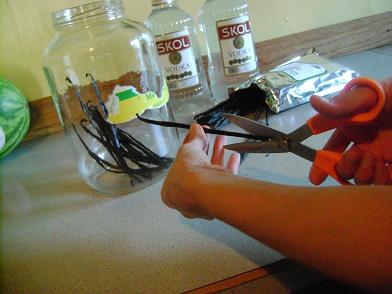
  1. Slice through each bean lengthwise, leaving about one inch at the top of each bean uncut so that it stays together.
  2. Place all of your cut Vanilla Beans into a half-gallon jar.
  3. Fill the jar with vodka.
  4. Secure the lid and put the jar in a dark place (like in the back of a cabinet).
  5. Allow it to sit and "extract" for 4-6 months.
  6. Every few weeks during extracting time, shake the jar to mix it up a bit.
3.5.3251

This vanilla extract is so strong that you can use 1/2 the amount called for in recipes to save yourself even more money. :)

Your Homemade Vanilla Extract is wonderful for your own use and to give as gifts!

Bonus Resources:

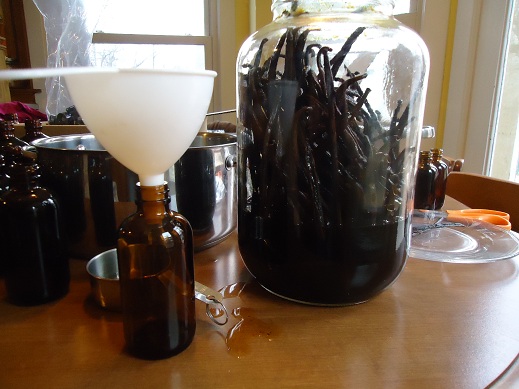
  • Read this post to learn how to finish and strain your vanilla after 4-6 months.
  • You can purchase dark amber bottles here.
  • Order personalized vanilla stickers for bottles and gifts here.
  • Get your beans here, and use the code HOME to get 20% off!
Heavenly Homemaker's Club Members: Access your homepage and all your fantastic resources here! Not a member yet? Please join us!
« Previous Page
Next Page »

Join Our Community!

 Facebook Twitter E-mail Instagram Pinterest

Popular Posts

~ Will All of the Real Moms Please Stand Up?
~ Easy! Stir-and-Pour Whole Wheat Bread
~ How to Make Gatorade
~ 31 Real Food Breakfast Ideas
~ Dear Teenage Girls...
~ When Mom Takes a Step Back
~ The Inexpensive Health Insurance We Love!
~ Let's Talk Real Food Grocery Budgets

Check out our latest posts!

  • Big Family Food and Fun: July 12-18, 2026
  • Big Family Food and Fun: July 5-11, 2026
  • Big Family Food and Fun: June 28-July 4, 2026
  • Big Family Food and Fun: June 21-27, 2026
  • Big Family Food and Fun: June 14-20, 2026
Home  ~  Simple Meals  ~  Club Membership  ~  Shop  ~  Privacy Policy  ~  Disclosure  ~ Contact

Copyright © 2026 · Beautiful Pro Theme on Genesis Framework · WordPress · Log in