Heavenly Homemakers

Encouraging women in homemaking, healthy eating and parenting

  • Home
    • About
    • FAQs
  • Recipes
    • Bread and Breakfast
    • Condiments
    • Dairy
    • Main Dishes
    • Side Dishes and Snacks
    • Desserts
    • Gluten Free
    • Instant Pot
    • Crock Pot
    • Heavenly Homemaker’s Weekly Menus
  • Homemaking
    • Real Food Sources
  • Store
  • Contact
    • Advertise
    • Disclosure
    • Privacy Policy
  • Simple Meals
  • Club Members!

Easy Alfredo Sauce

November 11, 2010 by Laura 92 Comments

This post may contain affiliate links. For more information, please see our disclosure policy.

High Five Recipes 2

I love a good alfredo sauce. Want to know why this recipe is so good and rich? It’s full of butter and cream. Indeed, this recipe is neither fat free nor dairy free. I am very much not afraid of real and healthy fat. For those of you who need to eat a dairy free diet, I’ll try to come up with something a little less “cow” next time. ;)

Easy Alfredo SauceYum

Easy Alfredo Sauce
 
Save Print
Author: Laura
Serves: 6 servings
Ingredients
  • ½ cup butter
  • One pint of cream (2 cups)
  • 1-3 garlic cloves
  • 2 Tablespoons cream cheese
  • ½ cup grated parmesan cheese
Instructions
  1. Bring the butter, cream, garlic and cream cheese to a boil.
  2. Turn down the heat, simmer and stir for about two minutes.
  3. Add the grated cheese and stir until melted.
  4. Simmer the sauce for 15-20 minutes until it becomes "thick and saucy", stirring occasionally.
3.4.3177

And now, a few alfredo pictures:

Into the pot go the butter, cream, cream cheese and garlic…

The parmesan cheese is shredded and ready to add once we’ve boiled the other ingredients for a couple of minutes.

Here’s our sauce, simmered and ready to serve…

OH. YUM.

pasta alfredo

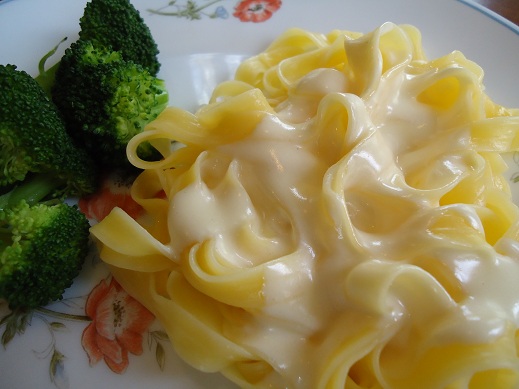
Are you wondering about the pasta I served with our Easy Alfredo Sauce? It looks like WHITE pasta, doesn’t it? Ah, but it isn’t!! I’m very excited to tell you that this was Gluten Free Corn Pasta  from OliveNation. My OliveNation friends told me that their GF pasta tasted awesome and wow they were right!!! It’s great stuff! AND, if you recall, just like with vanilla beans, OliveNation offers Heavenly Homemakers readers a 10% discount (use the code home).

Now, you can of course add chicken to this dish if you like. Just saute a little chicken in some olive oil and toss it into the sauce. For that matter, that steamed broccoli I served on the side tasted great stirrred right into the sauce and noodles on our plate!

Are you a red sauce or a white sauce kind of pasta lover? Or does it depend on the day?

Take a peek at all of our High Five Recipes –
High Quality Recipes…Five Ingredients or Less!

Heavenly Homemaker's Club Members: Access your homepage and all your fantastic resources here! Not a member yet? Please join us!

Eat Less Sugar

November 9, 2010 by Laura 39 Comments

This post may contain affiliate links. For more information, please see our disclosure policy.

simplesteps

You know why I’m writing this post? Because I need to hear it.

While our family has made huge strides over the past few years in Our Healthy Eating Journey, my one major struggle remains:  I really like sweets.

Yes, I’ve given up all forms of soda and have switched to healthy beverages. Yes, I’ve switched from white sugar to sucanat, honey or real maple syrup. So in those ways, of course I’m eating much healthier. But still, while these are healthier sugars and are much better than processed sugar…they are STILL sugar.

Too much sugar (in any form) can suppress our immune systems, mess up our blood sugar and insulin levels, make us feel sluggish, cause depression. Sugar can cause heart issues. Sugar can make us gain weight. 

Sugar tastes really, really good.

And sugar is addicting.

I’m not really convinced that any one of the Steps Toward Healthy Eating is more important than another. I truly think that each little (or big) thing you can do to improve your health is a step in the right direction whether it’s eating more fruits and veggies or switching to whole grains.  But doesn’t it sort of make sense that if you make all kinds of healthy changes, but you’re still eating a lot of sugary foods…you’re kind of taking some steps backward health-wise?  Our bodies are busy trying to make good use of all the healthy foods we’re feeding it, and sugar sort of sets us back one sweet morsel at a time.

Am I saying that we need to give up sugar altogether? Good grief, I hope that’s not what I’m saying. 

No indeed, I just had a meeting with myself and I have decided that we do not all have to give up sugar entirely. In fact, while giving up sugar entirely would be good for us in some ways, it may cause us to have an “all or nothing” mentality as in…eat no sugar for several days or weeks, then finally cave in and eat a whole bag of chocolate covered sugar with sprinkles, and a side of ho-hos.

I think that if we can achieve a healthy balance when it comes to sugar, our bodies will thank us, and so will our sweet tooth.

  • If you are in the habit of eating sweets during a certain time of the day, make a conscious effort to DO SOMETHING ELSE during that time period. Pray, read your Bible, call a friend, play a game with your kids, exercise, paint your nails…anything to distract you from your habit of sugary temptation. 
  • Eat fruit to satisfy sweet cravings. Fruit tastes so much better when your palate isn’t covered in sugar.
  • Instead of cookies and cakes, make sweet treats that are lower in sugar like muffins or a biscuit with a little honey drizzled inside.

Allow yourself some of your favorite treats every now and then. But you’ve gotta make those sugar calories worth it. Don’t settle for sour gummy goobers if you don’t even like them. Say NO to the sweets that you aren’t really big on and savor your favorites every once in a while.

So…what are your thoughts about eating less sugar? Is eating too much sugar a struggle for you? What tricks have you found to eat less and find a healthy sugar balance?

Be sure to read the other posts in this series: 
Switch from White to Brown; Eat Out Less; Invest Money in Good Food;
Healthy Beverages; Drink More Water;
The Decision to Eat a Healthy Diet; Eat More Fruits and Veggies

Heavenly Homemaker's Club Members: Access your homepage and all your fantastic resources here! Not a member yet? Please join us!

Cooking Ahead for November

November 8, 2010 by Laura 24 Comments

This post may contain affiliate links. For more information, please see our disclosure policy.

We had completely eaten our stash of frozen foods, so it feels good to have some healthy convenience foods back in the freezer again! I didn’t get everything made that was on my list, but shucks…I NEVER get everything done that is on my list. 

Can I tell you my biggest tip for making healthy convenience foods for your pantry and freezer? Don’t make freezer cooking difficult.  Just make extra food here and there as you are cooking and working in your kitchen. 

I have found that marathon freezer cooking doesn’t work for me. It wears me out and makes me feel behind in other areas. Instead, when I need to make Whole Wheat Tortillas, I’ll make a double or triple batch and freeze some for later. If I take the time once in a while to make a big bowl of Turkey Sausage and prep it for the freezer, then I’ve got Turkey Sausage ready for the next several weeks. If I am making one casserole, I’ll make three and freeze two. Cooking ahead really doesn’t have to be complicated.  I am always SO thankful for the healthy “go-to” foods in my freezer! 

Here are the extra foods that I’ve worked on during the past several days:

Applesauce Bread (x3)

Whole Wheat Waffles (x2)
We ate one batch for breakfast and I froze the rest. 

Whole Wheat Tortillas (x2)
Yeah, these are almost gone already. :)

Turkey Sausage (x6)
I froze sausage patties on parchment paper lined cookie sheets,
popped them off and put them into freezer bags for fast breakfasts and lunches.

Taco Seasoning, right there in my pantry next to a jar of Ranch Dressing Mix and Italian Dressing Mix. 
These mixes each take about five minutes to prepare, taste delicious, are SO much healthier and save a lot of money!!

Chicken Fried Steak Strips (x3)
Just like the turkey sausage, I prepped these, froze them on parchment paper lined cookie sheets
and put them into freezer bags for a quick lunch or dinner.

I am happy to report that the homemade, healthy poptarts I experimented with WORKED this time!!
I am sad to report that we ate them all already.
I am happy to report that I have the recipe written down and will type it out and share the EASY way to make these during the next week or two!!

Here are the items on my list that I just didn’t get around to making yet. Hopefully I will in the next few days…

  • Mini Apple Pies
  • Bean and Cheese Burritos
  • Whole Wheat Graham Crackers
  • Do you have anything yummy in your freezer, ready to pull out and fix quickly?

    Heavenly Homemaker's Club Members: Access your homepage and all your fantastic resources here! Not a member yet? Please join us!

    Menu Plan for the Week

    November 7, 2010 by Laura 20 Comments

    This post may contain affiliate links. For more information, please see our disclosure policy.

    Yesterday was Matt’s birthday, which means that he is now “as old as I am” again. I am an entire four months older than him and he has fun reminding me of that. :)  We celebrated with Cheesy Turkey Sausage Stromboli and Peach Cobbler, two of his favorites.

    Here’s what’s on the menu for this week:

    Sunday, November 7
    Oatmeal, pears
    Potato Soup, carrot sticks, fruit salad
    Corn Dog Muffins, apples

    Monday, November 8
    Chocolate chocolate chip muffins, oranges
    Taco Potatoes with lettuce and tomatoes, peaches
    Roasted chicken, potatoes, carrots, gravy, green beans

    Tuesday, November 9
    Creamy orange cooler, fried eggs on toast
    Turkey sausage, hashbrowns, fruit salad
    Chicken & biscuits with veggies

    Wednesday, November 10
    Honey whole wheat bagels, applesauce
    Pizza casserole, tossed salad, corn
    Chicken tortilla soup, raw veggies

    Thursday, November 11
    Scrambled egg sandwiches, pears
    Italian stew with green beans
    Shepherds pie

    Friday, November 12
    Warm vanilla soother, honey wheat muffins
    Grilled cheese sandwiches, tomato soup
    Lasagna, tossed salad

    Saturday, November 13
    Whole wheat cinnamon rolls, apples
    Leftovers
    Pizza

    Matt almost always chooses a Peach Cobbler instead of a birthday cake (which none of us complains about). Anyone else out there pick a different birthday dessert instead of a cake?

    Heavenly Homemaker's Club Members: Access your homepage and all your fantastic resources here! Not a member yet? Please join us!

    Healthy Caramel Frosting – with Homemade Sucanat Powdered Sugar

    November 3, 2010 by Laura 17 Comments

    This post may contain affiliate links. For more information, please see our disclosure policy.

    healthy_celebrations_med

    Click here to see all of the recipes in the
    Healthy Celebrations section of Heavenly Homemakers!

    This Caramel Frosting recipe is very exciting because you can make it with your very own homemade powdered sugar!!! If you don’t have sucanat or you don’t feel like making powdered sugar, DO NOT substitute regular pre-made powdered sugar. This recipe won’t taste very caramelly if you use the white stuff. (I made up that word. It is pronounced:  care-uh-mellleeeeee. I like it.)  If you do need to make a substitution, use regular ol’ brown sugar.

    You do need to know that this recipe takes several minutes to make. It isn’t hard to make, you just have to beat it (and beat it and beat it…) for several minutes to turn it into frosting. I had my kids take turns holding the beaters while I made the donuts to go with the frosting. They were making frosting…they did not mind holding the beaters.

    Oh look, only four ingredients!!!

    Caramel FrostingYum

    2 cups homemade sucanat powdered sugar
    1/2 cup butter
    1/2 cup cream
    1/2 teaspoon vanilla

    Place sucanat powdered sugar, butter and cream in a pan on the stove. Cook until butter is melted. Bring mixture to a boil and boil for one minute, stirring allthewhile (I made up that word too. It is pronounced ahll-thuh-wyle. It means – keep stirring for the whole minute and whatever you do, don’t stop). Remove this from the heat and pour it into a mixing bowl. Beat mixture with electric beaters for 15 minutes or until it thickens and becomes spreading consistency. Add vanilla and beat for a little bit longer, because you just love beating your frosting and you know it.

    Here is the mixture as it is beginning to boil…

    Now, we have poured it into our favorite stainless steel bowl and we are beginning to beat it…

    Hello there. We are still beating our mixture. 
    It has been only a few minutes but already it is getting thicker…

    Wow, will you look at that? It’s been about eight minutes and not only is the frosting getting thicker, it is turning a nice shade of…what shade of brown would you call that? Caramelly?

    Eleven minutes and counting. Thicker and thicker it becomes allthewhile we have been beating it. We have switched beater holders a few times. Life is getting more and more exciting as we see that this really might become frosting after all…

    Almost done. I think we’ve been beating for longer than fifteen minutes. What is that about?

    Okay, we are going to pronounce that the Caramel Frosting is now finished. It’s not as thick as we may have expected, but we can certainly spread it on our donuts. (Or on a cake if that’s what we were making this for.)

    Sure enough, we were able to spread this Caramel Frosting on our donuts.

    The moral of the story is this:  Just when you think you can’t possibly keep beating your frosting, stick those beaters back in the bowl and KEEP BEATING. Hey, if you’re alone in your kitchen, it’ll be good prayer time. Who says you can’t pray over your bowl and beaters? 

    The other moral of the story is this:  Good things come to those who beat. For a long time. When you eat this frosting on a cake or on donuts or on cookies…you will recognize that the beating was all worth it.

    Heavenly Homemaker's Club Members: Access your homepage and all your fantastic resources here! Not a member yet? Please join us!

    Menu Plan for the Week

    October 31, 2010 by Laura 4 Comments

    This post may contain affiliate links. For more information, please see our disclosure policy.

    I just proof read this post and almost put myself to sleep. Either I’m really sleepy, or this is a really boring and dry post….

    stromboli3sm.JPG

    My freezer foods have officially been depleted. I have been amazed at how helpful it is to have those grab and go meals prepared! Therefore, I have been amazed at how much I miss them now that they are gone. Over the next few days, I’m planning to cook a little extra so that we can have a well stocked freezer full of healthy convenience foods. I’ll show pictures of my progress once I’ve made some progress. :)

    • Mini Apple Pies
    • Turkey Sausage – made into patties
    • Whole Wheat Waffles
    • Taco Seasoning
    • Whole Wheat Tortillas (x2)
    • Applesauce Bread
    • Chicken Fried Steak Strips
    • Bean and Cheese Burritos
    • Whole Wheat Graham Crackers
    • Experiment number two on homemade poptarts!

    Speaking of making progress…I bet you’re wondering how our living room is coming along! I’ve got tons of pictures to show you and will put them into a post sometime this week. 

    By the way, Danielle made a great suggestion to put a link to the Recipe Parade link-up right on the top tool bar of the website. That way, if you want to reference all the great recipes linked up (86 and counting!), you’ll be able to find the post easily!! So…do you see it up there in the toolbar? Just to the right of the Links link. No, your other right.  Ah, you got it. Feel free to add your recipe links at any time!

    Last week was a sad week for our church family as one of our elders died very suddenly. He was a great man and ugh…how I hurt for his family. We have company coming in tonight for the funeral. We’re so excited that they’re coming to town and will be staying with us, and so sad for the reason they are coming. I am so thankful for the Hope we have in Jesus!

    Here’s what’s on our menu this week:

    Sunday, October 31
    Oatmeal, pears
    Italian Pasta Bake, tossed salad, cream corn
    Fall Party Cookout with our Small Group

    Monday, November 1
    Whole Wheat Waffles, blueberry syrup
    Funeral dinner with our church family  (a mixture of celebration and sadness)
    BBQ brisket, cream scalloped potatoes, green beans

    Tuesday,  November 2
    Applesauce Bread, bananas
    Grilled cheese sandwiches, tomato soup, carrot sticks
    Hamburgers, homemade fries, raw veggies

    Wednesday, November 3
    Warm Chocolate Soother, toast
    Homemade corn dogs, peas, fruit-kefir smoothies
    Steak fajitas with the works

    Thursday, November 4
    Sweet Potato Streusel Muffins, applesauce
    Chicken and noodles, carrots, soft pretzels
    Veggie Egg Scramble, fruit-kefir smoothies

    Friday, November 5
    Mini Breakfast Pizzas, oranges
    Chicken Tortilla Soup, peaches
    Three Cheese Garlic Chicken Pasta, tossed salad, steamed broccoli

    Saturday, November 6
    Giant Breakfast Cookies, apples
    Cheesy Turkey Sausage Stromboli, fruit salad
    Leftovers

    So, was that a boring post or am I just sleepy?

    I wonder if I can sneak in a nap before small group.

    Zzzzzzzzzzzzzzzzzzzzzzzzzz

    Heavenly Homemaker's Club Members: Access your homepage and all your fantastic resources here! Not a member yet? Please join us!

    Heavenly Homemakers Recipe and Cooking Tips Parade – Share YOUR Recipes!

    October 28, 2010 by Laura 77 Comments

    This post may contain affiliate links. For more information, please see our disclosure policy.

    Yum

    I just can’t thank all of you enough for making this week SOOOOOO much fun! All of your comments and participation have been so great! After all of this, I haven’t even come close to running out of recipes to share…in fact several more recipe requests have come in this week. There is NO END to great, healthy recipes!! Just in case you wanted to see quick links for all of the recipes in our parade this week, I’ll put them together for you here:

    • Healthier Rice Crispy Treats
    • How to Cook Brown Rice
    • Cottage Cheese Ideas
    • Italian Pasta Bake
    • What to do with Butternut Squash
    • Powdered Sugar with Sucanat
    • Barbecue Brisket
    • Chocolate Fudge Frosting
    • Buttermilk Whole Wheat Chocolate Cake

    There are still FIVE more winners to be chosen in the Parade Giveaway, so keep those comments coming in. PLUS, for more chances to win, each recipe you link up or share in the comments on this post will be counted in the drawing!! (You don’t have to share a recipe in the comments section, but you sure can if you want to!)  Also, be sure to sign up to win awesome Stainless Steel Bakeware from Paula’s Bread! I will draw the remaining giveaway winners and post them Saturday morning at precisely wheneverIgetaroundtoit-o’clock.

    Okay everyone…it’s your turn now!!! What recipes have you been wanting to share with all of us? If you have a blog, link up your awesome recipes. You can link as many as you would like to share!! Here’s what I would prefer for each of you that link up:

    1. Please don’t link to your main blog page, link your actual recipe post so we can find it easily.
    2. Let us know what recipe you are sharing in your name/title, for example:  Laura @ Heavenly Homemakers (Turtle Soup)
    3. In your recipe post(s), please link back to this recipe parade so that your readers can come join the fun and discover new recipes too! You’re welcome just to copy and paste the following:  You’ll find all kinds of new recipes this weekend at Heavenly Homemakers Recipe Parade!!

    If you don’t have a blog, please feel free to share your recipes in the comments section!

    (I don’t really have a recipe for Turtle Soup -sorry if I got your hopes up.) 

    Okay, are you ready? Start linking and visiting everyone’s blogs to learn more recipes!! Woohoo…I love a parade!!!

    Heavenly Homemaker's Club Members: Access your homepage and all your fantastic resources here! Not a member yet? Please join us!

    Buttermilk Whole Wheat Chocolate Cake

    October 28, 2010 by Laura 117 Comments

    This post may contain affiliate links. For more information, please see our disclosure policy.

    Say, would you like a little chocolate cake with that chocolate fudge frosting? :)

    This recipe is great because you can soak the flour to break down the phytates if you want. Or if you don’t, that’s okay too. 

    Buttermilk Whole Wheat Chocolate CakeYum

    2 cups whole wheat flour
    1 1/3 cups sucanat
    1/3 cup cocoa powder
    1 teaspoon baking powder
    1/2 teaspoon baking soda
    3 eggs
    1/3 cup melted coconut oil or melted butter
    1 1/3 cups buttermilk
    Chocolate Fudge Frosting

    If you choose to soak your flour, mix the 2 cups of whole wheat flour with the 1 1/3 cups buttermilk. Cover and allow this mixture to soak overnight on the countertop. Add remaining ingredients (everything but the frosting, that is) and bake as directed.

    Otherwise…

    Mix dry ingredients together in a large mixing bowl. Add eggs, oil or butter and buttermilk. Mix with beaters until batter is smooth and well mixed.

    Work very hard to avoid grabbing a spoon and eating the entire batter directly out of the bowl before it has been baked. 

    Butter two round cake pans or one 9×13 inch cake pan.

    Bake round cakes at 350° for 25-30 or a 9×13 inch cake for 35-40 minutes. OR, leave the cakes in the oven until a toothpick poked in the middle comes out clean. Every oven is different, right?

    Allow the cakes to cool completely before removing them from the pans. I used a butter knife to loosen the edges from the sides of the pan. Place the cakes on plates.

    Did I forget to mention that you would need some of this Chocolate Fudge Frosting? Oh yes, you DO need a batch of this Chocolate Fudge Frosting. Plop a nice amount of frosting on one cake and spread it around well.

    Like this…

    Carefully place the other layer of cake on top of the frosted layer.

    Oh look…it’s a chocolate fudge sandwich!!

    Plop another nice amount of frosting on top of the second layer. Carefully spread the frosting over the top and sides. This step is not very easy for me and I’m usually messy and have to lick my fingers. Bummer.

    All done.

    Ah, a slice of chocolate heaven…

    I will work (sometime within the coming months) to come up with a white cake and white frosting. However, when you’re using whole wheat flour and sucanat, the results are not going to be white. Anyone up for a Tan Cake?  Mmm, sounds good to me!

    Get ready to share YOUR recipes Friday!!! Can’t wait to see what you’re going to share!!!

    Heavenly Homemaker's Club Members: Access your homepage and all your fantastic resources here! Not a member yet? Please join us!

    Chocolate Fudge Frosting – the Healthier Way!

    October 28, 2010 by Laura 112 Comments

    This post may contain affiliate links. For more information, please see our disclosure policy.

    I won’t take up space talking about the loveliness of this recipe because well…it’s CHOCOLATE FUDGE FROSTING. Even if I thought of some cute words to write, you would likely be saying, “Yada, yada…show us the recipe!!!!!!!!!!!!!!!!!” And so…without further ado or ANY ado…here is the fudge frosting recipe made with homemade powdered sugar from sucanat I’ve been promising you…

    Chocolate Fudge FrostingYum

    1/2 cup butter
    1/3 cup water
    1/2 teaspoon vanilla extract
    1/3 cup cocoa powder
    4 (+) cups of powdered sugar (I suggest either making your own powdered sugar from sucanat, or using an unbleached powdered sugar)

    Melt butter in a saucepan. Add water to the butter and bring it to a boil. Pour the boiling butter/water into a bowl with the cocoa and powdered sugar. Add vanilla and mix with beaters until thoroughly combined. Add a little more powdered sugar if the frosting is too runny, but keep in mind that it does thicken up just a little bit as it cools.

    This recipe makes enough frosting for a two-layer cake or for a big sheet cake or for a nice thick layer of frosting on brownies or a 9×13 inch cake. Actually, it’s almost too much frosting for the brownies and 9×13 inch cake, so save some of it in your fridge and put the leftovers on homemade donuts another time. :)

    Here’s our Buttermilk Chocolate Cake recipe! :)


    Heavenly Homemaker's Club Members: Access your homepage and all your fantastic resources here! Not a member yet? Please join us!

    How To Cook Brown Rice

    October 25, 2010 by Laura 177 Comments

    This post may contain affiliate links. For more information, please see our disclosure policy.

    How to Cook Brown Rice

    Yum

    Transitioning your family from white to brown food (rice, grain, sugar) can be a little bit difficult on the taste buds. When we’re used to the white stuff, the brown stuff may seem a little heavy at first. I know I’ve heard the opposite from some of you, but transitioning my family from white rice to brown was actually one of our easier transitions when we were on our healthy eating journey.

    But first I had to learn how to cook the stuff.  Brown rice cooks a little differently than white rice. And it takes 45 minutes? Really?

    One of the things I’ve learned throughout our healthy eating journey is that whole foods may take a little longer to prepare, but that doesn’t mean that they are more difficult to prepare. I just have to plan ahead just a little bit better. Yes, brown rice takes 45 minutes to cook. But do I actually have to watch the pot and babysit my rice? Absolutely not. Start the rice a cookin’, set a timer, walk away and come back 45 minutes later.

    Long story short:  Cooking Brown Rice is SO Easy.

    Here are the basics of Brown Rice Cooking:

    • Use exactly twice as much liquid as rice. (For instance, use 2 cups of water with 1 cup of rice.)
    • The rice will absorb all the liquid, so if you cook one cup of rice in two cups of water, once the rice is cooked, you will have two cups of cooked rice.
    • Don’t bother your rice while it’s cooking. It will get grumpy. (Actually it will get sticky, and you may get grumpy.)
    • Sea Salt is your friend. Rice is a little bland without it.
    • We LOVE our rice cooked in Chicken Broth. The broth gives the rice excellent flavor and has really helped us transition to the taste of brown rice!

    Here’s how to cook brown rice:

    1. Begin by boiling your water or broth. Remember, use two cups of liquid for every one cup of rice.
    2. Once the liquid has come to a full boil, pour in the dry brown rice.
    3. Give the rice a stir. Turn down the burner to a simmering heat level.
    4. Cover the pot with a lid.
    5. Set a timer for 45 minutes.
    6. Do not stir the rice or even bother with looking at the rice until the timer goes off.
    7. Remove the rice from the heat.
    8. Salt liberally, or mix your cooked rice into your desired recipe.

    I took several pictures to create a tutorial for you, but in just about every picture, the steam from the pot fogged up my camera lense. It would have been a lovely tutorial.

    See? Look at the wonderful boiling broth. With steam. This was the least foggy of all the pictures.
    Don’t you just feel like you learned an awful lot by looking at it?

    Sorry for the lack of tutorial photos. Really though, even without pictures to look at, I do believe you can easily cook brown rice. Then use it to make Rice and Veggie Stir Fry or Spanish Rice…or even add butter and salt and eat it plain!


    Does your family like brown rice? How do you like to eat your rice?

    Heavenly Homemaker's Club Members: Access your homepage and all your fantastic resources here! Not a member yet? Please join us!
    « Previous Page
    Next Page »

    Join Our Community!

     Facebook Twitter E-mail Instagram Pinterest

    Popular Posts

    ~ Will All of the Real Moms Please Stand Up?
    ~ Easy! Stir-and-Pour Whole Wheat Bread
    ~ How to Make Gatorade
    ~ 31 Real Food Breakfast Ideas
    ~ Dear Teenage Girls...
    ~ When Mom Takes a Step Back
    ~ The Inexpensive Health Insurance We Love!
    ~ Let's Talk Real Food Grocery Budgets

    Check out our latest posts!

    • Big Family Food and Fun: May 3-9, 2026
    • Help Your Kids Become Independent in the Kitchen!
    • Big Family Food and Fun: April 26-May 2, 2026
    • Big Family Food and Fun: April 19-25, 2026
    • Big Family Food and Fun: April 12-18, 2026
    Home  ~  Simple Meals  ~  Club Membership  ~  Shop  ~  Privacy Policy  ~  Disclosure  ~ Contact

    Copyright © 2026 · Beautiful Pro Theme on Genesis Framework · WordPress · Log in