Heavenly Homemakers

Encouraging women in homemaking, healthy eating and parenting

  • Home
    • About
    • FAQs
  • Recipes
    • Bread and Breakfast
    • Condiments
    • Dairy
    • Main Dishes
    • Side Dishes and Snacks
    • Desserts
    • Gluten Free
    • Instant Pot
    • Crock Pot
    • Heavenly Homemaker’s Weekly Menus
  • Homemaking
    • Real Food Sources
  • Store
  • Contact
    • Advertise
    • Disclosure
    • Privacy Policy
  • Simple Meals
  • Club Members!

Help for Eczema! (a Giveaway from MadeOn Skin Care Products)

February 17, 2011 by Laura 736 Comments

This post may contain affiliate links. For more information, please see our disclosure policy.

I have recently begun a relationship with Renee from MadeOn Skin Care Products and I’m not sure who is more excited…me or my hands.

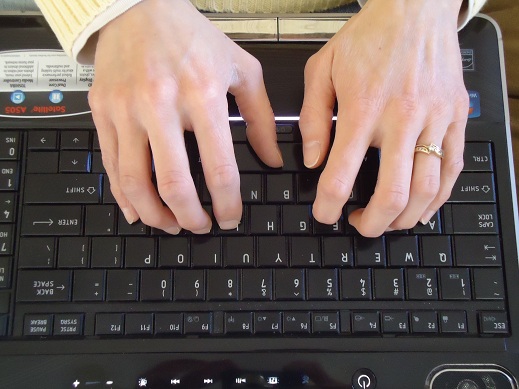
Really, you should see my hands flying all over this keyboard in their soft and smooth joy. NOTHING has ever worked this well for my dry, cracked hands. In fact for as long as I can remember, my hands have cracked and bled every winter, for the entire winter. It’s miserable, and while I try to keep coconut oil or chemical free lotion on them, it’s never been enough to really help. After thirty-ish winters of painfully cracked hands, I really had given up on ever having relief. You just get used to it, you know?

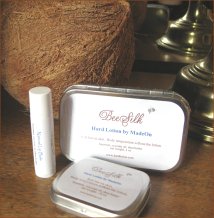
And then (on what has become marked as the best day of my hands’ life), Renee sent me a BeeSilk Lotion Bar, one of her wonderful dry skin products. I knew the MadeOn Products certainly wouldn’t hurt my hands, because they are made of completely pure, wholesome ingredients. But I’ve been so used to product after product just sort of giving me a short time of relief without really offering any kind of healing. When I rubbed on the BeeSilk Lotion Bar, right away my hands felt great. Okay, I thought, I wonder how long this will last?

Well, this is where the exclamation marks start to fly!!!!!!!!!!!!!!!!!!!!!!!!!!

!!!!!!!!!!!!!!!!!!!!!!!!!!!!!!!!!!!!!!!!!!!

The relief has NOT ended!!!!!!!!!!!! Can you hear me shouting?!!!!!!!!!!! I used to be constantly rubbing oil into them – all day long just for some brief relief. Now, once each day, I rub the BeeSilk Lotion Bar on my hands. Not only are my hands not dry, cracked and bleeding…they are SOFT. Soft!!!!!!!!!!!!!! My hands are SOFT!!!!!!!!!!!!!!

If you’ve never had hands that have been so dry that they’ve cracked and bled, you may think I’m exaggerating or being weird. I’m telling you though, thirty years of painful hands in the winter. My mom even took me to the doctor for this when I was a teenager and people have always looked at my bright red hands like they were diseased. I’ve always felt bad that my hands haven’t been nice and feminine for my husband.

And now, they are SOFT!!!!!!!!!!!!!!!!!!!!!!!!!!!!!

BeeSilk Lotion Bar will now be a permanent part of our lives. It is made up of three ingredients:  Shea Butter, Coconut oil and Beeswax. All safe, all pure.

We’ve now begun using the BeeSilk Lotion Bar on Malachi, who as you know, suffers from chronic eczema. I’ll keep you posted on how this is working for him. His eczema is severe (mostly on his legs at this point in his life), so the healing is taking a little longer for him. I’m thrilled to finally have a product that I’m not afraid to use that will actually hold moisture in his skin!

I can’t say enough good about the BeeSilk Lotion Bar, and I can’t wait to try more of their products! Renee is offering three of you a chance to win a 3 Pack Dry Skin Care Package, which includes a Family Size Lotion Bar, a Pocket Size Lotion Bar and a Lip Balm (which is also fabulous, by the way!)

Leave a comment here letting us know if you’re interested in winning one of these great prizes!  For an extra entry, click over and “like” MadeOn Hard Lotion on Facebook!

In addition, Renee has created an exclusive Heavenly Homemakers discount for us! You can use the coupon code HHFEB at checkout for 10% off your purchase, good until the end of February.

This giveaway is now closed…thanks!

Heavenly Homemaker's Club Members: Access your homepage and all your fantastic resources here! Not a member yet? Please join us!

It’s Not About You

February 16, 2011 by Laura 37 Comments

This post may contain affiliate links. For more information, please see our disclosure policy.

helpmeet

Matt and I were privileged to attend a weekend marriage seminar last weekend put on by FamilyLife.com. It was their video version, called The Art of Marriage. I’m so thankful our church hosted the event.

Marriage truly is an art, isn’t it? When we allow our Creator to sculpt our marriage, it is so beautiful.

One of the biggest lessons we heard over the weekend was not something new to us. And yet, it’s always good to be reminded about one of the key tools for making your marriage run smoothly.

The long and short of it (and Laura’s paraphrased and blunt version) of the lesson is this:  Get over yourself already.

We shouldn’t get married to please ourselves. We should get married to serve the person we love the most.  Ultimately, getting married means that you’ve chosen to become a loving servant to your spouse forever. And if children come along, you’re signing up to serve them forever too. Yep, years and years of serving others. Sounds tough…but it doesn’t have to be. It’s all about letting go of yourself and choosing to serve cheerfully.

I thought it interesting that one counselor pointed out that we all say these vows to our spouse on our wedding day:  “I promise to love, honor and cherish you until death do us part.” But what our hearts often mean is, “I want YOU to love, honor and cherish ME forever.” (And then we also expect our spouse to be able to read our mind so that they know exactly how they should perfectly love, honor and cherish us…but that’s another article for another day.)

No…when you got married, you promised to take care of and nurture your spouse. No matter what. Even when it isn’t easy. Even when you’re tired. Even when you’re grumpy. Even when you don’t feel like it.

See, because your marriage isn’t ultimately about YOU. 

If Jesus would have made his time on earth about HIMSELF, I’m very sure He never would have died for me and He certainly wouldn’t have healed all those sick, needy people that kept following Him everywhere. Why in the world would he? He may not have been in the mood…He may not have felt like it that day…He may have just needed some “me time”. But no…He chose to serve. He chose to love unconditionally. He chose to die. He chose to live for others, which praise God, includes you and me!

If you’re sitting there thinking, “Wow, she’s right. My spouse really needs to read this so he’ll/she’ll stop living for him/herself and serve me better” –  Stop it. Consider yourself bonked on the forehead. :)

It could be that your spouse is selfish (I wouldn’t be surprised since you and I are both quite selfish in nature). Your needs may not all be met. You may be wanting more out of your marriage.

But your healthier, more wonderfully sculpted marriage begins with your choice to be a loving servant.

As soon as you stop living for yourself and really start focusing on meeting the needs of your spouse, your marriage will become more joyful. Your spouse may then become more of a loving servant to you as well. 

Beautiful!

Heavenly Homemaker's Club Members: Access your homepage and all your fantastic resources here! Not a member yet? Please join us!

Homemade Teriyaki Sauce (No MSG or HFCS!)

February 15, 2011 by Laura 51 Comments

This post may contain affiliate links. For more information, please see our disclosure policy.

Ever noticed how tough it is to find dressings and sauces that don’t have MSG (Monosodium Glutamate) and HFCS (High Fructose Corn Syrup)? MSG, by the way, is a flavor enhancer that is made up of a bunch of chemicals I can’t pronounce and a bunch of scary stuff I don’t want to know about. You can read all the big words here.

I’ve been so excited each time I figure out how to make a new homemade salad dressing or condiment (see the whole list of healthier condiment recipes on our site)! Making your own condiments is not only much healthier, it’s often quite a bit cheaper too. And, lo and behold, these items are easy to make.

Shall we now all take a moment and enjoy a collective sigh of wonderment? Yes indeed recipes that are healthy, cheap and easy. All at the same time.

The beauty of homemade condiments too is how delicious and flavorful they are…all by themselves. We do not need to add MSG and HFCS or BGNJ to make our food taste good. (I made that last one up just for kicks and it was very fun.)

Well, apparently that was my little “rant” for the day. Try homemade condiments. They taste so good and pure.

And now for the Homemade Teriyaki Sauce recipe!

Teriyaki SauceYum

Homemade Teriyaki Sauce (No MSG or HFCS!)
 
Save Print
Author: Laura
Ingredients
  • ¼ cup tamari soy sauce
  • 1 cup water
  • 1-2 teaspoons freshly grated ginger or dry ground ginger (more or less to taste)
  • 2 Tablespoons honey
  • 1 minced garlic clove
  • 2 Tablespoons organic cornstarch
  • ¼ cup cold water
Instructions
  1. Combine 1 cup water, soy sauce, honey, garlic and ginger in a saucepan and bring to a boil, stirring constantly.
  2. Dissolve cornstarch in ¼ cup cold water and add to sauce.
  3. Stir constantly and allow the sauce to thicken.
  4. If the sauce is too thick, add a little bit of water or soy sauce to thin.
3.4.3177

(I use Organic Tamari Soy Sauce from OliveNation which is gluten and MSG free!) We LOVE this Teriyaki Sauce on chicken wings.

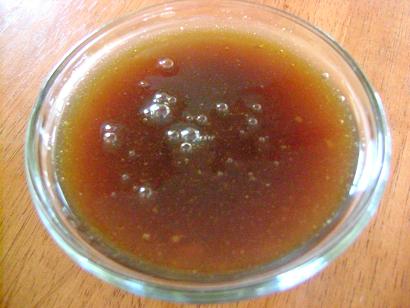
Homemade Teriyaki Sauce recipe

And with that, the Heavenly Homemakers Recipe Challenge continues. I’ve almost got another recipe ready to share. I’m not going to tell you what it is, but I will tell you that it starts with chocolate and ends with milk. Otherwise, I’m not giving any hints.

Heavenly Homemaker's Club Members: Access your homepage and all your fantastic resources here! Not a member yet? Please join us!

Gratituesday: Is This Really February?

February 14, 2011 by Laura 25 Comments

This post may contain affiliate links. For more information, please see our disclosure policy.

I beg your pardon, but I’m going to talk about the weather today. I’m not sure what it’s like where you live, but here in Nebraska, it is unseasonably warm. 

Normally, a “nice” day in February would be say…upper 30’s. Today, it was in the 50’s! It’s been beautiful for several days in a row, and it looks like our “heat wave” is going to last for several more days.

I sat for a while in the sun today, soaking it all in and praising God for this fantastic treat in the middle of what is usually a long winter. Matt and the boys did some outside work, played outside, walked to a nearby park and shot some hoops. 

What a lovely, warm blessing in the middle of February. 

Only God can create blessings like this one!

What are you thankful for this Gratituesday? Write about it on your blog, then come link up with us here. If you don’t have a blog, be sure to leave a comment letting us know what you’re grateful for!

If you are linking up a blog post for Gratituesday,
please copy and paste the following sentence into your post! Thanks!


Join us for Gratituesday at Heavenly Homemakers!

Heavenly Homemaker's Club Members: Access your homepage and all your fantastic resources here! Not a member yet? Please join us!

Menu Plan for the Week

February 13, 2011 by Laura 11 Comments

This post may contain affiliate links. For more information, please see our disclosure policy.

With the “You’re the Bomb” Valentine craft idea I shared, several of you mentioned that your schools have a zero tolerance policy for kids who bring anything to school that is even remotely related to a weapon. Yeah, bomb suckers sort of resemble weapons. Just a word of caution for you to check into that before you send your son to school with these valentines.

Instead, you could easily make these…

valentineglasses2sm.jpg

Because you just may want the loved ones in your life to look as ridiculous as this.

Valentine’s Day Specs

 Here’s our menu for this week:

Sunday, February 13
Strawberry bread, apples
Pizza, bananas
Leftovers

Monday, February 14
Heart shaped pancakes, blueberries
Heart shaped grilled cheese sandwiches, tomato soup
Veggie soup, heart shaped pretzels, sweetheart fruit salad

Tuesday, February 15  (Justus’ birthday choices)
Biscuits and turkey sausage gravy, hashbrowns
Cheeseburgers, homemade fries
Tilapia, rice and veggie stir fry

Wednesday, February 16
Vanilla muffins with cinnamon crumb topping, applesauce
Black bean taco salad, raw veggies
Beef stroganoff, steamed broccoli

Thursday, February 17
Warm vanilla soother, peanut butter honey toast
Italian roast wraps, smoothies
Easy breakfast casserole, zucchini bread

Friday, February 18
Creamy orange cooler, scrambled egg sandwiches
Bean and cheese burritos, pears
Lasagna casserole, tossed salad

Saturday, February 19
Cheesy omelets, oranges
Leftovers
Chicken fried steak strips, mashed potatoes, gravy, peas

What’s on your menu for this week?

Be sure to check out Say Mmm, a free menu planning resource!

Heavenly Homemaker's Club Members: Access your homepage and all your fantastic resources here! Not a member yet? Please join us!

“You’re the Bomb” Valentines – a Great Valentine Project for Boys

February 11, 2011 by Laura 22 Comments

This post may contain affiliate links. For more information, please see our disclosure policy.

Pink hearts and sparkly flowers don’t quite cut it at our house when it comes to making Valentines to take to our Home school Valentine Party. I’d be making them all by myself and my boys would not be impressed.

But, tell the boys they get to make little bombs for their Valentines this year? I had all kinds of help!

I originally saw this idea at Skip to my Lou…my go to site for all things crafty. That gal is FULL of great ideas! She had actually made these bombs into “bath bombs”…but in the interest of keeping things a little more simple…we used suckers. (I just didn’t read the label on the suckers. I didn’t want to know.)

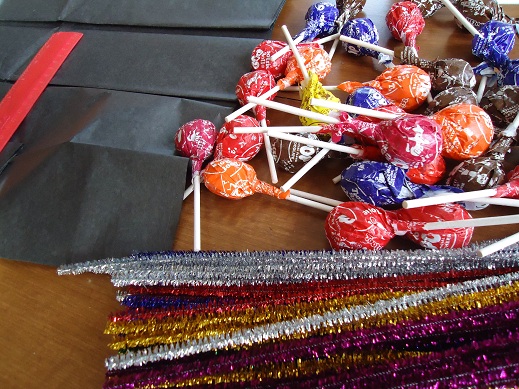
To make “You’re the Bomb” Valentines, you need:

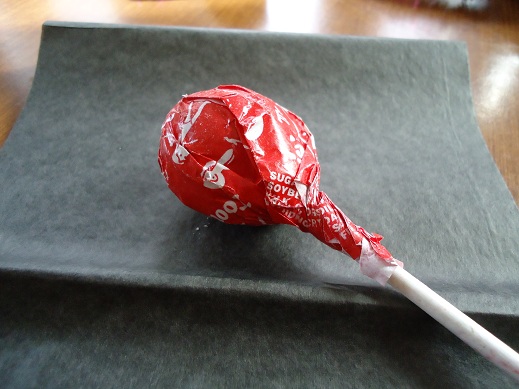
Round suckers, like tootsie roll pops
Black tissue paper cut into 5″x5″ squares (you’ll need two pieces for each bomb)
Glittery pipe cleaners
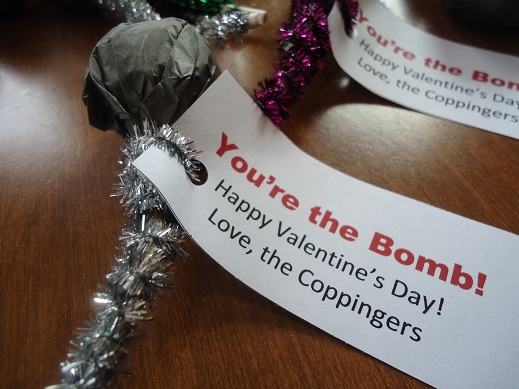
“You’re the Bomb” gift tags (we just printed them on our computer)

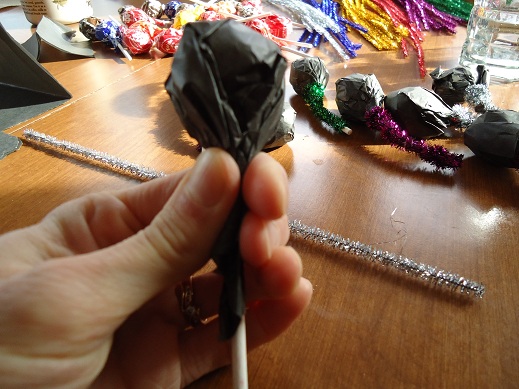
Begin by placing the sucker in the middle of a TWO pieces of black tissue paper. One piece is too thin and the sucker will show through.

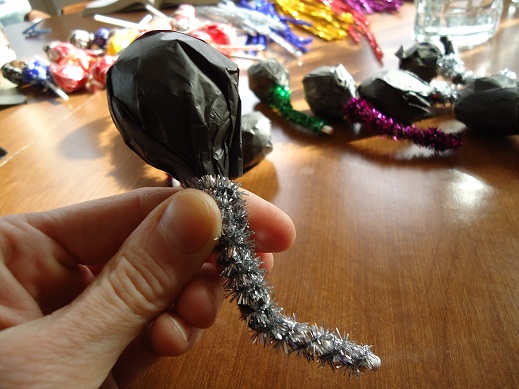
Wrap the tissue paper around the round sucker.

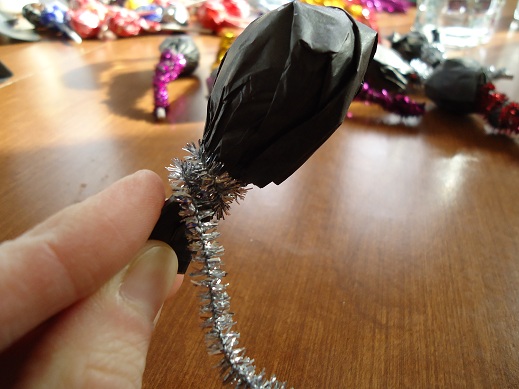
Fasten the black tissue paper by beginning to wrap a glittery pipe cleaner around the paper at the base of the sucker.

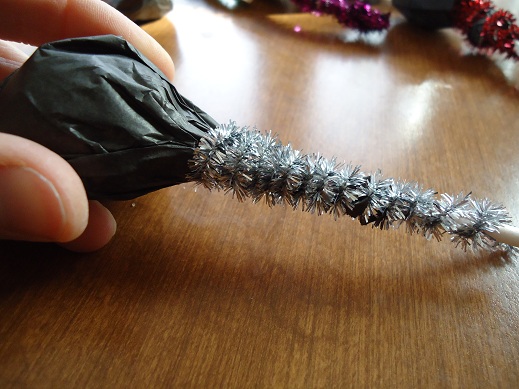
Continue to wrap the pipe cleaner all the way to the bottom of the sucker stick.

Gently bend the sucker stick so that it looks more like a “fuse”.

Print or create “You’re the Bomb” tags for your Valentines. I forgot this step until the end, but just simply pulled up the top part of the pipe cleaner and put it through the hole in the tag, then refastened the pipe cleaner.

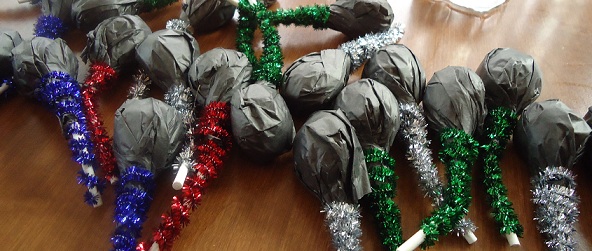
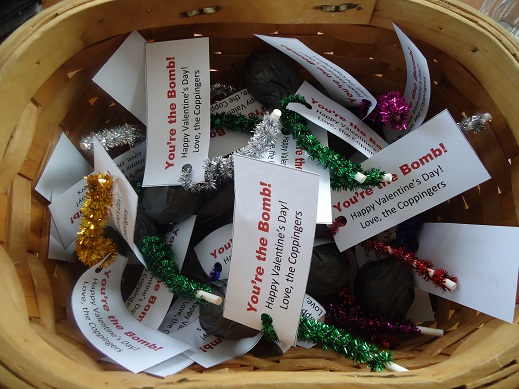
And now we have a basket full of bombs to deliver to our friends at our home school party. I’m not sure the girls will be very impressed.

Admittedly, the “bombs” over at Skip to my Lou are more nicely done than these. But, our boys had a blast (pun intended) and I was thrilled that these were so simple to make!!

Are you making homemade Valentines this year?

Heavenly Homemaker's Club Members: Access your homepage and all your fantastic resources here! Not a member yet? Please join us!

Valentine’s Day Crafts With Kids – a guest post

February 10, 2011 by Laura 4 Comments

This post may contain affiliate links. For more information, please see our disclosure policy.

Enjoy this fun guest post from Maria!

Valentine’s Day isn’t just for lovers—it’s for the whole family. Spend an afternoon with your kids this February 14th with these two simple crafts. Make a few extra to spread the love around to friends and family.


Lollipop Bouquet

This sweet craft costs considerably less than a store-bought set of flowers and is easy enough for kids to give to Mom or Dad as they please.

Materials Needed

Colored paper in green and pink, red, or other flower-like colors
Flat (not ball) lollipops
Scissors and glue stick

Directions

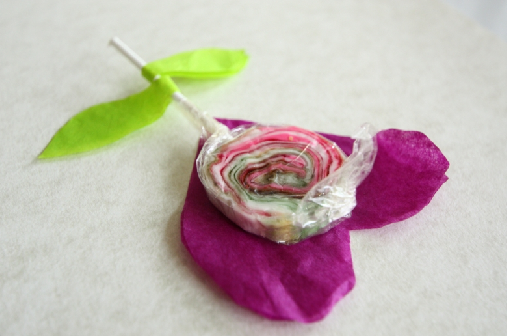
Fold the colored paper in half. Keeping part of the shape along the folded edge (so that the heart is a folded card), cut out heart shapes just bigger than the lollipop candy. Write a short message in the heart (“Be mine,” for example) and then glue it to the lollipop wrapper. For the leaves, fold the green paper in half. Cut out leaf shapes, keeping the stem part of the shape on the folded edge. Unfold the leaves and coat them with the glue stick. Fold it back over the lollipop stem.

Candy Cane Leftovers Chocolate Cookies


Image Credit

Still have candy canes lying around since Christmas? Recycle them in this simple chocolate cookie recipe. Bringing kids into the kitchen (with supervision, of course) is always good practice.

Ingredients

2 ½ cups bittersweet chocolate chips (but don’t go over 61% cacao or it will be more bitter than sweet!)
1 ½ cups all purpose flour
¼ cup natural unsweetened fair trade cocoa powder
1 tsp baking powder
½ tsp salt
1 stick (or ½ cup) unsalted butter at room temp
1 cup sugar
1 tsp vanilla extract
1 tsp peppermint extract
2 eggs
4 candy canes, coarsely crushed (an easy and safe way to do this is to take them out of their original wrappers and freeze them in a paper bag. Once frozen, take it out of the freezer, cover with a thick dish towel, and give them a good whack with a hammer or rolling pin.)

Directions

Preheat the oven to 375 F. Line 2 baking sheets with parchment paper. Stir 2 cups of chocolate chips in a metal bowl over a saucepan of simmering water so they melt. Measure out 2/3 cup and put into a separate bowl. Take them off the heat. You’re going to use the 2/3 measurement to drizzle over the cookies later.

Meanwhile, whisk flour, cocoa powder, baking powder, and salt in a bowl. Beat butter in another bowl until creamy with an electric mixer. Add sugar and vanilla and peppermint extracts. Add eggs and beat. Add what’s left in the original chocolate bowl to the mixture and beat. Finally, add the dry ingredients and beat just to blend. Stir in the remaining ½ cup chocolate chips.

Take the dough 1 level tablespoon at a time and roll between palms into a ball before placing on the baking sheet. Space the cookies about 1 ½ inches apart. Bake for about 8 minutes or until cracked all over and a tester comes out with moist crumbs. Cool the cookies for a few minutes before transferring them to a cooling rack (still on the parchment paper).

Remember that 2/3 cup of melted chocolate? Warm them over simmering water again and, once melted, drizzle over the cookies using a fork. Sprinkle the crushed candy canes. Make sure that some of the red show on the cookie to give it a Valentine’s Day feel. Chill the cookies for about 20 minutes so the chocolate sets. Then, enjoy!

Heavenly Homemaker's Club Members: Access your homepage and all your fantastic resources here! Not a member yet? Please join us!

Valentine’s Day Treats

February 9, 2011 by Laura 27 Comments

This post may contain affiliate links. For more information, please see our disclosure policy.

 Matt and I hardly ever do anything “special” on Valentine’s Day…we’re a little bit rebellious when it comes to this holiday. Although one year he did “break the rules” and get me some new potholders.  :)

A few years ago when our boys were all pretty little, going along with my Valentine’s Day rebellion, I didn’t do anything at all special for the family on Valentine’s Day. I guess I thought my kids were young enough not to notice? Or I figured they were boys and that they wouldn’t really get into heart shaped sandwiches? 

What was I thinking?

That evening, they shared with me how disappointed they were that we hadn’t done anything special to celebrate Valentine’s Day. No heart shaped pancakes or anything. Wow, I had no idea that my heart shaped efforts in years past had meant something to them. I ramped it up the next year, making heart shaped everything. They loved it…manly boys that they are. And I haven’t stopped since. I’m glad they care…hopefully they’re learning to do simple, inexpensive things for their future wives. Hopefully.

Here are some fun Valentine’s Day treats we’re looking at making this year:

heartpretzelssm.JPG

Heart Shaped Pretzels

strawberryfruitdipsm.JPG

Strawberry Yogurt Fruit Dip

deathbychoco1sm

Death by Chocolate

Sweetheart Fruit Salad

truffles3sm

Chocolate Caramel Truffles and Peanut Butter Truffles

Then of course, there is always the option of cookies and cakes, sandwiches and quesadillas cut into heart shapes. How about heart shaped Pop Tarts?  Pancakes? We even thought we’d use our tiny heart shaped cookie cutter to try and form some heart shaped Homemade Tater Tots.

Share your ideas! What Valentine’s Day treats are you making this year?

Heavenly Homemaker's Club Members: Access your homepage and all your fantastic resources here! Not a member yet? Please join us!

The Great Marriage Flirt

February 8, 2011 by Laura 53 Comments

This post may contain affiliate links. For more information, please see our disclosure policy.

helpmeet

“Hey there,” I say to my husband as I come into the room where he is mudding and sanding the drywall. “Now that is lookin’ good.”

“Thanks,”  he says as he reaches down for more mud.

And then I say, “Oh, and those walls aren’t looking too bad either.” 

Now that stops him mid-mud-smear. Obviously, I wasn’t talking about the walls the first time. {giggle}  We share raised eyebrows and sly grins, as the kids run in and out, oblivious to what I just really said. That makes it even more fun.

Flirting with my guy is one of the most enjoyable parts of my day. I can’t help it. He’s fun to flirt with. It’s such a simple way to connect and to share smiles in the midst of hard work and crazy schedules. I love being his number one girl. I love being the one who puts the smile on his face. My flirting always makes him smile – especially when it takes him by surprise.

Once a marriage is well underway and perhaps kids join the mix, we can sometimes feel lost in all the paper work and bills and gymnastic classes and carpooling and grocery shopping and dirty diapers and broken dishwashers. Somehow, we may not even remember how to flirt because really it feels good enough just getting your hair brushed some days. 

So don’t make this flirting thing complicated. Just do small things to keep your marriage fun and lively. Simply relax and enjoy your husband and the relationship God gave you.

A simple smile straight to him goes a long way.

Flirting isn’t always about sex. It rarely is, in my opinion. It’s really about connection. Sharing something special between just the two of you. Having those secret messages that float over the dinner table when neither of you can get a word in over the hubbub of one child banging his sippy cup on the highchair and another child sharing the most exciting part of her day with daddy (the part about how Curious George climbed a tree after a kitten and couldn’t get down and the fireman had to come and the Man with the Yellow Hat said…). 

If you’re just being “work partners”, trying to get through each day without losing your heads…something needs to give. You and your husband are more than just work partners. You’re more than just friends. You’re more than teammates. 

You’re lovers. Forever.

Enjoy being together. Smile. Bump into each other “accidentally”. Wink. Sneak a kiss. Email or text him something “sassy”.

Flirt.

It’s fun. :)
————————————-

What are your thoughts? Does flirting with your husband come naturally to you or is this something you try to improve upon?

Heavenly Homemaker's Club Members: Access your homepage and all your fantastic resources here! Not a member yet? Please join us!

Gratituesday: God, Your Love is Enough

February 7, 2011 by Laura 23 Comments

This post may contain affiliate links. For more information, please see our disclosure policy.

Being sick, while it’s terribly un-fun, does give a person some time to reflect. Over the weekend, as I lay in bed trying to recover from the flu, I was able to do some good thinking – as much as a person can think with a foggy brain, that is.

I was on the verge of feeling sorry for myself. I hate being stuck in bed. I hate seeing my kids suffering. I hate that Matt was having to take care of everything that I should have been helping him with.

And then, I read some emails from some of you who are struggling mightily with family members who have health problems. I learned of some terrible health situations from family members in our congregation. Some of my friends on Facebook shared prayer needs that hit me hard.

I stopped feeling sorry for myself right away. What our family is suffering with isn’t fun…but it’s just the flu. It’s normal. It happens. We’ll get over it. We’re already working our way back to normal (as in, the kids felt up to getting the swords out and swinging them today).

Justus had received the WOW Hits 2011 CD for Christmas and Matt put it in for me to listen to while I rested. I heard a song that was new to me, and I just couldn’t get enough. I played it over and over. I’m excited to share it with you here.

The song is Let the Waters Rise by Mikes Chair. It is a message of comfort, especially to those of you going through difficult times. I pray that it will be a blessing to all of you, whether you’re struggling, or whether you’re in the midst of calm and peace. God’s love IS enough. We can trust Him. 

What are you thankful for this Gratituesday? Write about it on your blog, then come link up with us here. If you don’t have a blog, be sure to leave a comment letting us know what you’re grateful for!

If you are linking up a blog post for Gratituesday,
please copy and paste the following sentence into your post! Thanks!


Join us for Gratituesday at Heavenly Homemakers!

Heavenly Homemaker's Club Members: Access your homepage and all your fantastic resources here! Not a member yet? Please join us!
« Previous Page
Next Page »

Join Our Community!

 Facebook Twitter E-mail Instagram Pinterest

Popular Posts

~ Will All of the Real Moms Please Stand Up?
~ Easy! Stir-and-Pour Whole Wheat Bread
~ How to Make Gatorade
~ 31 Real Food Breakfast Ideas
~ Dear Teenage Girls...
~ When Mom Takes a Step Back
~ The Inexpensive Health Insurance We Love!
~ Let's Talk Real Food Grocery Budgets

Check out our latest posts!

  • Big Family Food and Fun: September 20-26, 2026
  • Big Family Food and Fun: September 13-19, 2026
  • Big Family Food and Fun: September 6-12, 2026
  • Big Family Food and Fun: August 30-September 5, 2026
  • Big Family Food and Fun: August 23-29, 2026
Home  ~  Simple Meals  ~  Club Membership  ~  Shop  ~  Privacy Policy  ~  Disclosure  ~ Contact

Copyright © 2026 · Beautiful Pro Theme on Genesis Framework · WordPress · Log in