Heavenly Homemakers

Encouraging women in homemaking, healthy eating and parenting

  • Home
    • About
    • FAQs
  • Recipes
    • Bread and Breakfast
    • Condiments
    • Dairy
    • Main Dishes
    • Side Dishes and Snacks
    • Desserts
    • Gluten Free
    • Instant Pot
    • Crock Pot
    • Heavenly Homemaker’s Weekly Menus
  • Homemaking
    • Real Food Sources
  • Store
  • Contact
    • Advertise
    • Disclosure
    • Privacy Policy
  • Simple Meals
  • Club Members!

Our Home School Schedule(ish) for 2010-2011

August 26, 2010 by Laura 13 Comments

This post may contain affiliate links. For more information, please see our disclosure policy.

I hold to our schedule lightly in order to keep myself sane. Well, close to sane as the case may be. I thought I’d try to share with you what our daily schedule sort of looks like….although it really isn’t a schedule. It’s hardly even an order of events. This will just be a little glimpse into what our days look like if we don’t have a field trip or a PE class or a leaky dishwasher or a hang nail.

(In case you’re interested, here’s a look at our schedule for 2009-2010 and our schedule for 2008-2009.)

And now for 2010-2011…

Our schedule has changed from year to year, but one thing has stayed the same:  We always read the Bible at breakfast. We LOVE starting our kids’ day like this. We are currently reading a chapter of Matthew together, then reading a section from Why Pray?  (Why Pray? is a GREAT read by the way!)  Our older boys also read their Bibles on their own each morning before they come downstairs for breakfast.

why_pray

After breakfast/Bible reading begins a general organized hubbub. If possible, I sit down with Justus and Elias right after breakfast and read History and work through Spelling words. (You can see a list of their books and curriculum here.)  Malachi (Kindergarten) heads off to play Legos or super heros or army guys or something else very manly. Asa begins his reading assignments for the day. He works on his own for most of the morning, making his way through his history books, literature and math. Once I’ve finished History and Spelling with Justus and Elias, they do their individual work (handwriting, math, phonics, vocabulary).

IF by chance all the boys are working on their own without trouble at this point of the morning (of course I am available to answer questions at any time), I will start some laundry, wash some dishes, have a conversation with my husband (joy!), cook something, or scrub some unidentified gooey substance from the kitchen floor.

If I can, I try to put a big, nice meal on the table for lunch. Matt often works evenings, so I want to send him off with a healthy meal. I am finding that having good pre-made food in the freezer is a HUGE help for me since I don’t always have time to cook a big meal from start to finish during school time. Pulling something from the freezer and throwing some veggies on the table with it has been a life saver!!

While we’re eating lunch, Matt works with us on memory verses. Have I ever written about how we do “repeat afters”?  Why have I not ever written about how we do “repeat afters”?  I’ll put that on my list. It’s so simple, yet so effective.

While we’re doing “repeat afters”, I stuff my lunch down. Then, while the boys are still eating (because eating is an art form for them), I will read from our latest science book, then from our latest “read-aloud” book. They generally finish eating while I’m reading, but we all just sit around the table enjoying the books. I LOVE reading during meal times!!!

After lunch, before the boys scatter…we’ll do a quick grammar lesson (Grammar Ace) or art lesson (Mark Kistler’s Draw Squad). After that, I sit with Asa and help him finish his History, Spelling and Science lessons. This has been a really great time with my teenager! While I’m doing this with Asa, Justus and Elias set the timer for 25 minutes and sit down in a quiet room to read. Malachi has gone back to his Legos again.

Somewhere in there, we send Matt off to work (or soccer practice, depending on the day). Then finally, I call Malachi in to do his school work. I don’t do every subject with him every day. I don’t find it necessary. The main thing is that he gets it all done eventually…and he’s getting some one-on-one time with Mama.

Now keep in mind that this order of events is how an “ideal” day looks. I’m actually finding that by staying very laid back about our schedule has helped all of us stay stress-free during the day! Sometimes we’re still finishing up some of our lessons at 8 pm. Sometimes we don’t get everything finished and have to carry our work over to the next day. 

I have given up assigning a “time schedule” to our days. I pretty much HATED having a schedule that said, “Science 9:00-9:30; History 9:30-10:00…” We could NEVER stick to a schedule like that (read here if you want to know why) and it always made me a Frantic Freaked-Out Mama. NO ONE wants to do school work with a Frantic Freaked-Out Mama!  Not even me.

I think that the main point is to just get everything done (mostly) and to keep the most important things the most important things. I don’t want my kids to remember school days with a Frantic Freaked-Out Mama. I want them to remember “repeat afters” and reading with Mama while they eat lunch and snuggling on the couch to learn about Abraham Lincoln.

We get it all done somehow…so it doesn’t really matter what time the clock says, does it?

Here are some other posts you may be interested in reading about how we used to accomplish “school” when we had littler guys and  babies in the house!

  • How Can I Do This Along With Everything Else I’m Doing?!
  • Am I Qualified to Teach?
  • What To Do With Little Ones During School Time

Heavenly Homemaker's Club Members: Access your homepage and all your fantastic resources here! Not a member yet? Please join us!

Investing Money in Good Food

August 24, 2010 by Laura 48 Comments

This post may contain affiliate links. For more information, please see our disclosure policy.

simplesteps

As our family was making our way toward a more healthy lifestyle in the beginning stages of our healthy eating journey, one of the biggest obstacles I had to work through in my brain was that I had to actually spend money on groceries. I didn’t like spending money on food. I had figured out ways to use coupons to get almost all of our food practically for free so spending money on food seemed crazy to me. 

I’ve done a complete about-face on that issue now. Not that I don’t work hard to keep our grocery spending low…I do. I work VERY hard as a matter of fact so that our family of six can eat a healthy whole-foods diet on a limited budget. But I’ve changed my way of thinking now about spending money on food. And…I’d like to encourage you to do the same as you make some simple steps toward healthy eating.

I see money spent on food as an investment. I understand now that food is meant to nourish us…not just fill a hole and satisfy hunger. I feel like when I spend money to buy top knotch food, I’m actually investing in a healthy future for my family.

I’d like to challenge your thinking just a little bit if you fall into the category of one who thinks that “you can’t afford to eat healthier”. You may not have much extra in your grocery budget, but that doesn’t mean you have to feed your family unhealthy foods. 

It does mean you may have to work a little harder to find good, whole foods. You may have to change some of your habits. You may have to cut some other unnecessary spending out of your budget. But you don’t get to cop out with excuses about not being able to afford healthy foods. (I know this first hand as our family was barely scraping by a couple of years ago, yet we did not have to compromise the quality of food we ate. We just had to be creative!)

I’ve just about come to the conclusion that eating real food costs less than eating processed food if you go about it the right way. Now, does grass fed beef and free range chicken and raw milk and organic produce generally cost more than the “regular” beef and chicken and milk and produce from the store? Sure. (Although I’ve found many ways to save on those items too which I’ll address later on in this series.)  But just hear me out on this. My boys and I did a little research one day when we were out shopping. Then we came home and did the math. We were shocked at the results we found!

The reason, by the way, that we did this little experiment is because I’m tired of people telling me that fresh produce is too expensive. So instead of giving their kids fruits and vegetables, moms (the ones complaining to me about “expensive” fruits and vegetables) fill them up on “cheaper food” like crackers and fruit snacks. I wanted to see if indeed crackers and fruit snacks were cheaper than fresh produce.

My boys and I went down the snack aisle, writing down prices and ounces of some popular snack items. Then we wrote down prices of some of our favorite fresh fruits like apples, watermelon, pineapple, bananas, oranges, peaches…

The cost for the best in-season produce averages to be around $1.00 to $1.50 per pound (or even much less in many cases). 

But check this out: 

  • The cost for a box of cheese crackers…$3.20/pound (yes, we actually calculated how much the cost was per pound!)
  • The cost for chocolate sandwich cookies with the white filling inside that you lick out and dunk in milk (yeah, you know what I’m talking about)…$3.84/pound
  • The cost for an off brand of fruit snacks…$2.56/pound
  • The cost for a box of granola bars…$4.18/pound

Now, I know this price comparison isn’t apples to apples (literally!). I recognize that you can use coupons to cut the cost of the boxes of snacks. I realize that when you pay for a watermelon, you’re paying for the rind that you cut away, so that part shouldn’t really count when you’re figuring cost per pound. Yes, I realize all of the variables that make this experiment not exact.

But I hope you kind of get the idea that when you break down the cost of processed foods (that do practically nothing to nourish us) compared to the cost of fresh produce (which do quite a bit to actually nourish us)…you aren’t really right on track if you think that buying “cheap” boxes of snacks is saving you money. Produce, if bought in season, is really quite reasonably priced. 

Alrighty…this post is getting long!! I’ll stop there and we can talk more later about all kinds of other things you can do to save money as you switch to a healthier lifestyle. There’s so much to talk about as we break down Simple Steps Toward Healthy Eating!

But do give some thought to your mind-set about spending money on food. Are you looking at it in the right way? Are you really saving money when you avoid some of the “more expensive” healthier foods and instead buy “cheaper” food?

And what about the long term effects of not eating healthy now? Will health care costs outweigh what we might be saving in groceries?

Heavenly Homemaker's Club Members: Access your homepage and all your fantastic resources here! Not a member yet? Please join us!

Gratituesday: Oh, the Abundance

August 23, 2010 by Laura 26 Comments

This post may contain affiliate links. For more information, please see our disclosure policy.

gratituesday

I am writing this Gratituesday post as a reminder to myself to be grateful for Pete’s sake. You know why? Because lately I have been a whiny baby who has been feeling very sorry for herself. 

What in the world is wrong with me? 

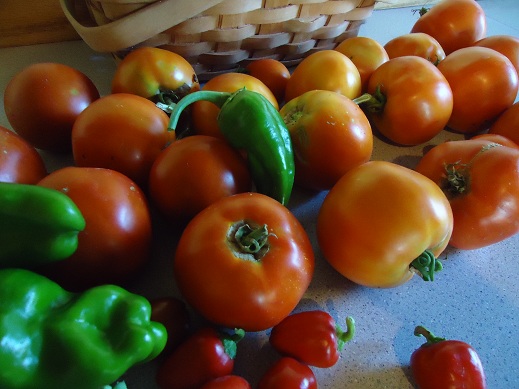
I’ve been whining because I have tomatoes and peppers needing to be picked at a crazy fast pace. I can hardly keep up with making them all into tomato sauce and salsa. They are constantly covering my counter-tops.

salsa_1

Also, my friend gave me a huge bunch grapes that I need to hurry and do something with. And I have two sacks of apples that I keep tripping over that really should be made into applesauce. And there are more apples to be picked if I could ever get around to going to pick them.

My kitchen is exploding with abundance…and I am whining.

I’m whining because I have too much food.  Really Laura? I’m whining because I have so much work to do, really?

It’s time for me to stop whining and be grateful. 

Thank you for letting me confess my rotten attitude and for holding me accountable to changing it.

God is good and if I can’t remember that…perhaps I should just take a good look around my kitchen at all the abundance. Because of Him, my family will not go hungry. 

Nope, in fact…we’ll be eating like kings.

What are you thankful for this Gratituesday? Write about it on your blog, then come link up with us here. If you don’t have a blog, be sure to leave a comment letting us know what you’re grateful for!

If you are linking up a blog post for Gratituesday,
please copy and paste the following sentence into your post! Thanks!


Join us for Gratituesday at Heavenly Homemakers!

Heavenly Homemaker's Club Members: Access your homepage and all your fantastic resources here! Not a member yet? Please join us!

Homemade French Dressing

August 22, 2010 by Laura 38 Comments

This post may contain affiliate links. For more information, please see our disclosure policy.

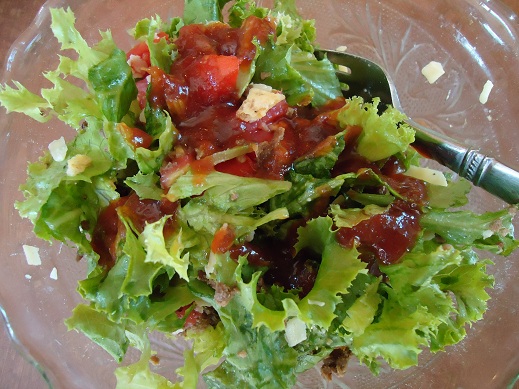
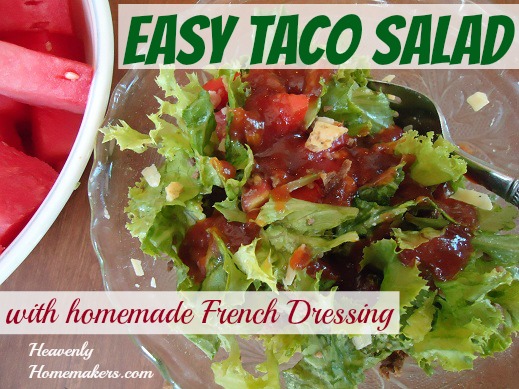
I figured out a French Dressing recipe that includes only real food ingredients and avoids high fructose corn syrup! It also means I can enjoy Taco Salad the way I used to – again without the high fructose corn syrup. Mmm, real food. I love revisiting my favorites and eating them in a healthier way!

french_dressing_2

Back in the day when I didn’t know what high fructose corn syrup was or understand that it was bad for us…I used to make a killer taco salad with Catalina Salad Dressing. Man that stuff tasted good!

I’d mix up a big bowl of lettuce, taco seasoned meat, shredded cheese, chopped tomatoes, chili beans, crunched up tortilla chips – and toss it all with Catalina. Such a perfect summer supper (or dinner, or whatever).

After a little experimenting, I came up with a yummy homemade French salad dressing that tastes even better than the store bought ever tasted! It’s so easy to put together, it’s inexpensive to make, and it tastes wonderful in my taco salad! It’s a blast from the past, only better.

Homemade French DressingYum

Homemade French Dressing
 
Save Print
Author: Laura
Ingredients
  • ¾ cup ketchup
  • 2 Tablespoons sucanat (you can substitute brown sugar if you want)
  • ½ cup olive oil
  • ¼ cup red wine vinegar
  • ½ teaspoon garlic powder
  • ¼ teaspoon liquid smoke
  • 1 Tablespoon ground celery seed
Instructions
  1. Put all ingredients directly into a pint sized jar.
  2. Put the lid on and shake it well.
  3. Refrigerate.
3.4.3177

I recommend Muir Glen Organic ketchup because guess what? It doesn’t include high fructose corn syrup.

Easy Taco Salad with homemade French Dressing

Remember that you can also find recipes for homemade Ranch Salad Dressing, Italian Salad Dressing and Thousand Island Salad Dressing in the Condiments Page of my recipe section!

And also…if that’s just too much salad for ya…you can find a recipe for Chocolate Caramel Truffles on the Desserts Page. I’m always willing to accommodate. ;)

Heavenly Homemaker's Club Members: Access your homepage and all your fantastic resources here! Not a member yet? Please join us!

Menu Plan for the Week

August 22, 2010 by Laura 8 Comments

This post may contain affiliate links. For more information, please see our disclosure policy.

Well, after feeding the soccer team last week, we’re back to just the six of us for most of this week. I’ve gotta say that while I LOVED feeding the team…I’m tired. :)  I’m kinda glad to be back to just feeding six people three times a day (okay five times a day, who am I kidding?). 

My tomatoes are ripening at lightening speed even though I thought they’d never be ready. Just a few days ago I said to Matt, “Do you think the tomatoes will EVER turn red?!” And now ALL the tomatoes are turning red. At the same time. And they’re big.

It’s awesome really…just keeping me very busy making tomato sauce and salsa. That’s what this time of year is though…busy!

Here’s our menu for the week:

Sunday, August 22
Oatmeal, peaches
Potluck:  BBQ chicken, Death by Chocolate
Cheddar ranch burgers, potato wedges, watermelon

Monday, August 23
Creamy orange coolers, chocolate chocolate chip muffins
Grilled tomato and cheese sandwiches, cherries, carrot sticks with ranch dip
Chicken Stir Fry with broccoli, carrots and squash

Tuesday, August 24
Simple soaked pancakes, blueberries
BLTs, cantaloupe
Cheesy Salsa Enchiladas, tossed salad

Wednesday, August 25
Mini apple pies
Bean dip with fresh tomatoes, lettuce and chips, grapes
Creamy mac and cheese, steamed carrots

Thursday, August 26
Giant breakfast cookies, applesauce
Chicken Fried Steak Strips, mashed potatoes and gravy, fried okra
Chicken Veggie Quesadillas, watermelon

Friday, August 27
Fruit and Yogurt , orange muffins
Tacos with the works
Homemade corn dogs, fruit salad

Saturday, August 28
Funnel Cake
Leftovers
Grilled steak, tossed salad, green beans, corn on the cob

——————————————————

Please be sure to visit my new sponsor Emergency Essentials!

——————————————————

Visit Organizing Junkie for more Menu Planning inspiration!

——————————————————

Heavenly Homemaker's Club Members: Access your homepage and all your fantastic resources here! Not a member yet? Please join us!

Family Vacation, Part 4 (finally!)

August 20, 2010 by Laura 17 Comments

This post may contain affiliate links. For more information, please see our disclosure policy.

If you’re curious, you can see pics of our Family Vacation Part 1, Part 2 and Part 3!

Did you think I would EVER show you the pictures we took of our kids at the beach? Or did you forget about it all together? I’m just a tad bit behind, that’s all.

In fact, I feel so far behind on all the posts that I want to write and recipes and ideas I want to share I’m not sure I’ll ever catch up. Hopefully you’ll be patient with me and keep coming back each day to see if I’ve posted something new in the Simple Steps Toward Healthy Eating series and the Becoming a Better Help Meet series. Or to see if maybe I’ve finally posted a new High Five Recipe…or maybe a new recipe for Healthy Celebrations. Or to see if I’ve finally answered the questions you’ve sent me via email. Or the questions you’ve left in the comments section. I really haven’t forgotten about all of those things. I just have a very long list. At least I’ll never run out of material!! Thank you all so much for being patient with me!

Anyhoo…here are the final pictures of our trip to Michigan in July. 

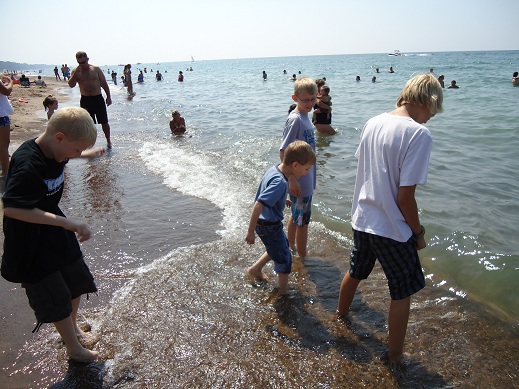
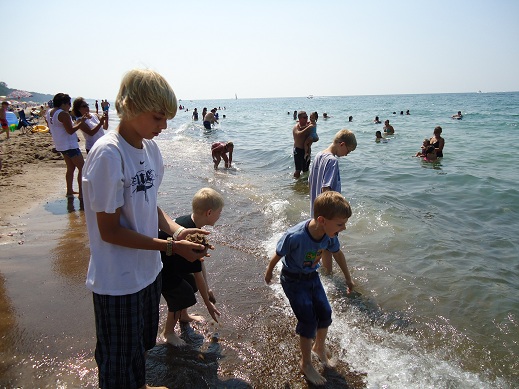
Our boys (with the exception of our oldest) had never been to a beach (ah, but they’ve seen their fair share of corn fields, yes they have). We really wanted to be sure and carve out some time to take them to Lake Michigan on our way home. We didn’t have tons of time and since we were traveling, we didn’t put the boys in swim gear. We just found a good (free) beach location and stopped for a little while to play in the water. 

beach_1

I can’t even tell you how perfect the weather was that day, or how perfect the water felt, or how much fun our boys had just standing in the water and jumping small waves.

beach_2

I don’t think I stopped smiling and laughing at the kids the entire time we were there. The younger boys seriously squealed (in that manly way boys squeal of course) for an entire half hour. I’m sure the folks around us who are used to being around that much water thought we all must be loony. Yeah well…we’re used to corn fields, remember?

beach_3

Asa found some really cool rocks. And oh yeah…Malachi insists on wearing jeans almost daily. Even when it’s a hundred and fifty degrees outside. Today was no exception. I rolled his  pant legs up, but…

beach_4

I think they started weighing him down a little bit.

beach_6

Here we all are taking an awesome boat ride in Lake Michigan. Just kidding. Here someone else is taking an awesome boat ride in Lake Michigan. We just watched and took a picture.

beach_7

And here’s a house Matt found for sale along the beach. We’re thinking of buying it. You know, because it’s totally within our budget to buy beach property in Michigan. 

Yeah, just kidding. As nice as it was to be at the beach, I’m afraid if we moved we’d miss the corn fields too much.

Heavenly Homemaker's Club Members: Access your homepage and all your fantastic resources here! Not a member yet? Please join us!

Homemade Ice Cream Sandwiches

August 18, 2010 by Laura 21 Comments

This post may contain affiliate links. For more information, please see our disclosure policy.

When I mentioned that I was making homemade ice cream sandwiches for the YC ladies soccer team, several of you said, “You ARE going to share your recipe aren’t you?!”

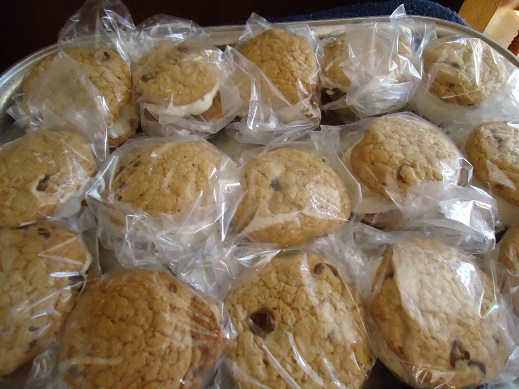
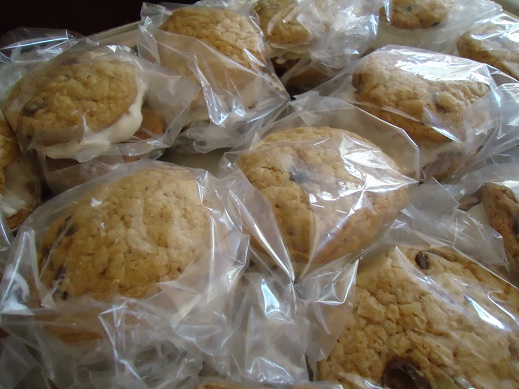
Uh yeah. Who am I to hold back on a recipe that includes cookies and ice cream? That would just be mean. Although this isn’t really a recipe exactly.  I just put ice cream between two cookies and called it a sandwich. I didn’t even make the homemade ice cream this time. I needed to make 40 of these and I was making homemade ice cream for the team another day…so this time it was Breyers to the rescue!

First off, I baked TWO double batches of these chocolate chip cookies. I used a Pampered Chef medium sized scoop so that my cookies would mostly, sort of turn out uniform in size. You must make sure your cookies are completely cooled for obvious ice cream sliding avoidance purposes. In fact, I made mine ahead and froze them. Then they were nice and cold and ready for ice cream.

Here’s the Homemade Ice Cream Sandwich math:

~A double batch of chocolate chip cookies made about 40 big cookies, which was enough for 20 ice cream sandwiches. Therefore I needed TWO double batches of chocolate chip cookies to make 40 ice cream sandwiches. I suppose that would be a quadruple batch, wouldn’t it?
~One container of Breyers Ice Cream was enough for thirty ice cream sandwiches.

I let the ice cream soften just a bit on my counter top. By “just a bit” I mean I have  no idea exactly how long I left it there. I brought it home from the store and put a few other groceries away and helped one of the kids on a math problem then got out supplies to make the sandwiches then started some meat cooking on the stove then washed my hands and finally started putting the sandwiches together. Yeah, about that long. The ice cream was then nice and soft for scooping, but not yet running all over my counter and down into my silverware drawer.

Once your ice cream is soft – but not too soft, good luck with that – pick two cookies that look pretty similar in size.

ice_cream_sandwich_1

Yum

Place a scoop of ice cream onto one of the cookies. If you get some on your fingers you are not allowed to lick it off. You are making these to share with other people right? Work hard to avoid the temptation to lick your ice creamy fingers. It will not be easy. But you can do it. If I can do it, you can do it. Believe me. Because it was lunch time and I hadn’t eaten yet.

ice_cream_sandwich_2

Place the second cookie on top of the ice cream which is on top of the first cookie. Squish it down just a little bit. But not too much. If you squish too much the ice cream will ooze all out of the sides of the sandwich and wow will you have a mess. So don’t blame me if you squish too hard. I warned you to do slight squishing.

ice_cream_sandwich_3

Hold up the pretty ice cream sandwich and show all family members and friends who are around and wish to see it. And then tell them that sorry, they can’t eat it yet.

ice_cream_sandwich_4

Place each ice cream sandwich in a little fold top sandwich bag. Who knew those were really for ice cream sandwiches and not just ham and turkey?

ice_cream_sandwich_6

Place all the wrapped sandwiches on a pan in the freezer for at least two hours or for however long you need to keep them there. Or for however long you can keep them there as these are rather tasty and people will want to take them out of the freezer and eat them.

ice_cream_sandwich_7

When you are eating your very own ice cream sandwich, you are then allowed to do all the squishing of the ice cream you would like to do. You are also then allowed to lick your fingers…and the ice cream that may or may not be running all the way down your arm toward your elbow.

Go ahead, see if you can lick your elbow.

You tried it just now didn’t you?

For the record, I am not quite able to reach my elbow to lick it. I will need to catch the running ice cream before it reaches my elbow. You?

No, not my elbow…yours. You may NOT lick my elbow.

Lick your own elbow…if you can.

Can you?

Yeah, explain this one to your family.

“Mama, why are you sitting at the computer trying to lick your elbow?”

“Just getting ready to make Ice Cream Sandwiches, Dear.”

Heavenly Homemaker's Club Members: Access your homepage and all your fantastic resources here! Not a member yet? Please join us!

Where to Buy Vanilla Beans

August 17, 2010 by Laura 61 Comments

This post may contain affiliate links. For more information, please see our disclosure policy.

I’m often asked where I recommend you buy vanilla beans to make homemade vanilla extract. You have checked into making homemade vanilla, right?! :)  Ooh, it’s so delicious…and easy…and can save you a lot of money!

I recently began a new batch of homemade vanilla extract but since I don’t purchase vanilla beans very often, I didn’t have a “go-to” source for them. I did a little research, and liked Olive Nation as they appeared to have a high-quality vanilla bean for a very reasonable price, plus they offered free shipping on orders over $50 and 15% off when we use the coupon code home. So I ordered a pound of vanilla beans from Olive Nation.

When my vanilla beans arrived just a few short days later I was very, very impressed. The beans were shipped very promptly. They were packaged very nicely. The beans were excellent quality.

I thought to myself, “I like how these people do business. I’m going to contact them.”

So I did….and they agreed to give all of you a discount on vanilla beans!!! They already offer free shipping and reasonable prices, so for them to offer a 15% discount on top of that for Heavenly Homemaker’s readers is awfully nice, wouldn’t you think?

If you order your vanilla beans through Olive Nation and use the code:  home you’ll receive a 15% discount on any size order of vanilla beans. Plus free shipping on orders over $50. Plus receive prompt service. Plus receive excellent quality vanilla beans.

When I did the math on how much it would cost me to make a big batch of homemade vanilla using beans from Olive Nation and inexpensive vodka from the store…it ended up saving me more than 50% over store-bought vanilla. So, yes making homemade vanilla does save money. Plus the homemade vanilla you make using this method makes very strong vanilla…so you can use half of what a recipe calls for! More savings!!!

The process I use for making homemade vanilla takes about six months, but if you want to start a batch now and have it ready for Christmas gifts…it will still work (if you hurry and get it started!!)…it just won’t be quite as strong as if you’d given it the full six months to “extract”. I say go for it! Your family and friends will love it and you will have made them a wonderful gift at a very low cost to you. If you do, check out these pretty labels! They are customizable, and come in several fun designs!

I’d like to thank Olive Nation again for offering the coupon code (home) to all of Heavenly Homemakers readers. Be sure to check them out…I was very pleased with their service and prices and I think you will be too!

OliveNation banner 460x60

(disclosure)

Heavenly Homemaker's Club Members: Access your homepage and all your fantastic resources here! Not a member yet? Please join us!

Gratituesday: Teamwork

August 16, 2010 by Laura 14 Comments

This post may contain affiliate links. For more information, please see our disclosure policy.

gratituesday

Matt and I love the idea of working together as a team. We don’t get to spend nearly as much time together as we would like to, but as much as possible we like to do “teamwork”. Work gets done so much faster when we work as a team.

Now that our boys are getting older, they join in the teamwork. They’ve always been “helpers” but wow is it cool that they are all old enough to really be a part of our “team” as we serve together.

I’ve really been struck by the blessing of our family working together as a team while we’ve all been feeding the soccer team together this week. Our boys don’t always do what they’re asked to do without complaining (trust me), but for some reason this week they are hopping right in…asking what needs to be done…going from one job to the next without complaint.

cooking_for_YC_1

cooking_for_YC_2

 I am so proud of them. The work has been so much more fun with all the boys pitching in and being a part of our team!

What are you thankful for this Gratituesday? Write about it on your blog, then come link up with us here. If you don’t have a blog, be sure to leave a comment letting us know what you’re grateful for!

If you are linking up a blog post for Gratituesday,
please copy and paste the following sentence into your post! Thanks!


Join us for Gratituesday at Heavenly Homemakers!

Heavenly Homemaker's Club Members: Access your homepage and all your fantastic resources here! Not a member yet? Please join us!

When to Compromise on Healthy Foods??

August 16, 2010 by Laura 43 Comments

This post may contain affiliate links. For more information, please see our disclosure policy.

I always try to make my guests feel like I went out of my way to “treat” them to some good home cookin’, but I will let you know that I do compromise a little on some of the ingredients I use when I’m feeding a very large crowd. Hey, when you’re feeding 40 people five different meals within a week’s time, can you expect a girl to make all the mozzarella cheese and tortillas and bread for every meal? 

Also, I’m not always willing to share some of my home-canned produce. I’d run out of our home-canned tomato sauce real fast if I used six jars to make enough lasagna to feed everyone one meal.

Is this selfish of me? Is it wrong of me to compromise? I don’t think so, but you may (kindly) disagree with me. My own family comes first and while I am very willing to share our good, healthy food on most occasions…I know that my resources are somewhat limited. I can’t just run right out and replace our home-grown organic produce once it’s gone. I have to ration it for the year and be wise with how I use it. 

I still use real butter and in general “real ingredients” when I’m cooking for large crowds…I just don’t always whip out my stash of real maple syrup or sucanat.

I find that in general, people are so used to eating processed foods, that even my homemade food made with what I consider to be compromise food is a treat for them. 

I also don’t feel like eating the occasional “less than the best” foods are going to kill my family. We eat very well at almost every meal. Eating the occasional store bought tortilla or white french bread from the bakery is okay. Really, I think it is.

I think that if I felt like I had to feed all of the extra people we feed our grass fed meat and homemade bread made with freshly ground flour…I would probably drop the whole thing and NOT FEED ANY EXTRA PEOPLE EVER. So what’s the trade off? Should I serve others, or be so worried about compromising ingredients that I never serve ever? 

I will say that in our day to day company…the times that we have just a few people over at a time…I DO tend to stick with our normal way of eating and I do it without a problem. We’ve budgeted in extra knowing that we feed a lot of company, therefore I buy extra meat and can/freeze extra produce to accomodate. But that’s just enough for “regular” company. Its a little different when we’re feeding 34 extra people at one time!!

Oh, and I will also admit that during these days that we’re feeding all these extras…we’re using paper plates. :(  I HATE using paper plates (both because of cost and because of waste) but seriously I don’t think I could stay sane if I was washing all those extra dishes. I’m still trying to get through a school day at home too, ya know? I bought a bag of Solo cups, had the girls write their  names on them and we’re using them all week long. And I did NOT buy styrofoam anything…but still. I hate using disposable and I’m doing it anyway. I know my limits.

Alrighty, well this was a choppy and poorly written post. Let’s blame it on the fact that my week is VERY busy and I don’t have time to concentrate or edit. :)

I’d love for you to share your thoughts on when you compromise on healthy foods and when you don’t. And when do you pull out the paper plates? ;)

Heavenly Homemaker's Club Members: Access your homepage and all your fantastic resources here! Not a member yet? Please join us!
« Previous Page
Next Page »

Join Our Community!

 Facebook Twitter E-mail Instagram Pinterest

Popular Posts

~ Will All of the Real Moms Please Stand Up?
~ Easy! Stir-and-Pour Whole Wheat Bread
~ How to Make Gatorade
~ 31 Real Food Breakfast Ideas
~ Dear Teenage Girls...
~ When Mom Takes a Step Back
~ The Inexpensive Health Insurance We Love!
~ Let's Talk Real Food Grocery Budgets

Check out our latest posts!

  • Big Family Food and Fun: September 20-26, 2026
  • Big Family Food and Fun: September 13-19, 2026
  • Big Family Food and Fun: September 6-12, 2026
  • Big Family Food and Fun: August 30-September 5, 2026
  • Big Family Food and Fun: August 23-29, 2026
Home  ~  Simple Meals  ~  Club Membership  ~  Shop  ~  Privacy Policy  ~  Disclosure  ~ Contact

Copyright © 2026 · Beautiful Pro Theme on Genesis Framework · WordPress · Log in