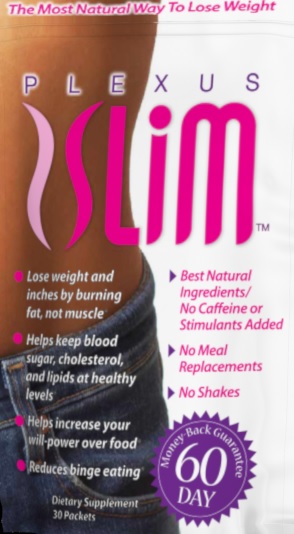
Heavenly Homemakers

Encouraging women in homemaking, healthy eating and parenting

  • Home
    • About
    • FAQs
  • Recipes
    • Bread and Breakfast
    • Condiments
    • Dairy
    • Main Dishes
    • Side Dishes and Snacks
    • Desserts
    • Gluten Free
    • Instant Pot
    • Crock Pot
    • Heavenly Homemaker’s Weekly Menus
  • Homemaking
    • Real Food Sources
  • Store
  • Contact
    • Advertise
    • Disclosure
    • Privacy Policy
  • Simple Meals
  • Club Members!

How You Can Get Our Curriculum Kit Plus Four Other Resources For LESS Than the Cost of the Curriculum

August 6, 2014 by Laura Leave a Comment

This post may contain affiliate links. For more information, please see our disclosure policy.

I loved watching this order come through on Monday, knowing the recipient was getting a huge bang for her buck.

shopping cart

See, normally our Learn Your Letters, Learn to Serve complete curriculum kit download is $45.00. You get a lot in this kit, no doubt. But this week? Since we’re running a 40% off sale on everything downloadable on our site, you can get the curriculum kit plus several other resources – for LESS than the original cost of the curriculum.

If you’ve been eyeing any of our downloadable items, from ebook to eCourse to curriculum – you must take advantage of this great deal this week. Use the code BIRTHDAY at checkout to receive 40% off your entire order of downloads. Note:  All printed items are excluded from this sale. Watch for fun bonus buys with printed books soon!


Many are taking advantage of this huge discount. Have you? Come and get it!!

Heavenly Homemaker's Club Members: Access your homepage and all your fantastic resources here! Not a member yet? Please join us!

How To Create Easy, Healthy, Fun Lunches: The Make-Ahead Lunch Box Series

August 5, 2014 by Laura 51 Comments

This post may contain affiliate links. For more information, please see our disclosure policy.

Ahhhhh, lunch. Whether you pack a lunch for yourself or your husband to take to work, send your kids to school with a lunch box, or eat lunch at home everyday – I believe every one of us can benefit from learning new make-ahead lunch ideas.

Since I’m not a fan of the sugar crashes, brain fog, or grumpiness that come after eating or feeding my kids empty carbs and processed foods, nor do I have time to cook complicated meals in the middle of a busy work/school day – I thought putting together a series of posts which include healthy make-ahead lunch ideas would be fun. Are you with me? Do you want some fresh new lunch box ideas? Do you have some ideas of your own to share?

Introducing:  The Make-Ahead Lunch Box – a new series here at Heavenly Homemakers.

The Make-Ahead Lunch Box

Sandwiches are great, and in fact, I’m hoping to put together a fun post full of great sandwich ideas within this series. (Have any to share? Leave a comment to let me know!)  But packed lunches, make-ahead lunches, and quick pull-out-of-the-fridge lunches can go way beyond sandwiches.

Healthy food that can be prepared ahead of time, then slipped into a lunch box or onto the table with minimal effort? Oh yes, bring it on.

From allergy friendly, to picky kids, to figuring out how to include plenty of fruits of vegetables – I think we’re all going to have a lot of fun together as we learn new recipes, tips, and ideas. So let’s get started right away!

Leave a comment on this post sharing your biggest lunch challenges, your best healthy lunch tips, and favorite lunch-time foods. Can’t wait to hear!

Heavenly Homemaker's Club Members: Access your homepage and all your fantastic resources here! Not a member yet? Please join us!

Gratituesday: Cherish the Moments. No, Seriously.

August 4, 2014 by Laura 63 Comments

This post may contain affiliate links. For more information, please see our disclosure policy.

gratituesday[2]

Our family tradition started back in 2008 when the boys were all just little guys. We’d make a list, walk the aisles of school supplies, and pick up crayons, markers, glue sticks, and paints. We’d celebrate the upcoming school year by going out to lunch after our school supply shopping. Year after year, we continued the tradition.

Would you look at these sweet young things? The boys were 3, 6, 8, and 11 then.

shoppinglunch3sm.JPG

Now, at the beginning of our 2014-2015 school year, I asked the boys if they’d mind doing this for me one more time. After all, it’s the beginning of Asa’s senior year. Who cares that we didn’t need one measly school supply this year? It’s been tradition for seven years in a row. I needed this picture.

first day of school 2014 4

Thirteen years.  That’s how long we’ve been homeschooling. Through the nursing baby years, the toddlers crawling all over our school books years, the learning to read years, the never can find a sharpened pencil years – we survived.

We are now in the algebra years, the reading novels and learning foreign languages years, the prep for the ACT years, and the what should I do after graduation years.  I do not know how we got here.  When did C.S. Lewis replace Curious George? How did simple addition turn into roman numerals turn into geometry theorems? How did my babies grow taller than me and become the ones who teach me how to use new software on the computer?

How I used to roll my eyes at the people who told me to “enjoy my boys while they are young because they grow up so fast.” Yeah, yeah, I know. Enjoy them and embrace this and cherish it all  blah, blah, blah because someday they’ll be grown up and I’ll miss those little years full of smeared snot and poop accidents and grocery cart tantrums.

The little years were long and hard and the snot and poop were ever-present and not something I wanted to document in the baby book. I was cherishing and embracing, but you better believe I also moved mountains so that I could take an occasional trip by myself to the grocery store – where for thirty blissful minutes nobody needed me or pulled on my leg.

That was all good. It’s okay that I found refreshment in the little slice of heaven that occurred while I waited to sack my groceries. Raising babies and toddlers and preschoolers is incredibly difficult and without a doubt, sometimes it is just plain hard to embrace and cherish each moment. Praise God for all the cute stuff that counteracts all the teething and tantrums. Praise God for nap time. Praise God for sticky kisses and grimy hugs and unconditional love from smiling baby faces.

It seems that I may have just thrown myself over into the other camp. I am now that lady – the one who will tell you to enjoy them while they’re young. (I totally give you permission to hate the poop accidents though.)

Those people – the ones that tell you how fast your kids will be all grown up? They weren’t even kidding. They were right – and if I was annoyed with them for saying it when my kids were little, now I’m just mad. How dare they be right? How is it that they said I would blink and they’d be grown? They really meant it, and it really is true. Somebody put on the brakes. This has gone entirely too fast.

As our oldest son begins his senior year, I’ve learned anew what it means to cherish the moments. This year is filled with a lot of “lasts.” Oh but praise God – this is also the beginning of a lot of “firsts.” Life doesn’t end as our kids grow older and launch the nest – but you’d better believe even the small and normal moments of life are a treasure to me like they never have been before.

We still have several years of parenting and schooling and guiding our kids along. But the beginning of this school year signifies big changes for our family in the upcoming years. What a story we’ll have to tell as we continue to experience God’s work in our lives.

You’d better believe – I’ll be cherishing this time for all its worth.

Please leave a comment to share what you’re grateful for this Gratituesday!

Heavenly Homemaker's Club Members: Access your homepage and all your fantastic resources here! Not a member yet? Please join us!

Menu Plan for the Week ~ The Boys Are Back in Town

August 3, 2014 by Laura 13 Comments

This post may contain affiliate links. For more information, please see our disclosure policy.

After a very busy and full three months of travel, mission trips, family reunions, and church camps – our family is all home and back together again. We have loved all the great experiences we’ve had all summer, especially loving that our boys have had such rich times of spiritual growth at church camp. We also really loved seeing family we don’t get to see very often. But being home together again and settling into a routine? We are so thankful!

I counted.  In all 31 days of July, I was home only 7 days. And those 7 little days I was home? I was only able to do bare minimum, like laundry and packing for the next trip. Phew! My house is dirty. My computer work is backed up. I don’t even know what’s in the back of my fridge. No matter. I’m refreshed and ready to settle back into home and work life again.

Also? I’ve missed you.  I really needed the computer break. I needed the break from writing day after day. I needed to step away from all the work it takes to keep up with this blog. Now that I’ve had this time of refreshment and break from the norm, I am so ready to sit here with you, sharing what I’ve learned, hearing about your experiences, and serving alongside you as we create heavenly homes and love our families together.

So, hi! I’m back. Praise God for how He works and the opportunities He provides to give us just what we need. I hope your summer has been full of God and the perfect lessons He teaches as we seek His will.

Fresh Peaches

Our peach trees are giving us all kinds of delicious fruit right now.
What a great treat to come home to!

In other news:  As of today, I am 41 years old. It’s been a fun, happy birthday so far with all my men spoiling me. I look forward to celebrating my birthday with you, too. Watch for fun sales starting tonight!

Fresh Peaches 2

Fresh banana bread and sliced peaches right off the tree? Perfection.

Now how about a menu plan? I haven’t written one for the past few weeks, so here’s hoping I still remember how. After all, all the boys are back home, and a couple of them grew several inches during the summer. I’m getting shorter and shorter all the time in this family of growing boys. People who haven’t seen them for a few weeks have commented that they didn’t even recognize them at first. Seriously, these teenage boy growth spurts are nuts. Wow, I love these kids – and their appetites.

pasta salad bar 3

Have you tried this great Pasta Salad Bar idea yet? What are you waiting for?!

Here’s this week’s menu plan:

Sunday, August 3 (Happy Birthday to me)
Banana bread, strawberries
Out to lunch for a birthday treat
Shrimp and veggie stir-fry with asparagus, broccoli, yellow squash, carrots, and zucchini; watermelon

Monday, August 4 (We start our school year today)
Whole wheat waffles, strawberries, blueberries, whipped cream
Meat and cheese burritos, sweet peppers, olives, pineapple mango smoothies (with spinach blended in)
Italian cream cheese chicken, tossed salad, asparagus

Tuesday, August 5
Honey cinnamon muffins, scrambled eggs, raspberries
Chef salad, banana bread, watermelon
Grilled barbeque chicken, corn on the cob, garden green beans, fried zucchini

Wednesday, August 6
Cream cheese filled crepes, fresh berries
Baked potatoes in the crock pot topped with ham, cheese, sour cream, and peas; cantaloupe
Burgers on the grill, zucchini-cheese casserole, tomatoes, pickles, honey dew melon

Thursday, August 7
Fried eggs, sausage, cantaloupe, blueberries
Baked beans with hot dogs, strawberry peach slushies, carrots and cucumbers with homemade ranch
Lamb chops, cheesy cauliflower cakes, tossed salad, green beans

Friday, August 8
Raspberry oatmeal bars, applesauce, cheese
Pasta salad bar with lots of veggies, watermelon
Chicken veggie quesadillas, tossed salad, cantaloupe

Saturday, August 9
Scrambled eggs, hashbrowns, creamy orange cooler with spinach blended in
Leftovers
Salmon patties, tossed salad, sweet peppers, cucumbers, strawberries with chocolate cream

What’s on your menu this week? Have any fun plans?

Heavenly Homemaker's Club Members: Access your homepage and all your fantastic resources here! Not a member yet? Please join us!

Easy, Healthy, Delicious ~ Zucchini Recipes

July 31, 2014 by Laura 21 Comments

This post may contain affiliate links. For more information, please see our disclosure policy.

Zucchini Recipes - Easy, Healthy, Delicious

We never plant zucchini in our garden any more. Why? Because about this time of year, friends, family, and people we’ve never met are begging us to please take 3 or 4 or 19 extra zucchini off their hands. Everyone who has zucchini growing in their garden seems to have more than they need. We save our garden space for other great produce, and are happy to “help” others by taking some of their excess fresh zucchini. Servant-hearted, that’s what we are. ;)

If you are someone who has lots of zucchini in your garden, or someone who lovingly takes zucchini from other people’s gardens – here are some of our favorite zucchini recipes:

1. Easy Fried Zucchini

Simply slice zucchini, and lightly stir-fry it in a little olive oil, coconut oil, or palm shortening. Cook until lightly brown, salt, and serve. Unbelievably delicious!

2. Zucchini Brownies

Yes, brownies with zucchini. Does life get any better?

3. Cheeseburger Zucchini Boats

These are easy to make and fun to eat. Perfection.

4. Zucchini Cake

With cream cheese frosting. You’re welcome.

5. Whole Wheat and Honey Zucchini Bread and Muffins

This is what we always think of when we have extra zucchini, right? Made with whole wheat and honey, this is super moist and wholesome at the same time.

6. Chocolate Chip Zucchini Cookies and Bars

No one even knows these have zucchini in them. :)

7. Easy Noodle Stir-Fry

This is one of our favorite “throw-together” meals. You can add any veggie you want, so why not zucchini? You won’t believe how delicious this is.

8. Teriyaki Chicken and Veggies

This is tangy and full of flavor, perfect for fresh zucchini.

9. Chocolate Zucchini Muffins

It doesn’t get any better than chocolate muffins that have a hidden vegetable inside! :)

zucchini muffins

What are your favorite ways to eat zucchini? Do you grow zucchini in your garden, or cheerfully take extra zucchini from friends?

Heavenly Homemaker's Club Members: Access your homepage and all your fantastic resources here! Not a member yet? Please join us!

Cream Cheese Filling For Your Crepes

July 30, 2014 by Laura 13 Comments

This post may contain affiliate links. For more information, please see our disclosure policy.

Want a Cream Cheese Crepe Filling that will change your life? I’m not even exaggerating (because I never do that). It doesn’t hurt that my Crepe recipe is super simple and delicious too. Need to eat gluten free? Gotcha covered. The crepes are made without flour and of course the filling is gf too. These are all real food and so, so good!

Quick and Easy Crepes

While Matt and I were cooking out at camp a couple weeks ago, we were blessed to work with a very talented lady who has been cooking for campers for years. One of her specialties? Homemade Crepes with cream cheese filling, topped with berries. You should have heard the kids as they walked by the kitchen and saw we were making crepes. “Is it crepe day tomorrow?!? I’ve been waiting all year for this day!”

Seriously, the campers love them. I believe we cranked out over 300 crepes in preparation for “Crepe Day.” Phew, what a job! But it was worth it. The crepes were amazing! The key to making these so great had to be the filling. Cream cheese filling.  Sooooo good!

We used powdered sugar at camp, but when I got home, I played with the idea to make the filling with stevia or maple syrup. Yum, yum, yummy.

Cream Cheese Crepe Filling

Cream Cheese Crepe FillingYum

Cream Cheese Filling For Your Crepes
 
Save Print
Author: Laura
Ingredients
  • 8 ounces softened cream cheese
  • 10 drops liquid stevia or 2 Tablespoons real maple syrup
  • ½ teaspoon vanilla extract
Instructions
  1. Beat ingredients together until smooth.
  2. Place about 2 teaspoons of filling in each crepe.
3.4.3177

I whip my cream cheese filling ingredients together in my Blendtec, which takes about thirty seconds.

Here’s my super easy Crepe Recipe.  Wholesome, filling, and delicious. And with cream cheese and berries? Heavenly. :)

Want more Simple Recipes like this one?

We’ve got a long list of quick and easy recipes for you to enjoy here! Subscribe for FREE to Heavenly Homemakers so you won’t miss all the new Simple Recipes we share!

  • Simple Baked Salmon and Asparagus
  • Simple Crock Pot Chicken Soup with a Kick
  • Simple Skillet Taco Pasta
  • Last-Minute Lentil Chili
  • Simple Sweet and Sour Baked Chicken Legs
  • 20-Minute Taco Soup
  • Simple Cheesy Baked Chicken
  • Simple Creamy Chicken Stew in the Crock Pot
  • Simple Italian Beef and Broccoli Skillet
  • Simple Bacon Ranch Chicken
  • Simple Hawaiian Crock Pot Chicken
  • Simple Taco Rice Dinner
  • Simple Last Minute Nacho Plate
  • Simple Chicken Cheeseballs with a Kick
  • Simple Beanie Weanies
  • Simple Crock Pot BBQ Spareribs
  • Simple Pizza Chicken Bake
  • Simple Italian Chicken and Green Bean Bake
  • Last Minute Creamy Bacon Spaghetti
  • Simple Hamburger Soup
  • Simple Parmesan Broiled Fish
  • Simple Overnight Saucy Crock Pot Chicken
  • Simple 15-Minute Meal
  • Simple Overnight Melt-in-Your-Mouth Beef Roast
  • Simple 3-Cheese Crock Pot Pasta
  • Simple Oven Fried Chicken
  • Simple Honey Mustard Chicken Legs
  • The Easiest Mashed Potatoes in the World
  • Simple Garlic Butter Shrimp
  • Simple Crunchy Ranch Chicken Strips
  • Simple Crock Pot Shredded Ranch Chicken (for salad or tacos)
  • Simple Crock Pot Pizza Casserole
  • Simple Barbecue Beef Roast
  • Simple Spanish Rice Bowls
  • Simple Roasted Rotiserie Chicken
  • Simple Green Chile Chicken
  • Simple Tex-Mex Creamy Chicken
  • Simple Waffle Omelets
  • Simple Crock Pot Taco Pasta
  • Simple Grilled Chicken
  • Simple Hawaiian Beef Roast
  • Simple Crock Pot Creamy Stew Meat
  • Simple Cheese Stuffed Burgers
  • Simple Hashbrown Casserole (For Instant Pot, Crock Pot or Oven!)
  • Simple Lasagna Casserole (For Instant Pot or Crock Pot)
  • Simple Chili Mac
  • Simple Bacon Cheeseburger Casserole
  • From Burrito Bar to Casserole (a 5-Minute Meal!)
  • Simple Bacon Cheeseburger Roll
  • Simple Garlic Parmesan Chicken Legs
  • Super Simple Lasagna
  • The Simplest White Chicken Chili
  • Simple Lentil Nachos
  • Simple Tuna Patties
  • Simple Banana Pancakes

Enjoy all these recipes without effort when you become a Simple Meals member! Every week we’ll send you a great menu plan full of Simple Recipes like this one. We’ll equip you with a grocery list. We’ll break everything down so that your meal prep is as simple as possible. We’ll give you bonus tips and recipes and freebies. And this is all for just $1 each week. You’ll love it! Get all the details.

Heavenly Homemaker's Club Members: Access your homepage and all your fantastic resources here! Not a member yet? Please join us!

How To Cold Brew Coffee

July 29, 2014 by Laura 18 Comments

This post may contain affiliate links. For more information, please see our disclosure policy.

Why? Why would we want to cold brew coffee instead of sticking with regular hot brewing methods?

Well, so that you can make iced coffee. Or iced coffee cubes for your iced coffee. Or so you can make this awesome and healthy Chocolate Frappe.

In the past, I’ve simply hot brewed coffee as normal, then chilled it for about 24 hours until it’s cold enough to make cold coffee drinks. That has worked just fine, and I assumed I needed some sort of special equipment to make cold coffee brew. Thanks to those of you who shared your easy cold brew coffee methods, I now know it’s as easy as can be – without any special equipment!

Cold brew coffee is less acidic, and has a wonderful, smooth taste. I’m loving this variety of coffee on a hot afternoon. My favorite way to drink cold coffee? Coffee ice cubes, cold coffee, and a shot of real cream. It is heaven. (And not at all sweet. I love it that way, but my family thinks I’m crazy. Yup.)

How to Cold Brew Coffee

How to Cold Brew Coffee

  1. Place 1/3 to 1/2 cup ground coffee (or more if you like your coffee really strong) in a French Press or quart-sized jar.
  2. Add 4 cups cold water.
  3. Allow this to sit on your countertop for 8-24 hours. I usually start mine at night so it’s ready in the morning.
  4. If using a French Press, simply press filter down to separate liquid from coffee grounds.
  5. If using a quart jar, carefully pour your cold brew coffee through a coffee filter to separate liquid from coffee grounds.
  6. Refrigerate. Or make Coffee Ice Cubes. Or you can do what I do and make some coffee ice cubes then refrigerate the rest to use them together for cold coffee drinks.

Some instructions I’ve read suggest using quite a bit more coffee in this brew. What has been your experience with this?

Are you a fan of cold coffee?

Heavenly Homemaker's Club Members: Access your homepage and all your fantastic resources here! Not a member yet? Please join us!

Gratituesday: Sister Symposium

July 28, 2014 by Laura 7 Comments

This post may contain affiliate links. For more information, please see our disclosure policy.

I grew up without any sisters. Matt’s sister grew up without any sisters. Matt’s brother’s wife grew up without any sisters. Now that we are all married and a part of the same family? We all have each other.  As much as we love our brothers, having sisters in our adult lives has been such a special blessing.

Perhaps the biggest blessing of all is that we all love being together. Not all sisters-in-law are able to enjoy this, and the three of us don’t take it for granted.

This is a picture of us two years ago when we got together for our bi-yearly “Sister Symposium.”

Since they both live in California, I’m the only one who has to travel far. Therefore, they are kind enough to share my airplane ticket expense to make this get-together possible. We save more expense by staying in one of their homes so we don’t have to pay lodging.

What do we do during the 2-3 days we’re together? We talk, and talk, and talk. We shop (oh yeah!). We eat out. We go to the beach (this Nebraska girl’s favorite place to visit!). And we pray together: for our husbands, for our children, for our parents, for each other.

With our lives all so full and busy with working and raising families, it keeps getting harder and harder to get away and find time to spend together like this. But never once have we regretted the effort it has taken. Our time together as sisters is always rich. This week is no different.

I’m so grateful to be spending time with my sisters this week. What are you thankful for?

Heavenly Homemaker's Club Members: Access your homepage and all your fantastic resources here! Not a member yet? Please join us!

Putting up Green Beans for Winter

July 27, 2014 by Laura 34 Comments

This post may contain affiliate links. For more information, please see our disclosure policy.

This was originally posted in 2008. This is evident in the fact that Justus and Elias are only 8 and 6 in the picture below. They are now 14 and 12. Time flies – and little boys become teenagers. The green bean freezer method is still the same, however. Since we have been harvesting many the past few weeks, I thought it would be fun to re-post this tutorial. :)

How to Freeze Fresh Green Beans

After posting about how I put up corn for winter, many of you asked about green beans. I just happen to be in the middle of crazy green bean season. So…here you go!!

beans5sm.JPG

After picking our beans, I usually get my boys on “bean snapping duty” right away. (They never complain about this job. I think it’s because they are given permission to “break things”….what do you think?)  They snap off the ends and put the green beans into a colander. As soon as the colander is full I wash the beans to try to get as much “garden” (my nice way of saying bugs and dirt) off.

It is my understanding that in order to maintain as much green bean nutrition as possible, it is best to only snap the ends off the bean…not to snap the bean into pieces. It makes sense that if you snap the green bean into three pieces, when you cook the bean, more of the nutrients will be washed away in the water. But if it’s a whole bean…more of the nutrients stay inside the bean. (And you can have “My green bean is longer than your green bean” competitions while you eat dinner.)

beans1sm1.JPG

After washing the green beans, I then put them into a pot of boiling water. This blanching process stops their aging process. (No, you can not blanche people in order to stop their aging process.)

beans2sm1.JPG

After about two minutes in the boiling water, the green beans are a brighter green…and they go back into the colander where they are given a cold, cold shower. This process stops the cooking process that the blanching part started.

beans3sm1.JPG

After the green beans are cooled from the cold water shower, I then spread them out onto a dry towel. I use another towel to pat over the top of them to help dry them off more. If your beans are too wet when you put them into a freezer bag, you’ll have ice form around your beans. (You don’t want ice to form around your beans.)

beans4sm1.JPG

And then, I put my beans into a gallon freezer bag and label it. And into the freezer it goes. I know some people prefer to can their green beans. I don’t can them for two reasons:

1. Freezing them maintains more of the green bean’s nutrition.
2. I’m incredibly afraid of my pressure cooker. (When I got my mom’s pressure cooker, it didn’t have a manual with it. I have no idea how to use it properly.)  I do not need to cause an explosion in my kitchen.

So there you go! As I begin to can and freeze my tomatoes and fruit for the winter, I’ll be sure to show you those processes too! (Yeah, because those don’t require a pressure cooker, just a hot water bath…and I’m not so afraid of those.)

Heavenly Homemaker's Club Members: Access your homepage and all your fantastic resources here! Not a member yet? Please join us!

A Very Manly Menu Plan

July 27, 2014 by Laura Leave a Comment

This post may contain affiliate links. For more information, please see our disclosure policy.

bacon_cheeseburger_casserole

Bacon Cheeseburger Casserole (recipe in Healthy Make-Ahead Meals and Snacks eBook)

For the first time in a couple of months, the six of us are all been home together again! All four of the boys are now home from camp. We’ve enjoyed some catch up time and heard lots of stories of adventures from the boys being away. We’re doing tons of loads of laundry and getting caught up on work we are behind on. I can’t tell you how nice it is to have all of us back under one roof, even if it is just for a couple of days.

So what does this week hold? Well, since this is the summer of crazy, you can bet it holds more excitement. I’m heading out tomorrow for a traditional “Sister Symposium.” (More on that for Gratituesday.)  Then the two younger boys will be heading to Kansas to spend several days with grandparents. Left at home will be Matt and our two oldest boys.

Since Asa and Justus have been at camps for weeks and weeks this summer, they’ll likely be spending quite a bit of time this week catching up on sleep. They’ll work with Matt on some house and garden projects. And what will they eat?

Well, I’m guessing they’d be just as happy as can be if I simply left them several pounds of bacon and some steak. :)  For the most part, they’ll be fending for them selves. But I did have the chance to do some freezer cooking in preparation for my being away. Here are some food choices I left for them:

Breakfasts:

Eggs, bacon, hashbrowns, sausage, homemade instant oatmeal, and plenty of fresh and frozen fruit for sides and smoothies

Lunches and Dinners:

Sandwiches, Meat and Cheese Burritos, Bacon Cheeseburger Casserole (recipe in Healthy Make-Ahead Meals and Snacks eBook), Tuna Salad or Tuna Casserole (they can easily make either one on their own), Spicy Avocado Dip, and plenty of fruits, veggies, and salad fixings.

My guys do great figuring out food when I’m away. I love it that they can all cook! I’m pretty sure they’ll even keep up with dirty dishes. :)

guacamoledipwithchipsm.JPG

Asa makes a great guacamole. I grabbed some avocados at the store so he can whip some up. Here’s the recipe!

Here’s to a great new week. Hope your summer has been awesome so far!

Heavenly Homemaker's Club Members: Access your homepage and all your fantastic resources here! Not a member yet? Please join us!
« Previous Page
Next Page »

Join Our Community!

 Facebook Twitter E-mail Instagram Pinterest

Popular Posts

~ Will All of the Real Moms Please Stand Up?
~ Easy! Stir-and-Pour Whole Wheat Bread
~ How to Make Gatorade
~ 31 Real Food Breakfast Ideas
~ Dear Teenage Girls...
~ When Mom Takes a Step Back
~ The Inexpensive Health Insurance We Love!
~ Let's Talk Real Food Grocery Budgets

Check out our latest posts!

  • Big Family Food and Fun: May 31-June 6, 2026
  • Big Family Food and Fun: May 24-30, 2026
  • Free 7-Day Summer Menu Plan
  • Big Family Food and Fun: May 17-23, 2026
  • Easy Side Dishes for Summer
Home  ~  Simple Meals  ~  Club Membership  ~  Shop  ~  Privacy Policy  ~  Disclosure  ~ Contact

Copyright © 2026 · Beautiful Pro Theme on Genesis Framework · WordPress · Log in