Heavenly Homemakers

Encouraging women in homemaking, healthy eating and parenting

  • Home
    • About
    • FAQs
  • Recipes
    • Bread and Breakfast
    • Condiments
    • Dairy
    • Main Dishes
    • Side Dishes and Snacks
    • Desserts
    • Gluten Free
    • Instant Pot
    • Crock Pot
    • Heavenly Homemaker’s Weekly Menus
  • Homemaking
    • Real Food Sources
  • Store
  • Contact
    • Advertise
    • Disclosure
    • Privacy Policy
  • Simple Meals
  • Club Members!

Make-Ahead Pumpkin Donuts (How to Cook Fresh Donuts in Minutes!)

October 12, 2017 by Laura 11 Comments

This post may contain affiliate links. For more information, please see our disclosure policy.

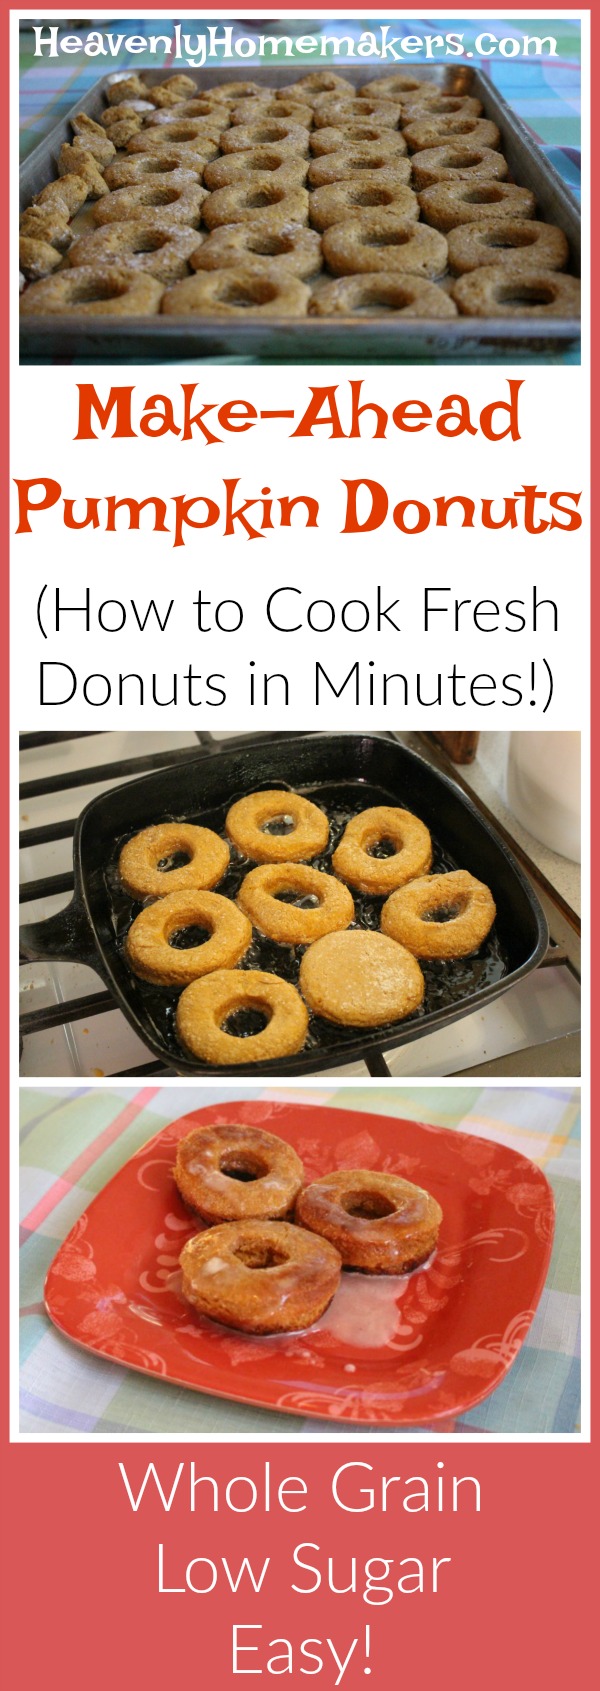
Introducing a perfect idea for this fall: Make-Ahead Pumpkin Donuts!

donuts4

After learning that it works well to make and freeze unbaked Giant Breakfast Cookies, Homemade Poptarts, Chocolate Chip Breakfast Bars, and all varieties of Muffins so that we can bake them fresh in the morning without any trouble, I thought, “Why not try this idea with my Whole Wheat Pumpkin Donut recipe?”

donuts5

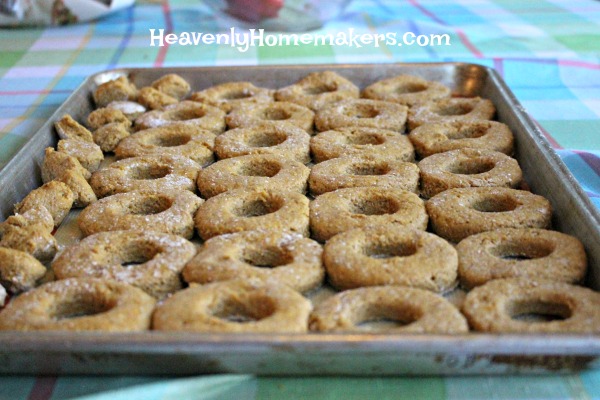
One of these things is not like the the other. Someone, who shall remain nameless,
forgot to cut a donut hole in one of the donuts. Hmmm…

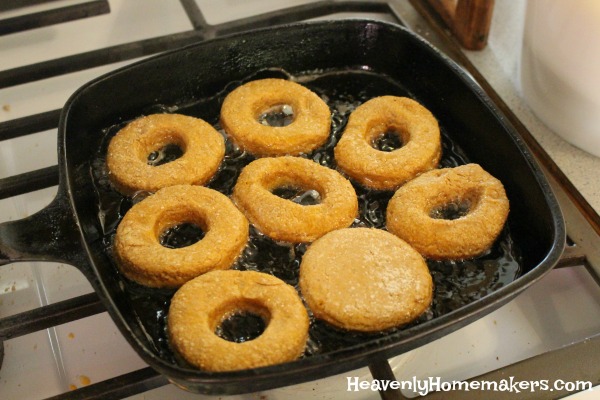
Indeed. We can mix up the pumpkin donuts, roll out the dough, cut the shapes, then freeze the uncooked dough on parchment paper or silicone mat-lined cookie sheets. We transfer the frozen dough into freezer bags, then any time we want fresh donuts (and when would we not want fresh donuts?), we can grab some out of the freezer and fry them up fresh to eat while sipping a cup of coffee, tea, or hot chocolate.

donuts6

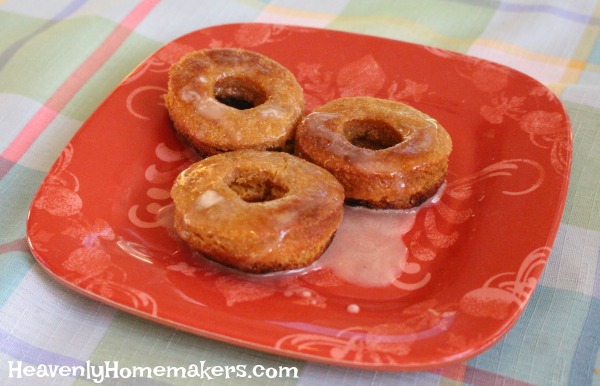
Can you think of a better breakfast treat to enjoy this fall than fresh homemade Pumpkin Donuts?

The best part is that the mixing, rolling, cutting, and clean up will have already been taken care of! Well, clearly the best part is eating the fresh donuts. But eating the fresh donuts without looking at a messy kitchen that you’ll have to clean up afterward? Fabulous.

Make-Ahead Pumpkin Donuts

5.0 from 1 reviews
Make-Ahead Pumpkin Donuts (How to Cook Fresh Donuts in Minutes!)
 
Save Print
Author: Laura
Serves: 15-20
Ingredients
  • 3½ cups whole wheat flour (I use freshly ground hard or soft white wheat)
  • 4 teaspoons baking powder
  • 1 teaspoon sea salt
  • 1 teaspoon ground cinnamon
  • ½ teaspoon nutmeg
  • ½ cup sucanat or brown sugar
  • 2 Tablespoons melted butter
  • 2 eggs
  • 1 teaspoon vanilla extract
  • ½ cup buttermilk
  • 1 cup pumpkin puree
  • Oil for frying (I recommend coconut oil or palm shortening for healthy frying)
  • GLAZE:
  • 2 cups powdered sugar (I use unbleached powdered sugar)
  • ⅓ cup buttermilk
  • ½ teaspoon vanilla extract
Instructions
  1. Stir together whole wheat flour, baking powder, sea salt, ground cinnamon, nutmeg, and sucanat. Add melted butter, eggs, vanilla, buttermilk, and pumpkin puree – mixing until all ingredients are well combined.
  2. Roll dough on a well-floured surface.
  3. Cut out donuts and donut holes (makes about 30 of each).
  4. Lay the cut outs on a parchment-paper lined cookie sheet and freeze for at least 2 hours.
  5. Transfer prepared donuts to a freezer bag to store in the freezer until ready for use.
  6. To Cook: Set donuts out of the freezer at room temperature for about 15 minutes before frying.
  7. Fry dough in hot oil for about 3 minutes or until donuts are golden brown.
  8. Whisk glaze ingredients together and drizzle over warm donuts before serving.
3.4.3177

Make-Ahead Pumpkin Donuts (Whole Grain, Low Sugar, Easy!)

Concerned about the fact that these treats are fried? Don’t be! Coconut and Palm Oils can withstand high temperatures without becoming harmful to us. So instead of fearing the fry, we can actually enjoy the healthy fat we’re getting while enjoying these donuts.

Wow. Who knew we would ever be able to say, “I need some healthy fats in my diet. Please pass the donuts.”

But of course, let us not ever eat more donuts than veggies, yada, yada. You know the drill.

WAIT. There are veggies in these donuts (thank you, pumpkin, for being there for us when we need you). So I guess we can enjoy these to our heart’s delight, all while enjoying the fact that you can make them ahead and freeze them for ease in the kitchen.

This is what I call one happy fall recipe!

Some of these links are my affiliate links.

Heavenly Homemaker's Club Members: Access your homepage and all your fantastic resources here! Not a member yet? Please join us!

Honey Sweetened No-Bake Cookies – Prepare To Be Amazed!

October 5, 2017 by Laura 11 Comments

This post may contain affiliate links. For more information, please see our disclosure policy.

When you no longer eat much sugar, but you want to enjoy your childhood favorite No-Bake Cookies…you make the cookies with a little bit of honey to see if you can pull it off. They turn out so delicious you start dancing in the living room.

no bake cookies 11

What? Of course you can dance about cookies. Delicious No-Bake Cookies made with honey are worth dancing over.

no bake cookies 22
For the record, I don’t dance in public. There is good reason for this as my feet and my head don’t always play nice together. My head knows where my feet should go and gives directions accordingly. But then my feet are like, “Are you kidding me right now?” then my head is like, “That is not at all what I told you to do; what are you actually thinking?” and my feet say, “You aren’t the boss of me, I’ll do what I want.” So then my brain gives up and says, “Forget it. At least I’m good at making cookies.”

My friend Kim sent me this recipe idea, then I tweaked it just a bit to make it my own. I guess we could say that it’s Kim’s fault that I was dancing in the living room. She can be glad I didn’t invite her over to watch. Though I probably should thank her with a cookie sometime.

Honey Sweetened No-Bake Cookies

3.5 from 2 reviews
Honey Sweetened No-Bake Cookies
 
Save Print
Author: Laura
Serves: 18-20
Ingredients
  • ½ - ¾ cup honey
  • ⅔ cup natural peanut butter
  • ½ cup butter or coconut oil
  • ⅓ cup unsweetened cocoa powder
  • 3 cups old fashioned oats
Instructions
  1. In a medium-sized sauce pan, stir together honey, peanut butter, butter, and cocoa powder.
  2. Melt and stir ingredients over medium heat until well combined and slightly bubbly.
  3. Remove from heat.
  4. Add oats and stir until coated.
  5. Scoop 1-2 Tablespoons of mixture onto a parchment paper-lined cookie sheet.
  6. Chill No-Bake Cookies in the refrigerator until they are set, about 1 hour.
3.4.3177

Honey Sweetened No Bake Cookies

Want some more Low Sugar Cookie recipes?

  • Easy {Low} Sugar Cookies
  • Low Sugar Lemon Melt-Away Cookies
  • Low Sugar Almond Melt-Away Cookies
  • Low Sugar Orange Melt-Away Cookies
  • Low Sugar Lime Melt-Away Cookies
  • Low Sugar Chocolate Fudge Cookies
  • Low Sugar Flourless Peanut Butter Cookies
  • Low Sugar Flourless Chocolate Peanut Butter Cookies

With all these recipes making us so very happy, we will all be dancing in our living rooms. What will the neighbors think?

Are you a No-Bake Cookie fan? Did you grow up eating these? Can you dance? (I mean, any of us can. But are you good at it?)

Heavenly Homemaker's Club Members: Access your homepage and all your fantastic resources here! Not a member yet? Please join us!

Easy Low Sugar Pumpkin Spice Roll-Out Cookies

October 1, 2017 by Laura 2 Comments

This post may contain affiliate links. For more information, please see our disclosure policy.

Allow me to introduce a new seasonal favorite: Easy Low Sugar Pumpkin Spice Roll-Out Cookies.

spice cookies 11

While I’ve shared that I just can’t get behind Pumpkin Spice Coffee (typing it actually makes me shudder just a little bit), I most certainly enjoy making many Pumpkin Spice treats this time of year – to eat while I drink my (plain, non-pumpkin-spice) coffee. If my house smells of nothing but Pumpkin Spice from now until Christmas, there will be much joy in the holiday season.

Of course, seeing as I live with a houseful of teenage boys, my house not only smells of Pumpkin Spice, it also frequently smells like Old Spice. And old shoes. Annnnnd cute girls.

It’s an interesting combination, you can be sure. One that I am so very blessed to experience. What a great God we serve!

Do you see His goodness all around you? Even in the midst of struggle? Even throughout the daily grind? Even during times of hardship and devastation?

spice cookies33

I love God. All that He offers is good, and all good comes from Him. I am continually in awe of how He provides for our spiritual needs, which makes all else fade.

What does this have to do with Pumpkin Spice Cookies? Ha. I don’t know. Lately I find myself working my way through all the day-to-day of life, which includes this houseful of teenage boys (and the cute girls that stop by) and in the midst of the cookies and the shoes and the vacuuming and the piles of mail, I sit in wonder at the peace God is revealing to me though His Spirit.

And in the Pumpkin Spice Cookie – well – there is joy. Especially when there is a great cup of coffee (sans Pumpkin Spice) to go with it.

spice cookies22

Easy Low Sugar Pumpkin Spice Roll-Out Cookies

Easy Low Sugar Pumpkin Spice Roll-Out Cookies
 
Save Print
Author: Laura
Serves: 18-24
Ingredients
  • 1 cup melted butter
  • ½ cup brown sugar or sucanat
  • 1 egg
  • 1 teaspoon vanilla extract
  • 1 Tablespoon Pumpkin Spice*
  • ½ teaspoon sea salt
  • 3 cups whole wheat flour (I use freshly ground soft white wheat)
Instructions
  1. Cream together melted butter and sugar.
  2. Add egg, vanilla, pumpkin spice, and sea salt.
  3. Stir in flour until well combined.
  4. Cover and chill dough for 1-2 hours.
  5. Roll dough to approximately ¼ inch thickness between layers of parchment paper or on a well-floured surface.
  6. Cut rolled dough with cookie cutter shapes and place cut-outs on a baking sheet, ½ inch apart.
  7. Bake in a 350 degree oven for 7-10 minutes or until cookies are lightly browned.
3.4.3177

Easy Low Sugar Pumpkin Spice Roll-Out Cookies


I’d love to hear about the joy of the Lord you are experiencing right now. Struggling to see His goodness? Look around at what you have, and I’m not talking about your stuff. See His goodness in the details of your life. In joy, in pain, in suffering – God is good. His mercies are new every morning.

And sometimes, they take on the form of a Pumpkin Spice Cookie dunked in coffee.

Heavenly Homemaker's Club Members: Access your homepage and all your fantastic resources here! Not a member yet? Please join us!

The Easiest No-Churn Strawberry Ice Cream

July 23, 2017 by Laura 12 Comments

This post may contain affiliate links. For more information, please see our disclosure policy.

As one who types for a living, I often find myself shocked at the words my fingers produce without asking me first. It’s as if they go on auto-pilot, typing with a mind of their own. There’s nothing I can do about this, and we can all be thankful for my ability to edit the words my fingers type without first asking my permission.

For instance, I’m so used to typing “Heavenly” (because I type HeavenlyHomemakers.com at least twelve times a day) that every time I write the words “heavy whipping cream” into a recipe my fingers automatically type “heavenly whipping cream.” In this case, I do think my fingers are brilliant because heavy whipping cream is quite heavenly, is it not?

The recipe I’m about to share with you happens to include said heavenly whipping cream. But also? According to my fingers that type on auto-pilot, this ice cream is of the un-churched variety. Sad, isn’t it? Allow me to explain…

strawberry ice cream

Without exception, each time I’ve typed the title of this recipe, it has come out like this: The Easiest No-Church Strawberry Ice Cream. Every single time. So this recipe is “the easiest” because you don’t even have to churn it. But no matter how much I concentrate on telling you that, my fingers type the words “No-Church” and this leads us to believe that this ice cream needs Jesus.

Do not miss the irony of this, because as we’ve already discussed, this “no-church ice cream” is made with none other than “heavenly whipping cream.” Thank you, fingers, for keeping me on my toes and confusing my brain. From now on, please let me tell you what to write instead of taking matters into your own hands. Literally.

The Easiest No-Churn Strawberry Ice Cream

5.0 from 1 reviews
The Easiest No-Churn Strawberry Ice Cream
 
Save Print
Author: Laura
Serves: 6-8
Ingredients
  • 4 cups heavy whipping cream
  • 3 cups fresh or frozen strawberries
  • Maple syrup to taste (1/4-3/4 cup)
  • 1 teaspoon vanilla extract
Instructions
  1. Blend all ingredients thoroughly until smooth, creamy, and slightly thickened.
  2. Pour mixture into a 9x13 inch pan.
  3. Cover and freeze for 2-3 hours.
  4. Scoop out ice cream and serve!
  5. If Ice Cream is in the freezer for a long time, simply set it on the counter for about 15 minutes before serving to make it easier to scoop.
3.4.3177

The Easiest No Churn Strawberry Ice Cream2

So as you can see, you don’t need to churn this Strawberry Ice Cream. And contrary to the message my fingers are trying to convey, you and I can actually take this to church if we want (because my fingers are not the boss of me.)

If we do take this treat to church and people ask how it’s made, we can tell them about the “heavenly whipping cream” that is the not-so-secret ingredient that makes the ice cream taste so good.

Who knew that an easy ice cream recipe could be the gateway to deep spiritual discussion? Who even knew?

Want more No-Churn Ice Cream recipes?

  • Low Sugar No-Churn Chocolate Ice Cream
  • Low Sugar No-Churn Vanilla Ice Cream

A note about sugar content:

In this Strawberry Ice Cream recipe as well as the Chocolate and Vanilla versions shared above, replace maple syrup with stevia or the other way around. My preference is to use about 1 Tablespoon of maple syrup and about 30 drops of liquid stevia. The stevia cuts the sugar content dramatically while the maple syrup takes away any bitterness the stevia leaves behind.

Enjoy not churning your ice cream. Or not churching it. Whatever.

Heavenly Homemaker's Club Members: Access your homepage and all your fantastic resources here! Not a member yet? Please join us!

How to Make Cheesecake in a Crock Pot (Crustless! Low Sugar!)

July 18, 2017 by Laura 5 Comments

This post may contain affiliate links. For more information, please see our disclosure policy.

You know how I eat these Fat Bombs every day? Well, I also eat one of these Low Sugar Mini Cheesecakes every day.

easy-mini-crustless-baked-cheesecake

They are lightly sweet, filling, and full of good fat and protein.

So what’s a girl to do when she runs out of her Mini Cheesecakes on a hot day in the summer? She certainly doesn’t want to turn on the oven to bake more for herself. And I think we all know the waffle iron just won’t work for something like this (but don’t think I didn’t at least consider it for one insane moment).

cheesecake12

How to Make Cheesecake in a Crock Pot

How to Make Cheesecake in a Crock Pot
 
Save Print
Author: Laura
Serves: 12
Ingredients
  • 2 8-ounce packages of cream cheese, softened
  • 2 eggs
  • 2 Tablespoons maple syrup
  • 2 full droppers of liquid stevia
  • 1 teaspoon vanilla extract
Instructions
  1. Blend all ingredients together until smooth.
  2. Pour mixture into a crock pot.
  3. Cook on low for 3- 3½ hours or until the center of the cheesecake is no longer liquid.
  4. Turn off crock pot, remove lid, and allow it to sit for 1-2 hours to cool.
  5. Transfer cheesecake to the fridge to chill for 3-4 hours before serving.
  6. Cut into 12 slices.
3.4.3177

How to Make Cheesecake in the Crock Pot

I forgot to mention – this Crock Pot Cheesecake is crustless. (I’m so used to eating them this way, I forget cheesecakes are supposed to have crusts. Ha!)

This same idea will work to make these Low Sugar Brownie Cheesecakes in the Crock Pot. Follow the recipe on this page and the directions above to make a chocolate version.

Or, if you want some No-Bake Cheesecake Varieties, check out the list below.

  • Pumpkin Cheesecake Whip
  • Low Sugar Pumpkin Cheesecake
  • Easy, Low Sugar Mini Crustless Cheesecakes
  • Strawberry Cheesecake Parfaits
  • Chocolate Strawberry Cheesecake Parfaits
  • Easy No-Bake Cheesecake
  • Chocolate Cheesecake Dessert
  • No-Bake Chocolate Peanut Butter Cheesecake

Can’t wait to hear how you like this Cheesecake in a Crock Pot idea!

~~~~~~~~~~~~~~~~~~~~~~~~~~~~~~~~~~~~~

Get more ideas to help you Beat the Heat this Summer!

Beat the Heat cover

Learn how to get this freebie here.
Offer ends tonight! :)

Join Simple Meals now to get this freebie sent to your inbox Thursday. Last chance!

Heavenly Homemaker's Club Members: Access your homepage and all your fantastic resources here! Not a member yet? Please join us!

Strawberry Shortcake Waffles

June 18, 2017 by Laura 8 Comments

This post may contain affiliate links. For more information, please see our disclosure policy.

I think it’s obvious that I’ve come to this conclusion about food: Why make it in the oven when you can make it in a waffle iron? This is most often true when trying to keep the house cool in the summertime. I love not having to turn on the oven!

Great Waffle Iron Hacks

After so many days of enjoying my waffle iron experiments, my family started suggesting more and more ideas for me. Hmm. Actually, it’s possible they were making fun of me. “Are you going to start making everything in the waffle iron now, Mom? Have you considered spaghetti?”

I don’t think they were serious, but don’t assume that I didn’t give it at least a few seconds of deliberation. I would have called it a Spaghaffle. But that sort of rhymes with awful and that’s where my brainstorm ended. You’re welcome.

shortcake waffle4

Other fun waffle iron experiments that actually work great:

  • Waffle Omelets
  • Egg and Cheese Hashbrown Waffles
  • Muffin Waffles
  • Actual Waffles (It is a revolutionary idea to make waffles in the waffle iron.)

Today’s new idea: Strawberry Shortcake Waffles. These turned out fantastic. Also, they are cute. This matters very much.

shortcake waffle 3

I adapted my original Strawberry Shortcake recipe and tried scooping it into my waffle iron. We went through several pounds of strawberries and a lot of homemade whipped cream the morning I first made these. Top with Strawberry Cheesecake Parfait filling if you want an even bigger treat!

Strawberry Shortcake Waffles

Strawberry Shortcake Waffles
 
Save Print
Author: Laura
Serves: 4-6
Ingredients
  • 1⅓ cups whole wheat flour (I use freshly ground whole wheat)
  • 1 teaspoon baking powder
  • 2 eggs
  • ¼ cup honey
  • ⅓ cup coconut oil
  • 1 teaspoon vanilla extract
  • ½ cup milk
  • 4-5 cups of fresh, sliced strawberries
  • Whipped cream (fresh cream whipped to form soft peaks, with a bit of stevia or sugar added for sweetness)
Instructions
  1. Mix together flour and baking powder.
  2. Add in eggs, honey, oil, vanilla and milk.
  3. Mix well.
  4. Scoop ½ cup batter into a waffle iron and cook for 2-3 minutes or until golden brown.
  5. Repeat until all waffle cakes are completed.
  6. Serve with fresh strawberries and whipped cream
3.4.3177

How to Make Strawberry Shortcake Waffles

Let’s keep the waffle iron recipes coming, shall we? Anybody have any new ideas for me? And please note that the idea of Tossed Salad Waffles have already been suggested, considered, and thrown out during a Coppinger Waffle Discussion. The sky is not the limit when it comes to waffle iron recipes. Just almost.

Heavenly Homemaker's Club Members: Access your homepage and all your fantastic resources here! Not a member yet? Please join us!

How to make fun and easy Muffin Waffles!

June 13, 2017 by Laura 9 Comments

This post may contain affiliate links. For more information, please see our disclosure policy.

This kitchen hack is going to make your day. This is your busy morning, picky people, grab it and go breakfast or snack hack. Allow me to introduce you to Muffin Waffles!

waffle muffin 1

Is it a waffle. Nope, it’s a muffin. Ain’t that somethin?

Indeed. I think my waffle iron is going to find a permanent place on my counter-top beside my coffee pot what with the frequency I’ve been using it lately.

First I tried these Waffle Omelets. Then I made Egg and Cheese Hashbrown Waffles. Now we’re using the waffle iron to make Muffins? Yep! Someday soon we might actually use it make regular ol’ waffles too. Won’t that be a treat?

Why make muffins in a waffle iron? To avoid heating up the oven on a hot day! Also, you can make each Muffin Waffle special and to each person’s preferences.

To make Muffin Waffles, you can use any muffin recipe that is your favorite. Allow me to start you off with a huge list of our favorites

  • Almond Flour Muffins (gluten free/dairy free)
  • Bacon Cheese Muffins
  • Banana Muffins
  • Blueberry Streusel Muffins
  • Breakfast Cake Muffins
  • Chocolate Chocolate Chip Muffins
  • Chocolate Swirl Muffins
  • Chocolate Zucchini Muffins
  • Coconut Flour Muffins (gluten free/dairy free)
  • Coconut Flour Banana Muffins (gluten free/dairy free)
  • Cornbread and Cornbread Muffins
  • Cream Cheese Pumpkin Muffins
  • Eggnog Muffins
  • Honey Cinnamon Muffins
  • Orange Muffins
  • Pancake and Sausage Muffins
  • Peanut Butter Chocolate Chip Muffins
  • Pumpkin Chocolate Chip Muffins
  • Snickerdoodle Muffins
  • Strawberry Cream Muffins
  • Sweet Potato Streusel Muffins
  • Vanilla Muffins with Cinnamon Crumb Topping
  • Whole Wheat and Honey Zucchini Muffins

Want an even better idea? Mix up a batch of the Basic Muffin Batter I am about to share with you. Then as you make individual Muffin Waffles for your family members or guests, sprinkle in their choice of berries, chocolate chips, or other add-ins!

Basic Muffin Batter

5.0 from 1 reviews
Basic Muffin Batter
 
Save Print
Author: Laura
Serves: 18
Ingredients
  • 3 cups whole grain flour (I use freshly ground soft white wheat)
  • ⅓-1/2 cup sucanat or brown sugar
  • 1 teaspoon baking powder
  • 1 teaspoon sea salt
  • 2 eggs
  • 1½ cups milk
  • ½ cup melted coconut oil or butter
  • Your favorite add-ins like chopped berries or chocolate chips
Instructions
  1. Mix together dry ingredients
  2. Whisk in eggs, milk, and oil until barely combined.
  3. For Muffins: Scoop mixture into 18-24 prepared muffin cups. Bake at 400 degrees for 20 minutes.
  4. For Muffin Waffles: Scoop ⅓ cup of batter into a hot waffle iron. Sprinkle on the add-in of choice. Cook for 3-4 minutes. Spread butter on the hot Muffin Waffle and serve!
3.4.3177

Make Fun Muffin Waffles

There are more waffle iron ideas where this came from, so prepare yourself for the fun. I’d love to hear your suggestions for good add-ins to the Basic Muffin Batter!

~~~~~~~~~~~~~~~~~~~~~~~~~~~~~~~~~~~~~~~~

Pray, Trust, Coffee, Repeat.

Get your copy of The Prayer Mugs!

PrayerMugsprev

[wp_eStore_fancy1 id=25]

Heavenly Homemaker's Club Members: Access your homepage and all your fantastic resources here! Not a member yet? Please join us!

Honey Sweetened Peanut Butter Cups You Can Feed Your Family for Breakfast

May 14, 2017 by Laura 26 Comments

This post may contain affiliate links. For more information, please see our disclosure policy.

This is how I begin every day:

fat-bombs-easy-and-delicious

And also this…

life1

They all go together for me now. I begin each day (if at all possible) with time in my chair with my Bible, my coffee, and a Chocolate Peanut Butter Fat Bomb.

Can you think of a better way to start the day? I think not.

I think the coffee and Bible are obvious, but you might be wondering – a Fat Bomb? For breakfast?

Absolutely, yes. I’ve gone from avoiding fat at all costs (in my teen and young adult years) to eating as much good fat as possible. In fact, I’ve discovered that the more good fat I eat, the better I feel. When I start my day with a Fat Bomb, I start my day with energy and a clear brain that actually functions.

I usually eat another Fat Bomb mid-afternoon, and sometimes at night before bed. I need the fat. You probably do too. Healthy fat is so very good for our bodies and minds.

Well, that’s my Fat Bomb story (thank you for asking), but what about everyone else in my family?

My husband eats a Fat Bomb here and there, loving them as much as I do (though he can eat most anything he wants without feeling crummy, so he doesn’t seem to crave these or need them like his fat-seeking wife). And our boys? Well, they just don’t like stevia-sweetened food. It’s okay. I probably wouldn’t have either when I was their age.

But here’s the thing: These sons of mine are growing to be enormous man-sized people. If I don’t have eggs and/or some kind of meat on the table every morning for breakfast, they pleasantly ask, “Is there something we can eat with protein?”

Yep, gone are the days they would eat a muffin and fruit and be fine for a few hours. These men need their meat. {mmm…bacon}

Thus, I have been playing with my Fat Bomb recipe to see if I can make them more palatable for my kids, which offers them protein and fat in the morning but keeps us from eating too many pigs (there’s no other way to say this).

Now, my youngest won’t touch these Fat Bombs because they have peanut butter in them. (He’s slightly allergic, but mostly, he can’t stand the taste.) But my other boys love these and as my 17-year old said, “Why would I ever need a regular peanut butter cup with all the sugar? These are phenomenal!”

So I now present to you a slightly altered Fat Bomb, sweetened perfectly with honey, and a fantastic choice for breakfast or a filling snack. What a great way to start the day! (For the record, I’m sticking with the stevia-sweetened Fat Bombs.)

Honey Sweetened Peanut Butter Cups

5.0 from 1 reviews
Peanut Butter Cups You Can Feed Your Family for Breakfast
 
Save Print
Author: Laura
Serves: 12
Ingredients
  • ½ cup coconut oil (I use expeller pressed so the coconut flavor didn't overpower.)
  • 1 heaping Tablespoon cocoa powder
  • 4 Tablespoons butter
  • ½ cup natural peanut butter
  • 2-3 Tablespoons honey
Instructions
  1. In a small saucepan, heat and stir together coconut oil, cocoa powder, butter, honey, and peanut butter.
  2. Pour into 12 muffin lined muffin tins. (I prefer silicone liners for these.)
  3. Freeze for 20 minutes or refrigerate for 2 hours.
  4. Store in fridge and eat as needed.
3.4.3177

These Silicone Muffin Liners are a rock star for this recipe.

Have you tried the Fat Bombs? Are you a stevia lover or a stevia hater? Think you might prefer these sweetened with honey?

Heavenly Homemaker's Club Members: Access your homepage and all your fantastic resources here! Not a member yet? Please join us!

Easy, Low Sugar, Mini Crustless Brownie Cheesecake Recipe

March 2, 2017 by Laura 4 Comments

This post may contain affiliate links. For more information, please see our disclosure policy.

If you like cheesecake, and you like brownies, you will love these Mini Crustless Chocolate Cheesecakes. The combination of (only 6!) ingredients creates what becomes a Brownie Cheesecake!

Indeed, I’m sharing this now so you can make your weekend the best of the best. I’m always here for you. True friends offer recipes so you can make guilt-free Brownie Cheesecake. Oh yeah. Did I not mention you can eat these guilt-free?

chocolate-cheesecake2

Huge Perk: These cheesecakes are super low in sugar and use all real food ingredients.

The main sweetener in this recipe is Stevia (this is my favorite brand). But if you’re not a huge fan of stevia, you’ll love knowing that this recipe also includes a tiny bit of maple syrup. The maple syrup overshadows any of the bitterness stevia sometimes leaves behind. In my experience, the combination of these two sweeteners keeps this recipe very low in sugar but creates a perfect, delicious treat that is perfectly sweet!

easy-mini-crustless-baked-cheesecake

You might remember the sister recipe to this one: Easy, Low Sugar Mini Crustless Cheesecakes. I think I like those even better than this chocolate variety, and I think we all know how much I love chocolate. Now I’m thinking that I should make a batch of each, and pour them into the pan together to make a Chocolate Vanilla Cheesecake Combo. Hmmm….put that on your “can’t wait until Laura tells us about that” list.

Easy, Low Sugar, Mini Crustless Chocolate Cheesecakes

Easy, Low Sugar, Mini Crustless Chocolate Cheesecake Recipe
 
Save Print
Author: Laura
Serves: 12
Ingredients
  • 2 8-ounce packages of cream cheese, softened
  • 2 eggs
  • 2 Tablespoons unsweetened cocoa powder
  • 2 Tablespoons maple syrup
  • 2 full droppers of liquid stevia
  • 1 teaspoon vanilla extract
Instructions
  1. Blend all ingredients together until smooth.
  2. Pour into 12 muffin cups.
  3. Bake in a 350 degree oven for 20 minutes.
  4. Turn off heat, open the oven door, and leave the cheesecakes in the oven for an additional 20 minutes. (Cheesecakes will puff up during baking but deflate while continuing to sit in the oven.)
  5. Transfer cheesecakes to the fridge and chill for at least two hours before serving.
3.4.3177


low-sugar-mini-crustless-chocolate-cheesecakes

Make These Cheesecakes EASY!

I always blend the ingredients for these cheesecakes in my Blendtec. It takes about 20 seconds. So easy! Also, I have a Silicone Baking Pan similar to this one that makes baking and cleaning up after these cheesecakes super simple. They pop right out of the pan right after cooling. The pan is BPA free and is very easy to clean!

silicone muffin pan

If you want more low sugar treat recipes, you’ll definitely want to check out this Low Sugar Treats, the Real Food Way eBook. It’s full of our family’s favorites!

Low Sugar Treats cover5

Here are more great cheesecake recipe ideas:

  • Pumpkin Cheesecake Whip
  • Low Sugar Pumpkin Cheesecake
  • Easy, Low Sugar Mini Crustless Cheesecakes
  • Strawberry Cheesecake Parfaits
  • Chocolate Strawberry Cheesecake Parfaits
  • Easy No-Bake Cheesecake
  • Chocolate Cheesecake Dessert
  • No-Bake Chocolate Peanut Butter Cheesecake

Some of the links in this post are my affiliate links.

Who of you is a cheesecake lover? Do you prefer chocolate or vanilla? Are you loving that we can have GUILT FREE cheesecake because of these recipes?!

Heavenly Homemaker's Club Members: Access your homepage and all your fantastic resources here! Not a member yet? Please join us!

Hot Vanilla Milk (3 Ingredients)

January 1, 2017 by Laura 4 Comments

This post may contain affiliate links. For more information, please see our disclosure policy.

Hot cocoa is wonderful. Hot tea hits the spot. I think we all know how I feel about a lovely cup of coffee. (Best thing ever, in case you weren’t sure.) But this Hot Vanilla Milk is a fun option to offer when you need a little variety in your hot drink repertoire.

vanilla-milk

If you want to make it really special, add one of the fun Flavored Whipped Cream options I shared below. As fun as it is to hit a coffee shop sometimes for a special treat, it is not fun to pay $4-$5 per cup of delicious drink. This Hot Vanilla Milk and all the other fun drink options I listed below will save us all loads of money because we can make many great hot drinks at home!

Hot Vanilla MilkYum

Hot Vanilla Milk (3 Ingredients)
 
Save Print
Author: Laura
Serves: 3-4
Ingredients
  • 3 cups milk (I use whole milk)
  • 2 Tablespoons real maple syrup (give or take)
  • 1 teaspoon vanilla extract
Instructions
  1. Whisk milk and maple syrup together in a small sauce pan.
  2. Stir over low heat until milk mixture begins to bubble.
  3. Remove from heat and stir in vanilla extract.
  4. Serve right away.
3.4.3177

hot-vanilla-milk

I will now make a list for you of all the hot drink recipes I’ve shared here through the years. With this Hot Vanilla Drink recipe, there’s a hot drink for every day of the week! Plus I included a few fun add-ins to the list. Hot drinks are fun. Hot drinks with flavored whipped creams are even better!

Homemade Hot Cocoa

  • Easy Hot Chocolate Mix
  • The Best Hot Cocoa
  • Homemade Healthier Eggnog
  • Warm Vanilla Soother
  • Warm Chocolate Soother
  • Warm Pumpkin Custard
  • Chocolate Caramel Coffee Creamer
  • Peppermint Cream for your hot chocolate or coffee
  • Chocolate Whipped Cream for Coffee

What are your favorite hot drinks? Do you live in a cold-weather area? My family (here in Nebraska) is doing everything we can to stay warm right now.

Heavenly Homemaker's Club Members: Access your homepage and all your fantastic resources here! Not a member yet? Please join us!
« Previous Page
Next Page »

Join Our Community!

 Facebook Twitter E-mail Instagram Pinterest

Popular Posts

~ Will All of the Real Moms Please Stand Up?
~ Easy! Stir-and-Pour Whole Wheat Bread
~ How to Make Gatorade
~ 31 Real Food Breakfast Ideas
~ Dear Teenage Girls...
~ When Mom Takes a Step Back
~ The Inexpensive Health Insurance We Love!
~ Let's Talk Real Food Grocery Budgets

Check out our latest posts!

  • Big Family Food and Fun: May 10-16, 2026
  • Big Family Food and Fun: May 3-9, 2026
  • Help Your Kids Become Independent in the Kitchen!
  • Big Family Food and Fun: April 26-May 2, 2026
  • Big Family Food and Fun: April 19-25, 2026
Home  ~  Simple Meals  ~  Club Membership  ~  Shop  ~  Privacy Policy  ~  Disclosure  ~ Contact

Copyright © 2026 · Beautiful Pro Theme on Genesis Framework · WordPress · Log in