Heavenly Homemakers

Encouraging women in homemaking, healthy eating and parenting

  • Home
    • About
    • FAQs
  • Recipes
    • Bread and Breakfast
    • Condiments
    • Dairy
    • Main Dishes
    • Side Dishes and Snacks
    • Desserts
    • Gluten Free
    • Instant Pot
    • Crock Pot
    • Heavenly Homemaker’s Weekly Menus
  • Homemaking
    • Real Food Sources
  • Store
  • Contact
    • Advertise
    • Disclosure
    • Privacy Policy
  • Simple Meals
  • Club Members!

Simple Summer Supper: Broccoli Bacon Salad

July 3, 2018 by Laura 4 Comments

This post may contain affiliate links. For more information, please see our disclosure policy.

I promise not all of the Simple Summer Suppers we’re going to share have bacon in them. (At least I think I promise this. Yes. I do. I promise.) But it only made sense that this Broccoli Bacon Salad recipe follow the BLT Wraps recipe. Because obviously you made extra bacon when you made the BLT Wraps, right?

When one makes bacon, one should always make extra. This is not so all the people can over-eat the bacon. This is so the mother can get ahead in the kitchen. And who am I kidding? Here’s the real reason I make lots of bacon at one time:

I don’t want my hair to smell like bacon any more than is necessary.

When I make bacon my hair, clothes, and house absorb the delicious smell of bacon. But I don’t want to wear bacon hair for three days, nor do I want my house to constantly smell as if I’m burning a bacon-scented candle. (I am amused and slightly horrified that these actually exist.)

So I make bacon bits like this, or I bake bacon in strips like this. I make many pounds at one time so I can get ahead and then I wash my hair. The end.

Now that we have the bacon cooking situation under control, we can make all kinds of delicious meals in a hurry! This Broccoli Bacon Salad is packed with flavor! Of course it’s easy to make, because easy recipes are the only kind I like to make and share.

Broccoli Bacon Salad

5.0 from 1 reviews
Simple Summer Supper: Broccoli Bacon Salad
 
Save Print
Author: Laura
Serves: 3-6
Ingredients
  • ¾ cup mayonnaise (I use Hain Safflower Mayo)
  • 2 Tablespoon red wine vinegar
  • 5 cups of chopped broccoli (1 large head)
  • 2 Tablespoons chopped onion
  • 8 slices of cooked bacon bits
  • ¾ cup grated cheddar cheese
Instructions
  1. In a large bowl, combine broccoli, onion, bacon, and cheese.
  2. Stir in mayonnaise and vinegar.
  3. Serve right away or make ahead and chill until serving time.
3.5.3229


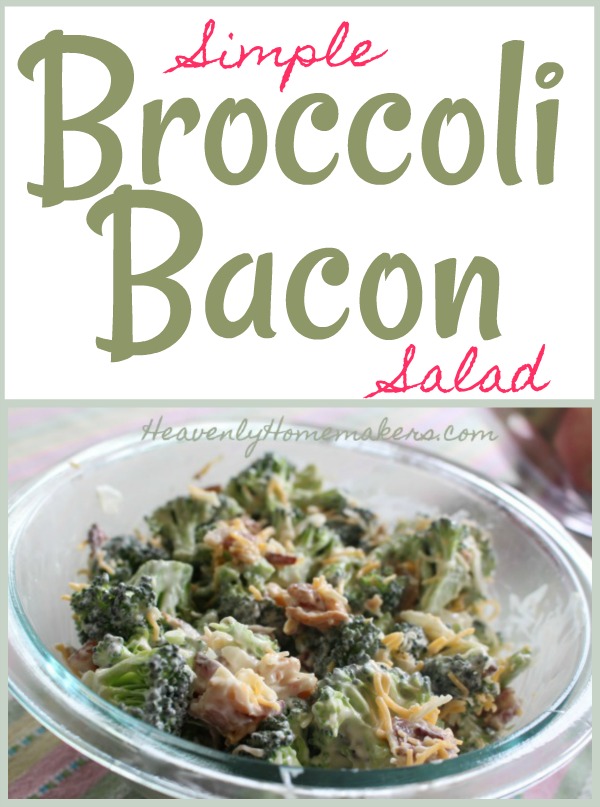
Truly, this Broccoli Bacon Salad is a meal in and of itself. It can be packed in a lunch or eaten on the road. It can be made ahead of time and pulled out of the fridge for an instant meal. It makes a perfect Simple Summer Supper on a hot day!

You can look forward to getting more Simple Summer Supper ideas like this during the entire month of July. Stay tuned! (Be sure to subscribe here for free so you don’t miss any of these ideas and posts!)

Heavenly Homemaker's Club Members: Access your homepage and all your fantastic resources here! Not a member yet? Please join us!

Simple Cream Cheese Corn (4 Ingredients!)

June 21, 2018 by Laura 8 Comments

This post may contain affiliate links. For more information, please see our disclosure policy.

I just realized I’ve never shared my Simple Cream Cheese Corn recipe here. As such, I’m terribly afraid that you’ll try this recipe and wag your finger at me. “Laura!!” you’ll exclaim. “This corn is incredible! Where has this recipe been my whole life? Why have you not shared it with us before today? You’ve been blogging and sharing recipes for years and years!! And you wait until today to finally disclose this?”

I hang my head in shame. I have no excuses. There are no words I can say to explain this away. I have withheld one of the best recipes in the world, and if I could go back in time and erase this mistake, I most certainly would.

Please forgive me and know that I’ll never do it again. All of my tried and true, very best recipes are yours to be had. I’ll never not share one again. Except for when I do. After all, how am I to know what I am forgetting to remember?

Rest assured, as soon as I remember what I have forgotten, you’ll be the first to know.

This Simple Cream Cheese Corn is my go-to recipe to serve when hosting guests. Why? Because it makes a “fancy” dish without any effort. Steam your corn, add the beautiful cream cheese and butter, serve it to your guests, watch them pass out.

Oh, did I forget to tell you that part? (Seems I’m extra forgetful these days.) Your guests might pass out when they eat this. It can’t be helped. The corn tastes too amazing. The creaminess and the buttery goodness mixed with the sweetness of the corn is just too much for most people to handle. They cry tears of joy while eating it. They think you’re a rock star for cooking it. They go back for seconds and thirds. You’ve changed their lives.

All this, and somehow I forgot to share the recipe until now. I have nothing to say for myself.

Simple Cream Cheese Corn

You’re about to be shocked over how ridiculously easy this is to make.

5.0 from 1 reviews
Simple Cream Cheese Corn (4 Ingredients!)
 
Save Print
Author: Laura
Serves: 4-6
Ingredients
  • 16-ounces frozen corn
  • 4-ounces cream cheese
  • 4 Tablespoons butter
  • Sea salt to taste
Instructions
  1. Steam corn in a small amount of water until tender and hot (about five minutes).
  2. Drain excess water.
  3. Stir in cream cheese and butter until melted.
  4. Salt to taste.
  5. Serve.
3.5.3229

I wasn’t kidding when I said it was easy.

Here are 20 great main dish recipes that are simple and fun to serve with this Simple Cream Cheese Corn:

  • Simple Sweet and Sour Baked Chicken Legs
  • Simple Cheesy Baked Chicken
  • Simple Italian Beef and Broccoli Skillet
  • Simple Bacon Ranch Chicken
  • Simple Chicken Cheeseballs with a Kick
  • Simple Crock Pot BBQ Spareribs
  • Simple Pizza Chicken Bake
  • Simple Parmesan Broiled Fish
  • Simple Overnight Saucy Crock Pot Chicken
  • Simple Overnight Melt-in-Your-Mouth Beef Roast
  • Simple Oven Fried Chicken
  • Simple Honey Mustard Chicken Legs
  • Simple Garlic Butter Shrimp
  • Simple Crunchy Ranch Chicken Strips
  • Simple Barbecue Beef Roast
  • Simple Roasted Rotiserie Chicken
  • Simple Grilled Chicken
  • Simple Hawaiian Beef Roast
  • Simple Garlic Parmesan Chicken Legs
  • Simple Crock Pot Applesauce BBQ Chicken

Want more recipes that only include five or fewer ingredients? You’ll love this!

[wp_eStore_fancy1 id=32]

Heavenly Homemaker's Club Members: Access your homepage and all your fantastic resources here! Not a member yet? Please join us!

Simple Chocolate Frozen Yogurt (Low Sugar, Five Ingredients)

June 17, 2018 by Laura Leave a Comment

This post may contain affiliate links. For more information, please see our disclosure policy.

Just when you thought life couldn’t get any better, you learn that you get to eat Chocolate Frozen Yogurt for breakfast.

Why wouldn’t you be able to eat this for breakfast? Have you eaten regular yogurt for breakfast? Of course. So this is the frozen variety. It’s just as nourishing and just as delicious.

But it looks like dessert! And it feels so wrong to eat something like this for breakfast!

Then let me ask you this: Have you ever eaten a Cinnamon Roll for breakfast? A Poptart? A Donut? A bowl of Captain Crunch?

I rest my case.

Eat this Chocolate Frozen Yogurt and you’re in for a much healthier start compared to what most American “breakfast foods” offer. It’s perfect on a hot summer day!

I love that this can be made dairy free (with coconut milk and coconut yogurt) if that is a need you have. You can run this through your Ice Cream Maker if you like. I tend to make it the “lazy way” which I admit isn’t quite as creamy, but still very delicious!

Simple Chocolate Frozen Yogurt

Simple Chocolate Frozen Yogurt (Low Sugar, Five Ingredients)
 
Save Print
Author: Laura
Serves: 4-6
Ingredients
  • 32-ounces (4 cups) plain yogurt
  • ½ cup milk (regular or coconut)
  • ½ cup unsweetened cocoa powder
  • 1 teaspoon vanilla extract
  • 30 drops liquid stevia OR 4 Tablespoons real maple syrup (or a mixture of both)
Instructions
  1. Blend ingredients together until smooth.
  2. Spread mixture into an 8x8 inch dish.
  3. Cover and freeze for one hour.
  4. Scoop out Chocolate "Fro-Yo" and enjoy!
3.4.3177

Feel free to switch out the cocoa powder for blended fresh fruit to make different varieties of Simple Frozen Yogurt.

Want more great recipes that include only five or fewer real food ingredients? You’ll love this High Five Recipes eBook!

[wp_eStore_fancy1 id=32]

Want more No-Churn Ice Cream recipes?

  • Low Sugar No-Churn Chocolate Ice Cream
  • Low Sugar No-Churn Vanilla Ice Cream
  • Low Sugar No-Churn Strawberry Ice Cream

Want more Chocolate Recipes?

We’ve got an entire post filled with 36 of them, coming right up! Be sure to subscribe so you won’t miss all the fun!

Heavenly Homemaker's Club Members: Access your homepage and all your fantastic resources here! Not a member yet? Please join us!

Simple Slow Cooker Party Potatoes

June 14, 2018 by Laura 11 Comments

This post may contain affiliate links. For more information, please see our disclosure policy.

Twas the day before Easter and my friend Chandra and I were discussing our Easter Dinner menus. She mentioned that she was making Party Potatoes, which we all know is a delicious, creamy, and cheesy potato dish.

While I knew exactly what Chandra was talking about, it occurred to me that when I was growing up, my family always called this dish “Funeral Potatoes.” Same recipe, same deliciousness, but incredibly different label. Party Potatoes and Funeral Potatoes are one in the same? Yes, indeed.

Chandra and I decided that people in the north (where her family is from) must like parties better. And that people in the south (where my family is from) need to let go and live a little. Bless our hearts.

Indeed, my family had Funeral Potatoes on all the most exciting celebration days: Easter, Christmas, and Birthdays. “Happy Easter, He is Risen!!!! Please pass the Funeral Potatoes.” What is wrong with me that I never realized what we were saying?

It is worth noting that Death By Chocolate was also a family favorite. I requested it at one of my Bridal Parties before Matt and I got married. “I’m going to marry the man of my dreams! I want Death by Chocolate please!”

Well, now you know the truth about my family history. We really knew how to party.

I have decided that it’s time to break the cycle. No more Funeral Potatoes. From now on, we will eat Party Potatoes!! Woohoooo, I LOVE PARTY POTATOES!!!!!”

Though what will I do the next time I’m at a funeral and they serve Party Potatoes? This is a conundrum.

Simple Slow Cooker Party Potatoes

You’ll notice that I’ve taken this popular potato dish recipe and tweaked it to include all real food ingredients (so we can avoid the MSG in canned soup). You’ll also notice that I found a way to make this dish in a slow cooker. I found this to be a helpful trick for the times I’m out of the house and need the potatoes to be ready to eat when we get home. It’s also nice to use the slow cooker method as it frees up oven space.

Not to worry though. I’ve included instructions for oven baking as well. As you can see, I’ve done all that I can to meet all of your funeral and party planning needs.

5.0 from 1 reviews
Simple Slow Cooker Party Potatoes
 
Save Print
Author: Laura
Serves: 6-10
Ingredients
  • 24 ounces frozen hashbrowns or cut potatoes
  • 3 Tablespoons dry minced onion
  • 1-2 teaspoons sea salt, to taste
  • 16 ounces sour cream
  • 1 cup heavy whipping cream
  • 16 ounces shredded Colby jack or cheddar cheese
Instructions
  1. Mix all ingredients together and spread evening in a slow cooker or 9x13 inch baking dish.
  2. Slow Cooker Instructions: Cook on low for 5-6 hours or on high for 3-4 hours.
  3. Oven Instructions: Cover and bake in a 350 degree oven for one hour.
3.5.3229


Survey time: What did you call this potato recipe when you were growing up?

Heavenly Homemaker's Club Members: Access your homepage and all your fantastic resources here! Not a member yet? Please join us!

How to Make Mashed Potatoes in the Instant Pot

June 5, 2018 by Laura 4 Comments

This post may contain affiliate links. For more information, please see our disclosure policy.

If you have an Instant Pot and you have ten minutes, you can make mashed potatoes. I suppose it is also important that you have some potatoes available to work with. Butter is a must. Sea salt is a game changer. Wait until you see how simple it is to make these mashed potatoes!

Remember a few months ago when I figured out how to make Mashed Potatoes in my crock pot? That amazing trick took my family from the depths of mashed potato despair into the peak of mashed potato heaven. As it was, I had stopped making mashed potatoes altogether. After all, who had time for the effort? Who could afford the energy? Why must mashed potatoes make such a mess of pots and beaters and countertops and walls? (Confession: I am a messy cook. Mashed potatoes were the worst for me.)

So I stopped. We never ate mashed potatoes. There simply was no time.

Then I learned to make them in the most simple way possible, which meant that not only could we make mashed potatoes again, we could make them every week without trouble. And then, just when I thought I’d discovered the easiest way to make mashed potatoes…

I learned to make them in my Instant Pot (my affiliate link). In ten minutes.

You know how people always say, “Oh, life was so much better back in the pioneer days. Certainly life was much simpler then.” I agree to a certain extent but alas, the pioneers did not have Instant Pots. So let’s here it for the 21st century and its wonderful technology!

So would you believe you can wash potatoes, throw them into your Instant Pot with some water, let them cook for 10 minutes, then mash them and serve them and make everyone very happy? You, of course, will be the happiest of all because you didn’t have to slave over your potatoes. And if your children happen to be of age, you can ask them to scrub your potatoes, making your work load is even lighter!

How to Make Mashed Potatoes in the Instant Pot

How to Make Mashed Potatoes in the Instant Pot
 
Save Print
Author: Laura
Serves: 6-8
Ingredients
  • 5 pounds gold or red potatoes
  • 1 cup water
  • 1 cup whole milk, half-and-half, or cream
  • 2 cups sour cream
  • ¼-1/2 cup butter
  • sea salt to taste
Instructions
  1. Scrub, but don't peel the potatoes.
  2. Put them (whole) into an Instant Pot on the metal trivet, along with 1 cup of water.
  3. Seal and cook at hi pressure, manual setting, for 10 minutes.
  4. Release the pressure and open the Instant pot.
  5. Mash soft potatoes directly in the crock with a potato masher.
  6. While mashing, dump in the milk, sour cream, butter, and salt.
  7. Continue mashing until potatoes have reached desired consistency.
3.5.3229

Truly these are the most delicious!

Can you use russet potatoes to make these mashed potatoes? I don’t recommend it. They take a longer cooking time, they aren’t as nourishing, and they don’t taste as good. Gold or red potatoes are much preferred!

I like to also add shredded cheese to our potatoes to make them tastier and more substantial.

Want Simple Meal ideas to serve with your Simple Instant Pot Potatoes?

  • imple Baked Salmon and Asparagus
  • Simple Crock Pot Chicken Soup with a Kick
  • Simple Skillet Taco Pasta
  • Last-Minute Lentil Chili
  • Simple Sweet and Sour Baked Chicken Legs
  • 20-Minute Taco Soup
  • Simple Cheesy Baked Chicken
  • Simple Creamy Chicken Stew in the Crock Pot
  • Simple Italian Beef and Broccoli Skillet
  • Simple Bacon Ranch Chicken
  • Simple Hawaiian Crock Pot Chicken
  • Simple Taco Rice Dinner
  • Simple Last Minute Nacho Plate
  • Simple Chicken Cheeseballs with a Kick
  • Simple Beanie Weanies
  • Simple Crock Pot BBQ Spareribs
  • Simple Pizza Chicken Bake
  • Simple Italian Chicken and Green Bean Bake
  • Last Minute Creamy Bacon Spaghetti
  • Simple Hamburger Soup
  • Simple Parmesan Broiled Fish
  • Simple Overnight Saucy Crock Pot Chicken
  • Simple 15-Minute Meal
  • Simple Overnight Melt-in-Your-Mouth Beef Roast
  • Simple 3-Cheese Crock Pot Pasta
  • Simple Oven Fried Chicken
  • Simple Honey Mustard Chicken Legs
  • The Easiest Mashed Potatoes in the World
  • Simple Garlic Butter Shrimp
  • Simple Crunchy Ranch Chicken Strips
  • Simple Crock Pot Shredded Ranch Chicken (for salad or tacos)
  • Simple Crock Pot Pizza Casserole
  • Simple Barbecue Beef Roast
  • Simple Spanish Rice Bowls
  • Simple Roasted Rotiserie Chicken
  • Simple Green Chile Chicken
  • Simple Tex-Mex Creamy Chicken
  • Simple Waffle Omelets
  • Simple Crock Pot Taco Pasta
  • Simple Grilled Chicken
  • Simple Hawaiian Beef Roast
  • Simple Crock Pot Creamy Stew Meat
  • Simple Cheese Stuffed Burgers
  • Simple Hashbrown Casserole (For Instant Pot, Crock Pot or Oven!)
  • Simple Lasagna Casserole (For Instant Pot or Crock Pot)
  • Simple Chili Mac
  • Simple Bacon Cheeseburger Casserole
  • From Burrito Bar to Casserole (a 5-Minute Meal!)
  • Simple Bacon Cheeseburger Roll
  • Simple Garlic Parmesan Chicken Legs
  • Super Simple Lasagna
  • The Simplest White Chicken Chili
  • Simple Lentil Nachos
  • Simple Tuna Patties
  • Simple Banana Pancakes
  • Simple Crock Pot Applesauce BBQ Chicken
  • Simple Hashbrown and Egg Nests
  • Simple Cornbread Waffles with Chili
  • Simple Veggie Fritters
  • Simple Lemon Garlic Chicken Legs
  • Simple Noodle Soup
  • Simple Three Cheese Spaghetti
  • Simple Crock Pot Salsa Shredded Beef
  • Simple Cheeseburger Hashbrown Casserole

Join Simple Meals. You’ll love it!


Enjoy all these recipes without effort when you become a Simple Meals member! Every week we’ll send you a great menu plan full of Simple Recipes like this one. We’ll equip you with a grocery list. We’ll break everything down so that your meal prep is as simple as possible. We’ll give you bonus tips and recipes and freebies. And this is all for just $1 each week. You’ll love it!

[wp_eStore_subscribe_fancy id=19]

Heavenly Homemaker's Club Members: Access your homepage and all your fantastic resources here! Not a member yet? Please join us!

The Easiest (and Fastest) Way to Cook Spaghetti Squash

May 31, 2018 by Laura 1 Comment

This post may contain affiliate links. For more information, please see our disclosure policy.

I just learned to cook spaghetti squash in ten tiny minutes, from start to finish. Unbelievable!

Is it just me, or is it incredibly fun that God created a squash that once cooked, shreds out like noodles? He did all the work. We simply have to cook it. (There is a deep spiritual parallel here we should adopt and live by: God does God’s work. We simply get to be His glorious tools to be a part of His work as we listen and obey Him. I love this.)

So God’s spaghetti squash. It’s always been easy to prepare in the oven, but I just learned how to make it in my Instant Pot. It cooks at high pressure for 5 minutes and just like that, the spaghetti squash is ready to shred and eat!

First, use a sharp knife to cut the spaghetti squash into four rings like this:

Use a spoon to dig out the seeds.

Place the spaghetti squash rings onto the metal trivet inside your Instant Pot. Put 1 cup of water under the trivet.

Put the lid on the Instant Pot and seal. Set it to manual, for 5 minutes at hi pressure.

The cooking process will be barely over this 5 minutes because the Instant Pot won’t come to full pressure or need to release. So in just these few minutes, the squash is cooked and ready!

Use a fork to pull the squash apart into “noodles.”

So delicious as-is!

Or, my personal favorite: we mix leftover spaghetti sauce with leftover Alfredo Sauce and pour it over the spaghetti squash. What a nourishing meal!!

Warning: Spaghetti Squash doesn’t taste like regular pasta. I consider spaghetti squash to be a pasta replacement, but only as a vehicle to hold my sauce. I LOVE spaghetti squash covered in sauce, and in fact, I love it more than wheat pasta. But it doesn’t taste the same. It tastes like a mild vegetable covered with delicious sauce. Bring it on!

The Easiest (and Fastest) Way to Cook Spaghetti Squash

The Easiest (and Fastest) Way to Cook Spaghetti Squash
 
Save Print
Author: Laura
Serves: 3-6
Ingredients
  • 1 Spaghetti Squash
  • 1 cup water
Instructions
  1. Slice the squash into four rings.
  2. Remove the seeds with a metal spoon and discard.
  3. Pour one cup water into the Instant Pot.
  4. Place the prepared squash rings onto the metal trivet in the Instant Pot.
  5. Place the lid on and seal.
  6. Cook for 5 minutes at high pressure.
  7. Remove the cooked squash and pull the insides away from the rind with a fork.
  8. Serve as is or smothered in sauce.
3.5.3229

Don’t have an Instant Pot? Here’s what I think about mine. (Spoiler alert: I love it.)

How to Cook Spaghetti Squash in the Oven

  1. Slice the squash into four rings.
  2. Remove the seeds with a metal spoon and discard.
  3. Place the prepared squash rings into a 9×13 inch baking dish.
  4. Bake in a 350 degree oven for 30-45 minutes.
  5. Remove the cooked squash and pull the insides away from the rind with a fork.
  6. Serve as is or smothered in sauce.

Are you a spaghetti squash fan?

Heavenly Homemaker's Club Members: Access your homepage and all your fantastic resources here! Not a member yet? Please join us!

The Most Amazing Flourless Chocolate Cake Recipe

May 27, 2018 by Laura 2 Comments

This post may contain affiliate links. For more information, please see our disclosure policy.

I am about to introduce you to The Most Amazing Flourless Chocolate Cake.

Why do I sometimes share flourless treat recipes? Because we can all stand to eat fewer grains. (But apparently I’ve decided that chocolate is still a necessity.) It’s also fun to bless the gluten free or grain free eaters among us. And I promise you this: EVERYONE will be blessed by this Amazing Flourless Chocolate Cake recipe!

I’m finding that flourless=moist. How about that? Want more of our family’s favorite flourless treat recipes? Here you go!

11 Flourless Treat Recipes

  • Super Moist Flourless Peanut Butter Brownies
  • Super Moist Flourless Brownies
  • Chocolate Cheesecake Fudge
  • No Bake Chocolate Chip Cookie Bars
  • Low Sugar Flourless Peanut Butter Cookies
  • No Bake Cookie Cups 
  • Honey-Sweetened Flourless Peanut Butter Bars
  • Low Sugar Flourless Peanut Butter Cookies
  • Flourless Fudge Cookies
  • Flourless Peanut Butter Chocolate Chip Cookies
  • Honey-Sweetened No Bake Cookies

Now how about the most Amazing Flourless Chocolate Cake?

I will warn you that while most of the recipes I share now are 1-step, simple as can be recipes – this Flourless Chocolate Cake is a bit more involved. Worth it? Oh, it is so worth it. I got this recipe years ago from my friend Kim and it is truly incredible!

The Most Amazing Flourless Chocolate Cake

The Most Amazing Flourless Chocolate Cake Recipe
 
Save Print
Author: Laura
Serves: 12
Ingredients
  • 12 ounces bittersweet chocolate chips or bittersweet chocolate, roughly chopped
  • 1 cup (2 sticks) plus 3 Tablespoons butter, cut into chunks
  • 1¼ cup sugar or sucanat (more or less to taste)
  • 6 eggs
  • 1 cup unsweetened cocoa powder
  • 1 Tablespoon milk
  • 1 Tablespoon honey
  • ¼ teaspoon vanilla
Instructions
  1. Preheat oven to 375°. Butter a 9-inch spring form pan, then line the bottom with a circle of parchment paper. Butter the paper, and set the pan aside.
  2. Place two-thirds (8 ounces) of the chocolate and 1 cup (2 sticks) of the butter in a medium saucepan over medium low heat. Stirring often, melt chocolate with butter until completely blended. Remove from heat and transfer to a large bowl. Add sucanat and mix well. Add eggs one at a time, whisking well after each addition. Sift cocoa into bowl and stir until just blended.
  3. Pour batter into prepared pan and bake for 35 to 40 minutes, or until cake has risen and top has formed a thin crust. The cake should be just firm in the center when done. Cool for 10 minutes, then invert onto a plate, removing sides of spring form pan. Remove and discard parchment paper and set cake aside to cool completely.
  4. While waiting for the cake to cool, make the chocolate glaze. Melt remaining 4 ounces chocolate and 3 tablespoons butter in a small saucepan over medium low heat, stirring until smooth. Remove from heat, then stir in milk, honey and vanilla. Set aside to cool slightly.
  5. When cake has cooled, pour glaze onto the center. Using a spatula or the back of a spoon, smooth the glaze very gently along the top and sides of the cake. Chill cake, uncovered, for 30 to 60 minutes before serving to set the glaze and make the cake easier to slice.
3.5.3229


Doesn’t that look fabulous? It is super rich and oh so chocolaty. Save this recipe to use at your next special occasion. Or next Thursday is fine too. :)

Heavenly Homemaker's Club Members: Access your homepage and all your fantastic resources here! Not a member yet? Please join us!

Super Moist Flourless Peanut Butter Brownies

May 13, 2018 by Laura 12 Comments

This post may contain affiliate links. For more information, please see our disclosure policy.

Like the old saying goes, when life gives you Super Moist Flourless Brownies, switch the almond butter for peanut butter and turn them into Super Moist Flourless Peanut Butter Brownies.

I admit that I often get on recipe kicks at my house. We discover a new recipe we love and we make it thirty times in forty days because we can’t get enough. (Sometimes, but not always, I exaggerate.) So it is with both varieties of these Super Moist Flourless Brownies. They are so incredibly good that we have gone through a ridiculous amount of Almond Butter and Peanut Butter in the past month and a half.

There goes the grocery budget.

Well, only sort of. After all, both of these brownie varieties are super wholesome and full of protein. So I’ll put out a pan of these for breakfast (no one complains, mind you) and because they are so rich and filling, there’s no need for me to add meat to the meal. Therefore, we’re subbing nut butter for bacon on days like this. Money-wise, it’s kind of a wash. Taste wise, well, we love our bacon, but the trade off is brownies. So everyone is happy.

If you’ve tried the Super Moist Flourless Brownie recipe (only 5 ingredients!) you’ll look at this one and notice that the only difference is a direct exchange of peanut butter for the almond butter. It’s too easy!

But here’s the thing: The tiny ingredient switch makes for a significant flavor change. This Super Moist Flourless Peanut Butter Brownies recipe really turns out a treat with the awesome peanut-butter-chocolate taste so many of us love! The Super Moist Flourless Brownies recipe made with almond butter taste like regular, but amazing, brownies.

So we love both. A lot. Like, I’m buying cases of Almond Butter just so we can make brownies. I can’t help it.

Make Your Own Nut ButtersYum

I consistently make Homemade Peanut Butter, which does save a few pennies, but mostly just produces the most amazing peanut butter in the whole wide world. This one is super creamy and spreadable, our favorite. This one is made with straight peanuts, also incredible. Both are nourishing.

I have experimented with making Almond Butter but for the most part, I buy it already made.

Whether you make or buy your nut butters, I recommend using unsweetened, natural butters in these recipes.

Super Moist Flourless Peanut Butter Brownies

Super Moist Flourless Peanut Butter Brownies
 
Save Print
Author: Laura
Serves: 12
Ingredients
  • 1½ cups (12-ounces) Peanut Butter
  • ½ cup honey
  • ½ cup unsweetened cocoa powder
  • 2 eggs
  • ½ teaspoon baking soda
Instructions
  1. Stir all ingredients together until well combined.
  2. Spread batter into a buttered 8x8 inch baking dish.
  3. Bake in a 350 degree oven for 13-15 minutes. (Remove them from the oven when they are just slightly underdone so they come out moist!)
3.5.3251


Can you believe, these brownies have taken the place of my Fat Bombs for now? Depending on the day. I guess it’s apparent I really like my chocolate and my peanut butter, in all its healthy forms.

~~~~~~~~~~~~~~~~~~~~~~~~~~~~~~~~~~~~~~~~~~~~~~~~~~~~

Want 111 more recipes that include 5 or fewer real food ingredients? Here’s our best collection!

[wp_eStore_fancy1 id=32]

Heavenly Homemaker's Club Members: Access your homepage and all your fantastic resources here! Not a member yet? Please join us!

How to Make Roast Gravy

May 3, 2018 by Laura 2 Comments

This post may contain affiliate links. For more information, please see our disclosure policy.

If you saw my recent “Easiest Way to Make Beef Roast in the Instant Pot” post, you saw that I promised to share How to Make Roast Gravy. Where there is roast, there must be gravy. There is no other way.

While I shared that I struggled with making a good roast for over 20 years before figuring it out, I perfected my gravy-making skills long ago. I guess that’s a good thing, seeing as my roasts weren’t great. At least we drown the dry meat in gravy.

Making gravy truly isn’t difficult, though in my case, it took some practice. Did I ever tell you about the first time I made gravy for Matt? He had to spread it onto his potatoes with a knife. Good times. (That was in our dating days. Praise God he saw gravy-making potential and still chose to marry me. It was probably because of how I rocked the big hair. Or the high waist pants, which are somehow now back in style. Why, girls? Why?)

How to Make Roast Gravy

How to Make Roast Gravy
 
Save Print
Author: Laura
Ingredients
  • 1-2 cups beef broth/drippings from a roast
  • ¼ cup cold water
  • 2 Tablespoons corn starch or arrowroot powder
  • Sea salt to taste
Instructions
  1. Pour the drippings from a cooked roast into a small sauce pan.
  2. Heat to boiling.
  3. Meanwhile, whisk together water and cornstarch in a small glass or jar.
  4. Slowly pour water/cornstarch mixture into the boiling beef broth, stirring/whisking constantly.
  5. Continue to cook and stir over medium heat until the mixture has thickened into gravy.
  6. Salt liberally as desired.
3.5.3229


Need to thicken your gravy? Make another mixture of water/cornstarch and whisk it in to the boiling broth little by little until you’ve reached the desired gravy consistency you want.

It is important that you mix the water and cornstarch together before stirring it into your drippings/broth! Sprinkling cornstarch directly into the hot drippings will only give you lumpy gravy. Ask me how I know.

What are you better at making: Roast or Gravy? Maybe now we can all be good at both!

Heavenly Homemaker's Club Members: Access your homepage and all your fantastic resources here! Not a member yet? Please join us!

The Easiest Way to Make Beef Roast in the Instant Pot

May 1, 2018 by Laura 9 Comments

This post may contain affiliate links. For more information, please see our disclosure policy.

My mom used to be the queen of perfect Sunday roasts. But for some reason, it’s taken me over 20 years to figure out how to get my roast to fall apart and taste delicious. Today I’ll share what I’ve learned about making beef roast in the Instant Pot. Aha! Now we’re on to something.

After years of trial and error, I finally learned to make a Melt–in-Your-Mouth Beef Roast in the Crock Pot. This is all well and good except for the days I don’t have 12 hours to wait for my beef roast to cook to perfection. A recent Sunday morning, “What can I make for lunch before we leave for church in ten minutes?!” panic led me to investigate how to make a beef roast in my Instant Pot.

Wait. You don’t have an Instant Pot? Trust me. I understand. It took me years of hearing about them to get on the Insta-Train. Now that I’m on board, I’m declaring it to be one of my favorite appliances. Is an Instant Pot worth your investment? I give an emphatic, “Absolutely!” (I have this one.)

So anyway, back to my pot roast. I discovered that there are many Instant Pot roast-making instructions out there. But I have to admit what you already know about me: I really do not like recipes that instruct me to take several steps before walking away from my food to let it cook. After all, what good is using a Crock Pot or Instant Pot if I have to spend 30 or more minutes prepping the food?

Therefore, while most recipes I found instructed that I sear both sides of the roast and sing it a lullaby before allowing the Instant Pot to work its magic, I decided to do what I do best: Throw the food into the pot, turn it on, and walk away. After all, I don’t have time to sear meat on a Sunday morning, nor am I interested in going to church smelling like caramelized onion. And all my fellow worshipers said amen.

I figured the worst that might happen if I took a few shortcuts is that my roast would be mediocre, something my family has dealt with for most of my roast-making life. This is why God invented gravy.

So into the Instant Pot went the roast. I dumped on some sea salt, worchestershire sauce, water, onion, and carrots. We went to church and came home to this:

The meat fell apart. The flavor was incredible. Continue to sear your roast if you must, but as for me and my house, I will continue to throw in the food and let the appliances do the work.

The Easiest Way to Make Beef Roast in the Instant Pot

The Easiest Way to Make Beef Roast in the Instant Pot
 
Save Print
Author: Laura
Serves: 6-8
Ingredients
  • 3 pound beef roast
  • 2 Tablespoons Worcestershire sauce
  • 1 medium-sized onion
  • Sea salt and pepper to taste
  • 5-8 medium-sized carrots
  • 1 cup water
Instructions
  1. Place roast on the metal trivet in your Instant Pot.
  2. Pour 1 cup water into the bottom of the pot.
  3. Cut onion into fourths and place in the pot.
  4. Peel carrots, cut them in half, then place them on the roast.
  5. Salt liberally, pepper as you like.
  6. Place the lid on the Instant Pot and seal it.
  7. Cook it at High Pressure, Manual Setting, for 70 minutes.
  8. I do natural release as I'm usually still at church during this time.
  9. Shred meat and serve!
3.5.3229


Add 3ish pounds of scrubbed and cut potatoes to the pot if you like. :)

Be on the lookout for a tutorial on making Roast Gravy.

Am I the only one who has struggled to make a good pot roast? Here’s hoping this recipe solves all your roast-making issues!

Some of the links in this post are affiliate links.

~~~~~~~~~~~~~~~~~~~~~~~~~~~~~~~~~~~~~~~~~~~~~~~~~~~~

Join Simple Meals!

728x90

We love how Simple Meals has been saving family time for so many, and helping people put great food on the table each night! Join us for just $1/week!

[wp_eStore_subscribe_fancy id=28]

Heavenly Homemaker's Club Members: Access your homepage and all your fantastic resources here! Not a member yet? Please join us!
« Previous Page
Next Page »

Join Our Community!

 Facebook Twitter E-mail Instagram Pinterest

Popular Posts

~ Will All of the Real Moms Please Stand Up?
~ Easy! Stir-and-Pour Whole Wheat Bread
~ How to Make Gatorade
~ 31 Real Food Breakfast Ideas
~ Dear Teenage Girls...
~ When Mom Takes a Step Back
~ The Inexpensive Health Insurance We Love!
~ Let's Talk Real Food Grocery Budgets

Check out our latest posts!

  • Big Family Food and Fun: May 10-16, 2026
  • Big Family Food and Fun: May 3-9, 2026
  • Help Your Kids Become Independent in the Kitchen!
  • Big Family Food and Fun: April 26-May 2, 2026
  • Big Family Food and Fun: April 19-25, 2026
Home  ~  Simple Meals  ~  Club Membership  ~  Shop  ~  Privacy Policy  ~  Disclosure  ~ Contact

Copyright © 2026 · Beautiful Pro Theme on Genesis Framework · WordPress · Log in